StatusIQ mobile app for iOS devices
Site24x7's StatusIQ ensures clear and transparent communication by allowing technicians to provide real-time updates on incidents. The StatusIQ mobile app takes this a step further, delivering instant updates directly to your fingertips. Even without access to a laptop or desktop, you can monitor ongoing issues, track progress, and keep your customers informed with continuous updates on your status page just with your mobile device.
The StatusIQ mobile app is available for both BU and MSP customers.
Benefits of StatusIQ mobile app
- Proactive communication during outages
- Real-time incident updates
- Scheduled maintenance notifications
- Multi-channel and multilingual communication
Use cases
- When an unexpected outage occurs while a user is traveling, they might not be able to access their laptop or desktop in time to address the issue. With the StatusIQ mobile app, users can promptly report the issue on the status page and notify stakeholders through multiple channels, such as email and SMS. This transparency helps reduce frustration and minimize potential losses by effectively managing expectations.
- Consider a banking sector where a system admin scheduled planned maintenance in the early morning hour but forgot to update the status page for customers. Instead of panicking, even without access to a laptop or desktop computer, the sysadmin can utilize the StatusIQ Mobile App to instantly notify customers by posting the message: "Scheduled maintenance from 1am to 3am UTC on January 20". This ensures customers are informed in real time, helps them prepare for the downtime, and reduces support inquiries.
Installing StatusIQ mobile app
- Download StatusIQ mobile app from the App store.
- Click Install and then Open.
Note
The StatusIQ mobile app is free to download and use, with no additional charges for mobile access.
Log in to StatusIQ mobile app
Once you install the StatusIQ mobile app, this landing page will display:
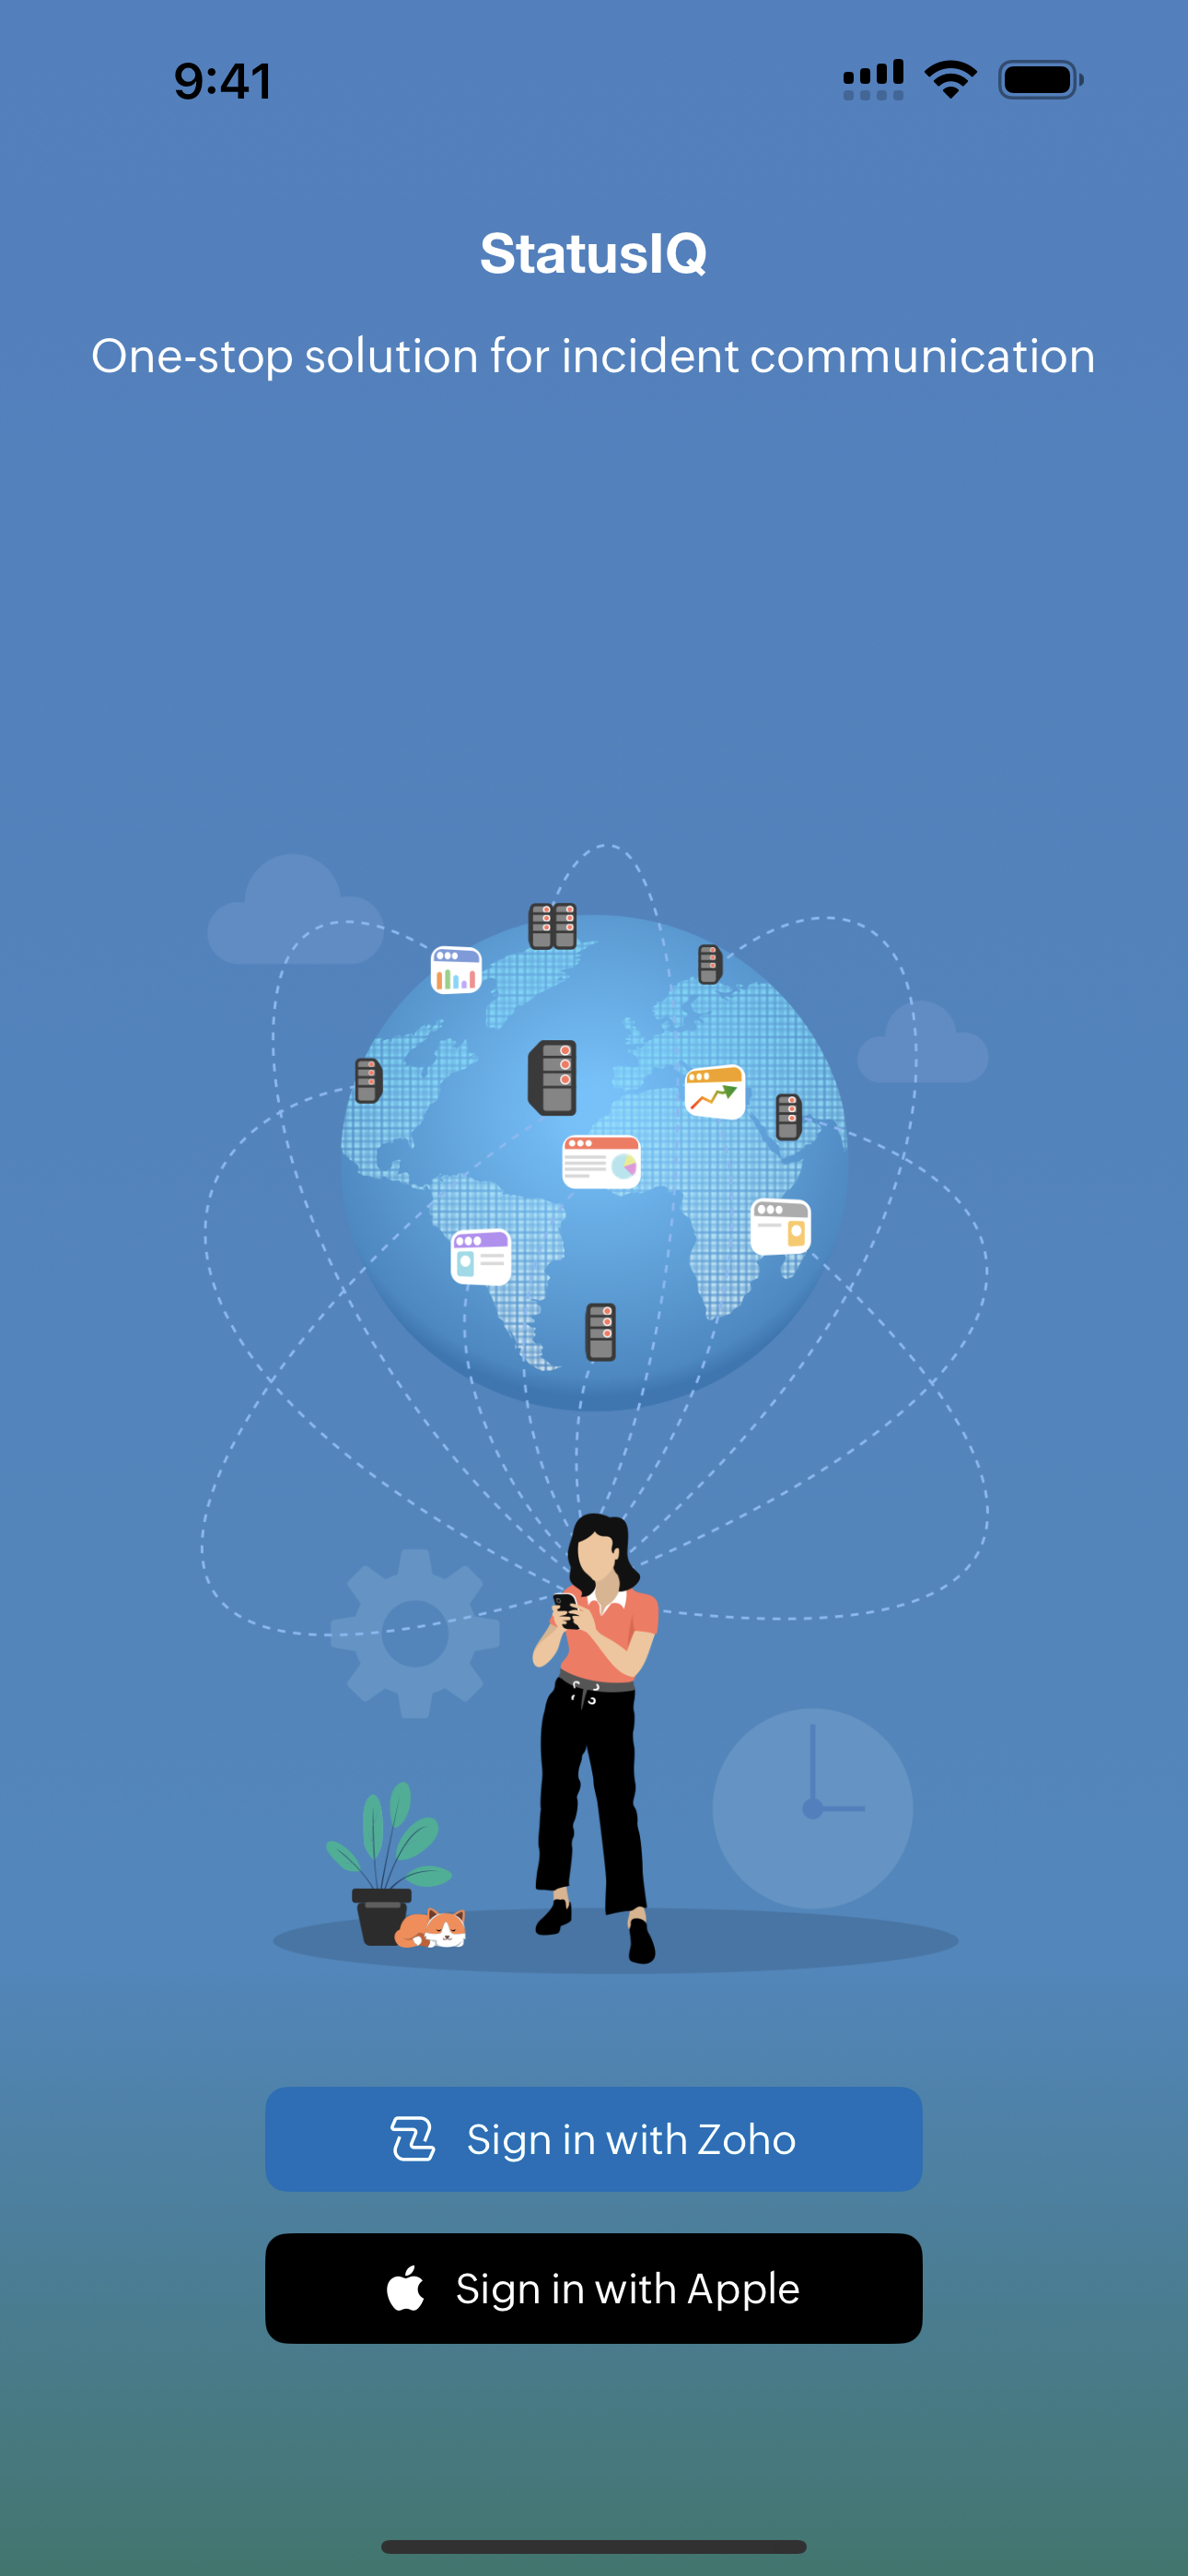
- Log in with your Zoho credentials, sign in through Apple, or Sign up for free in StatusIQ website and use those credentials.
NoteFor now, in StatusIQ mobile app, only a sign in option is available. You can sign up through the StatusIQ web page.
-
If you are logging in through your Zoho credentials, then you will have to authorize this in OneAuth.
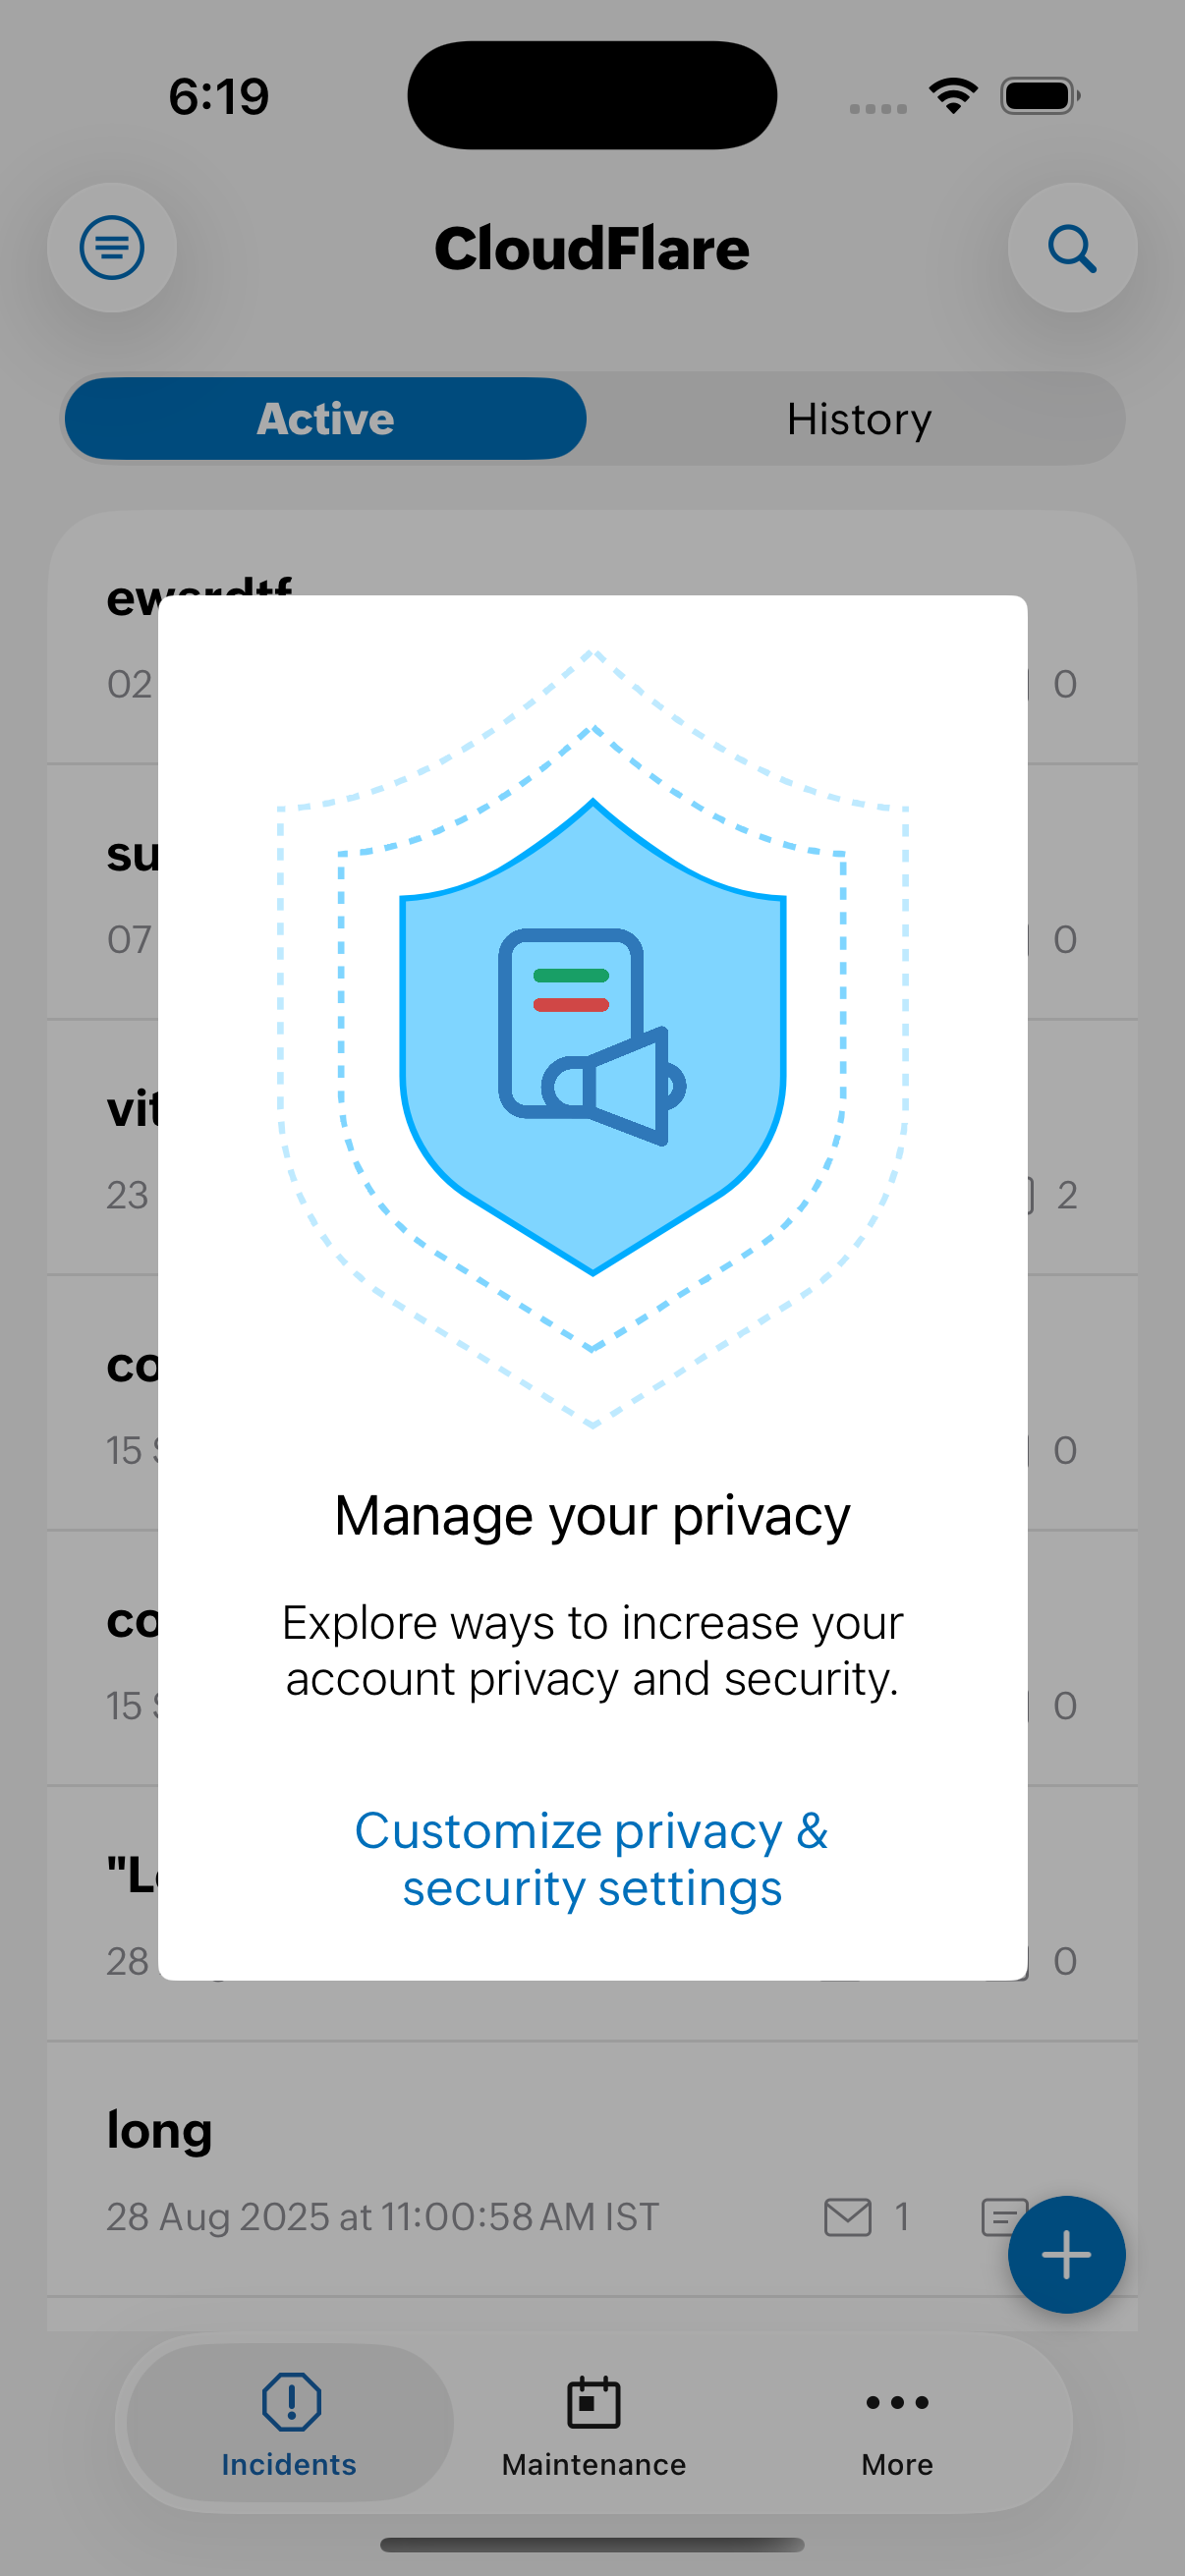
- After logging in, you will receive a notification to customize your privacy and security settings that will take you to the Analytics page.
-
After modifying the settings to suit your needs, return to the Home page.
Inside StatusIQ mobile app
Inside the StatusIQ mobile app, you can view the following tabs:
Incidents
Incidents
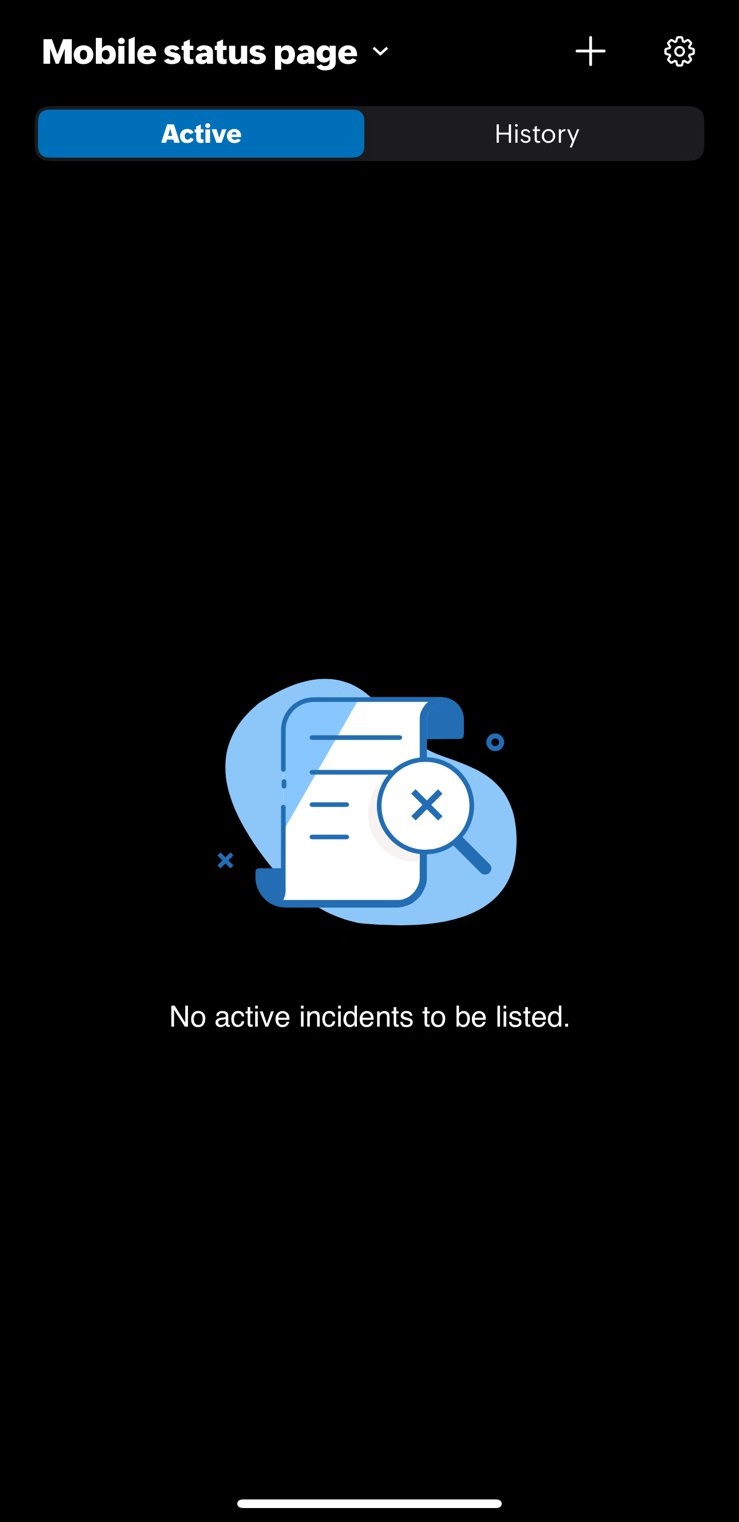
From the Home page, click the Incidents tab to create and manage incidents. Initially, you will not have any incidents to be listed. So start adding incidents.
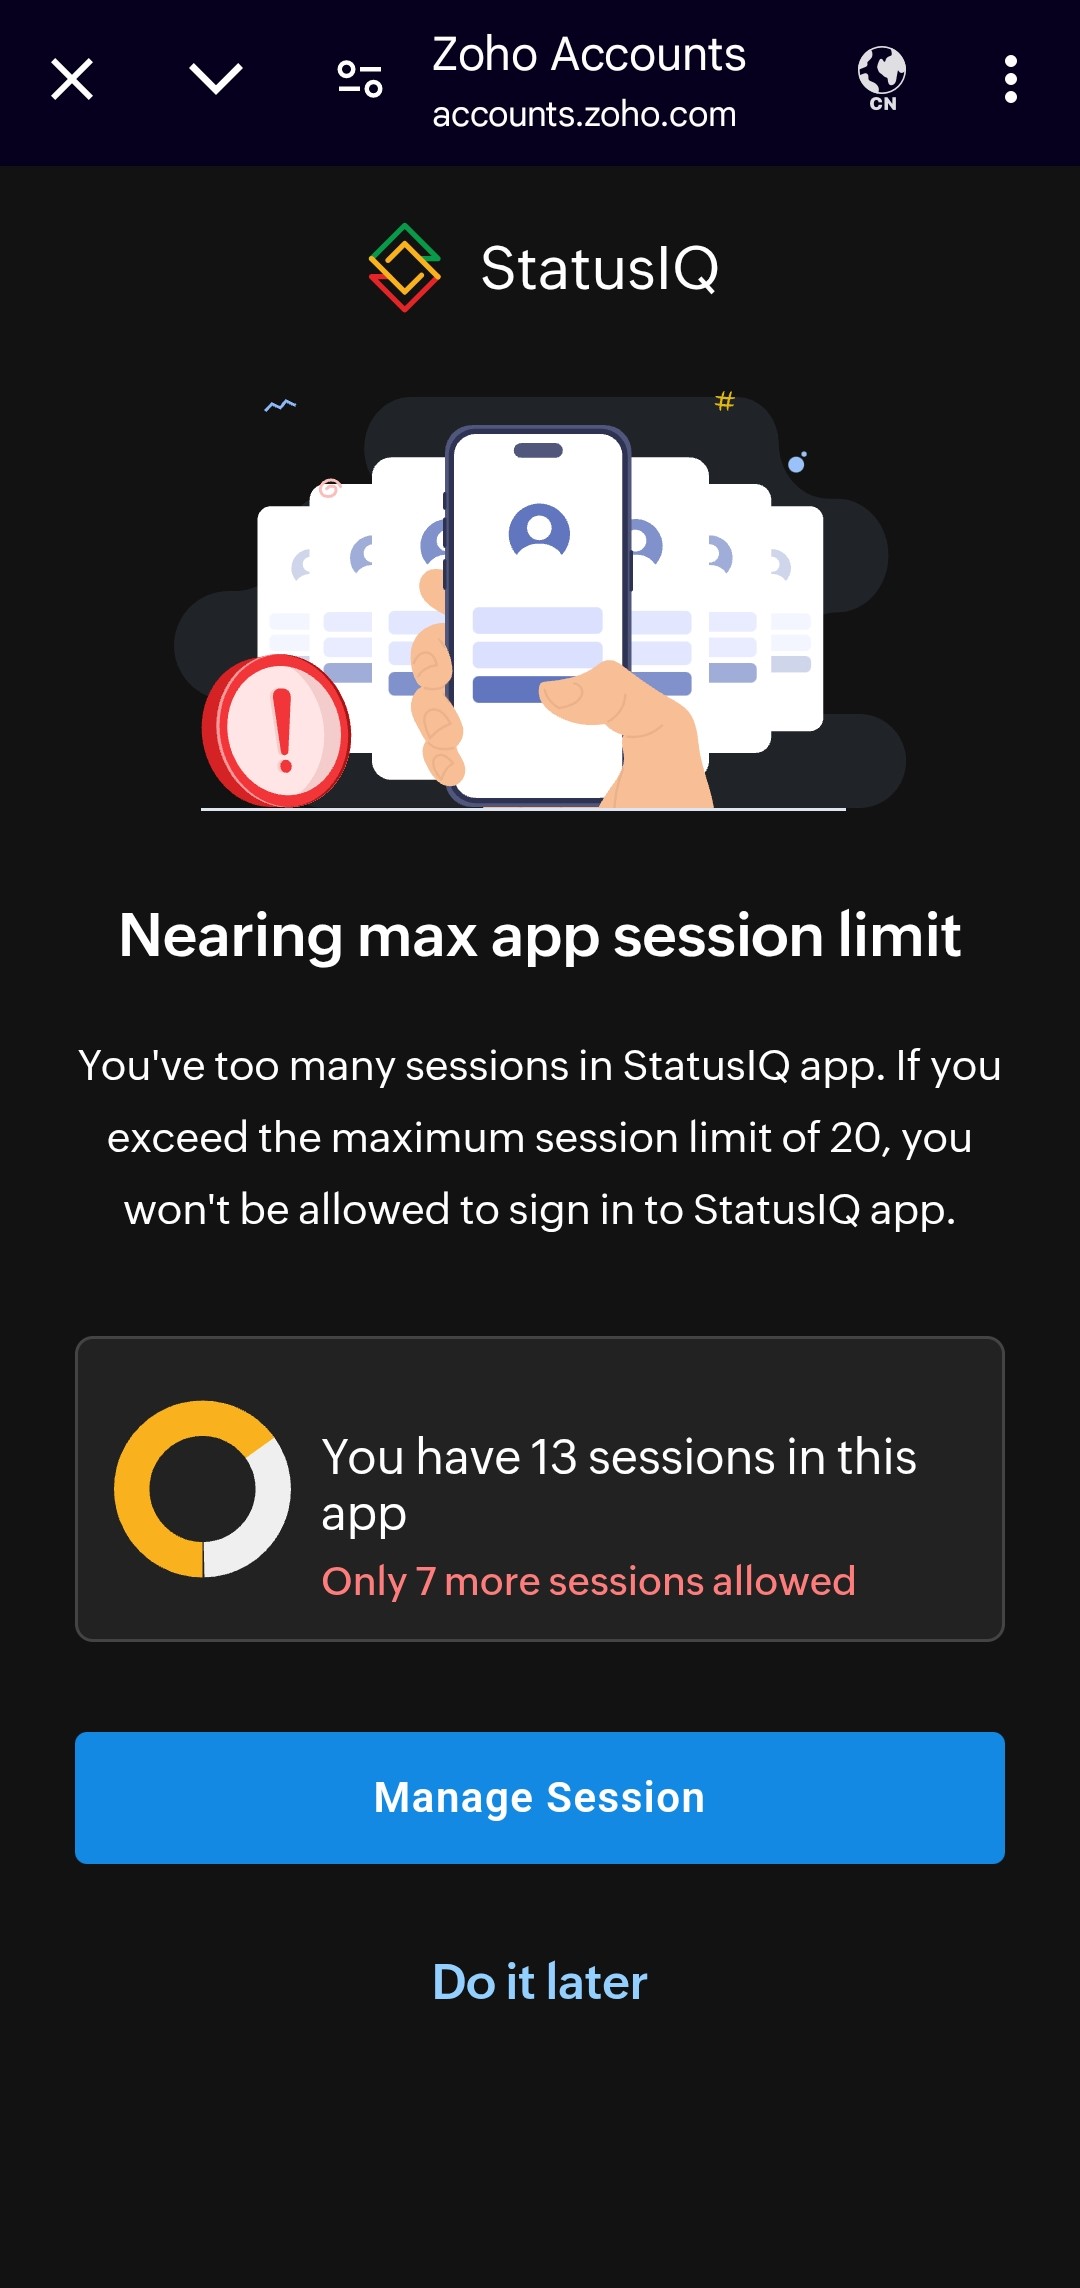
You can only have a maximum of 20 active sessions using the StatusIQ mobile application. To receive details about the number of active sessions remaining, you need to log in with the same user account on multiple devices. The notification will look like this:
The StatusIQ mobile app is free to download and use, requiring no additional charges for mobile access.
Create a new incident
Follow these steps to create an incident.
- Log in to the StatusIQ mobile app.
- For iOS, click the + icon on the top to create a new incident.
- Select Active if it is a current incident or Historic if it is a past incident.
- Fill in the details on the pop-up screen and click Create to create a new incident.
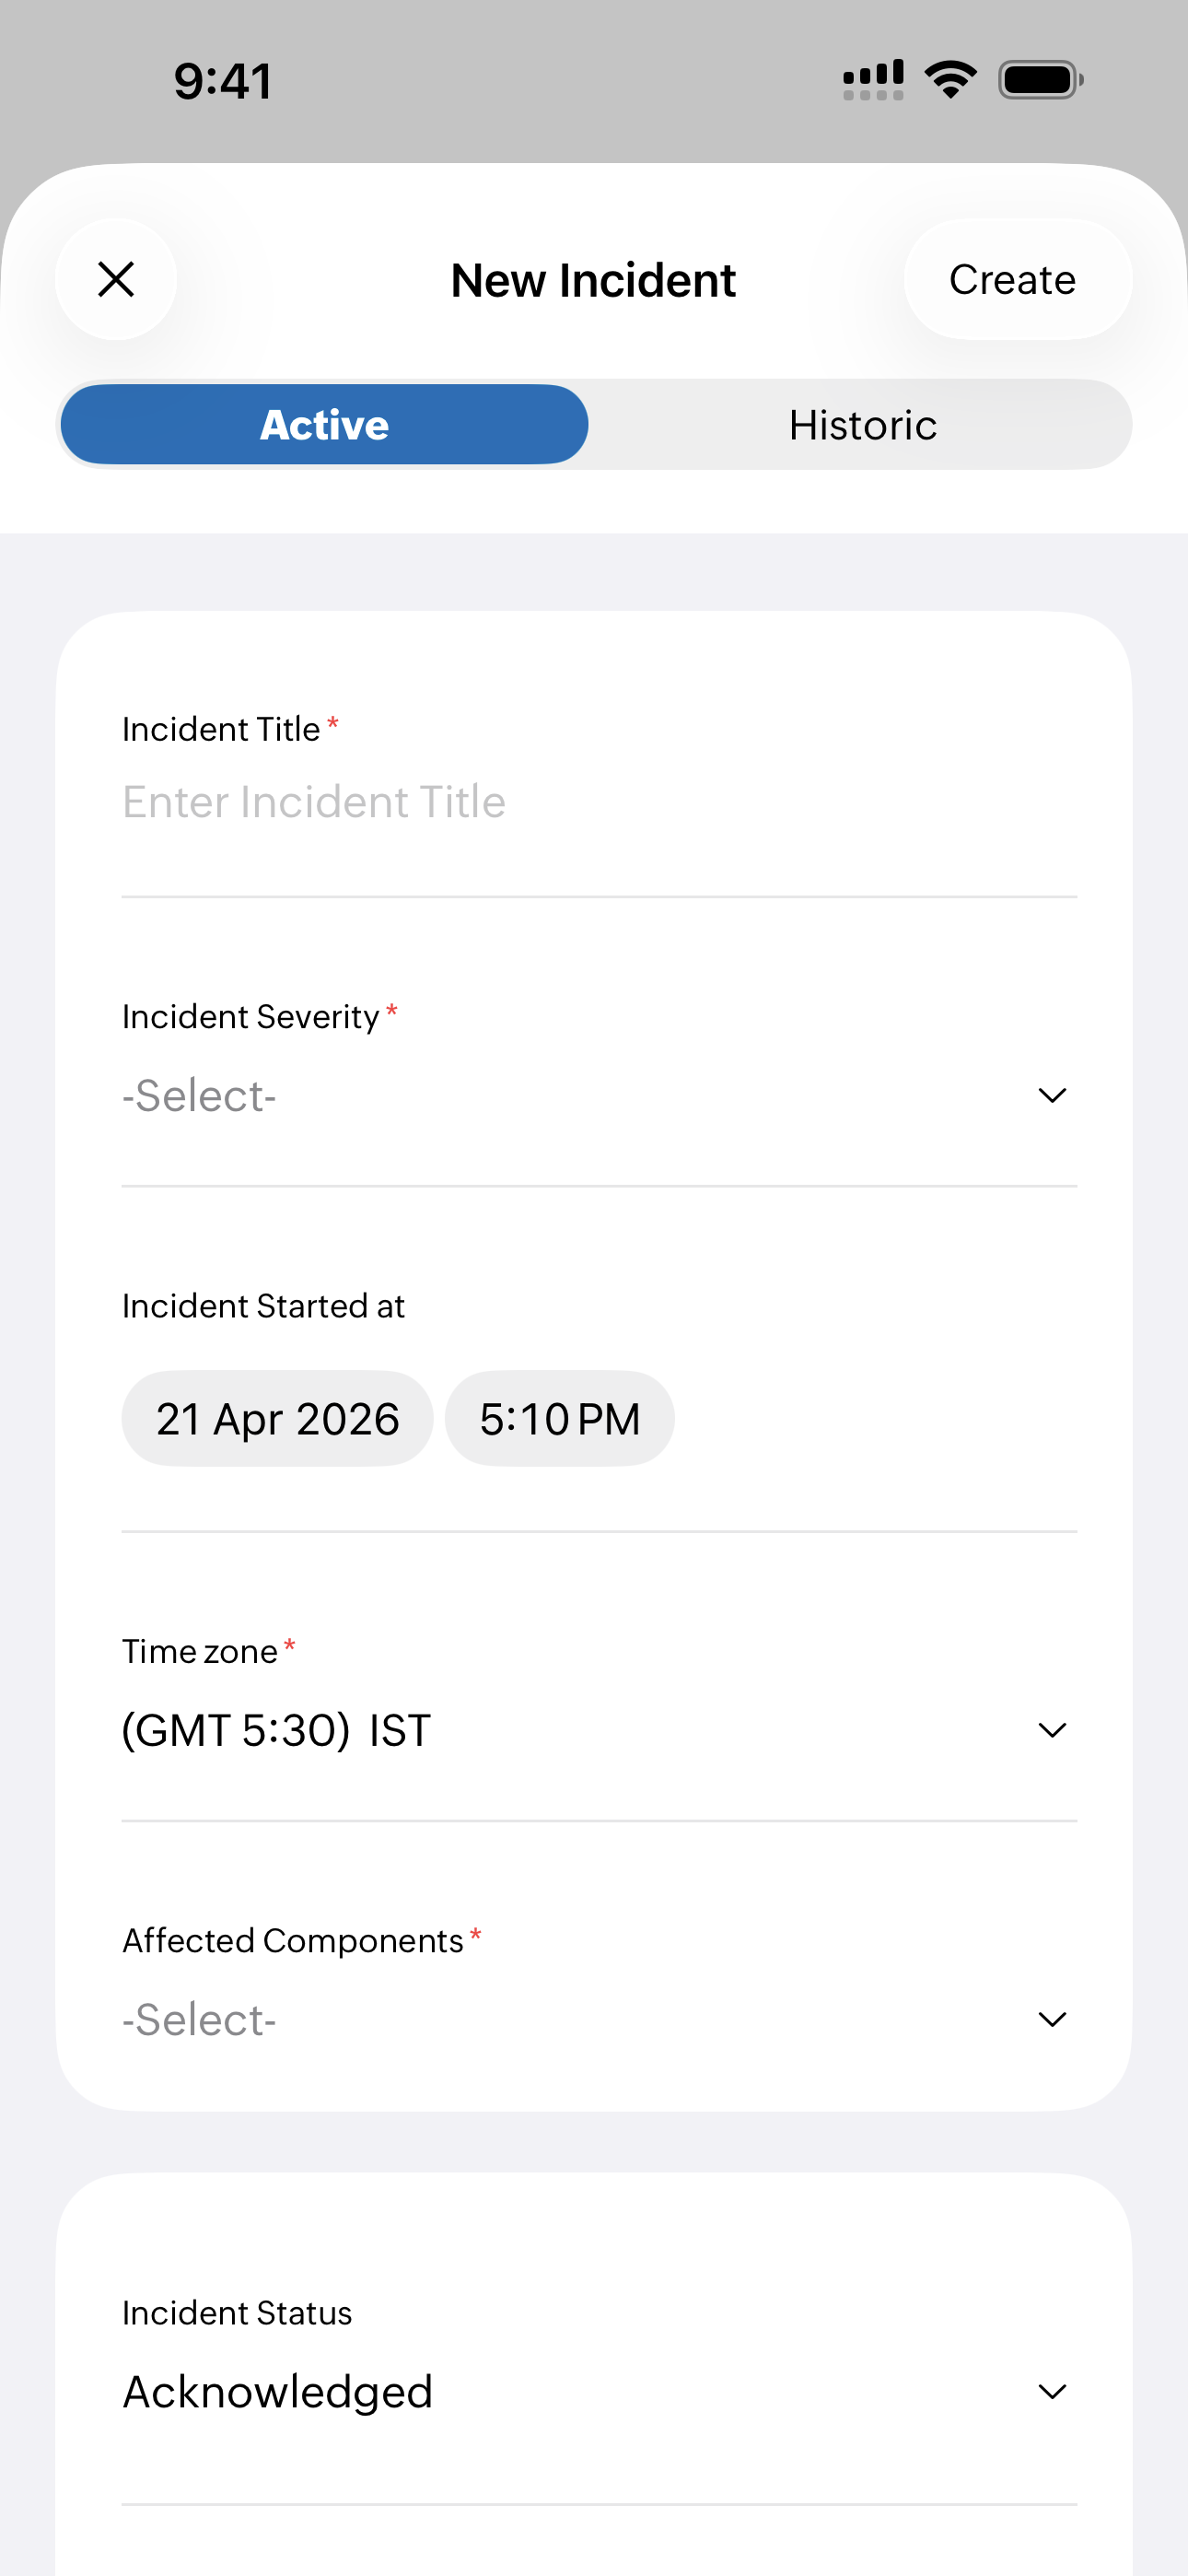
Users with a billing account or read-only account cannot create an incident.
Edit or delete an incident
You can edit or delete the incidents by long pressing the incidents. You can also perform the actions using the following methods:
- Edit the details of active and past incidents inside the Incident details page using the
 icon on the top corner of the page.
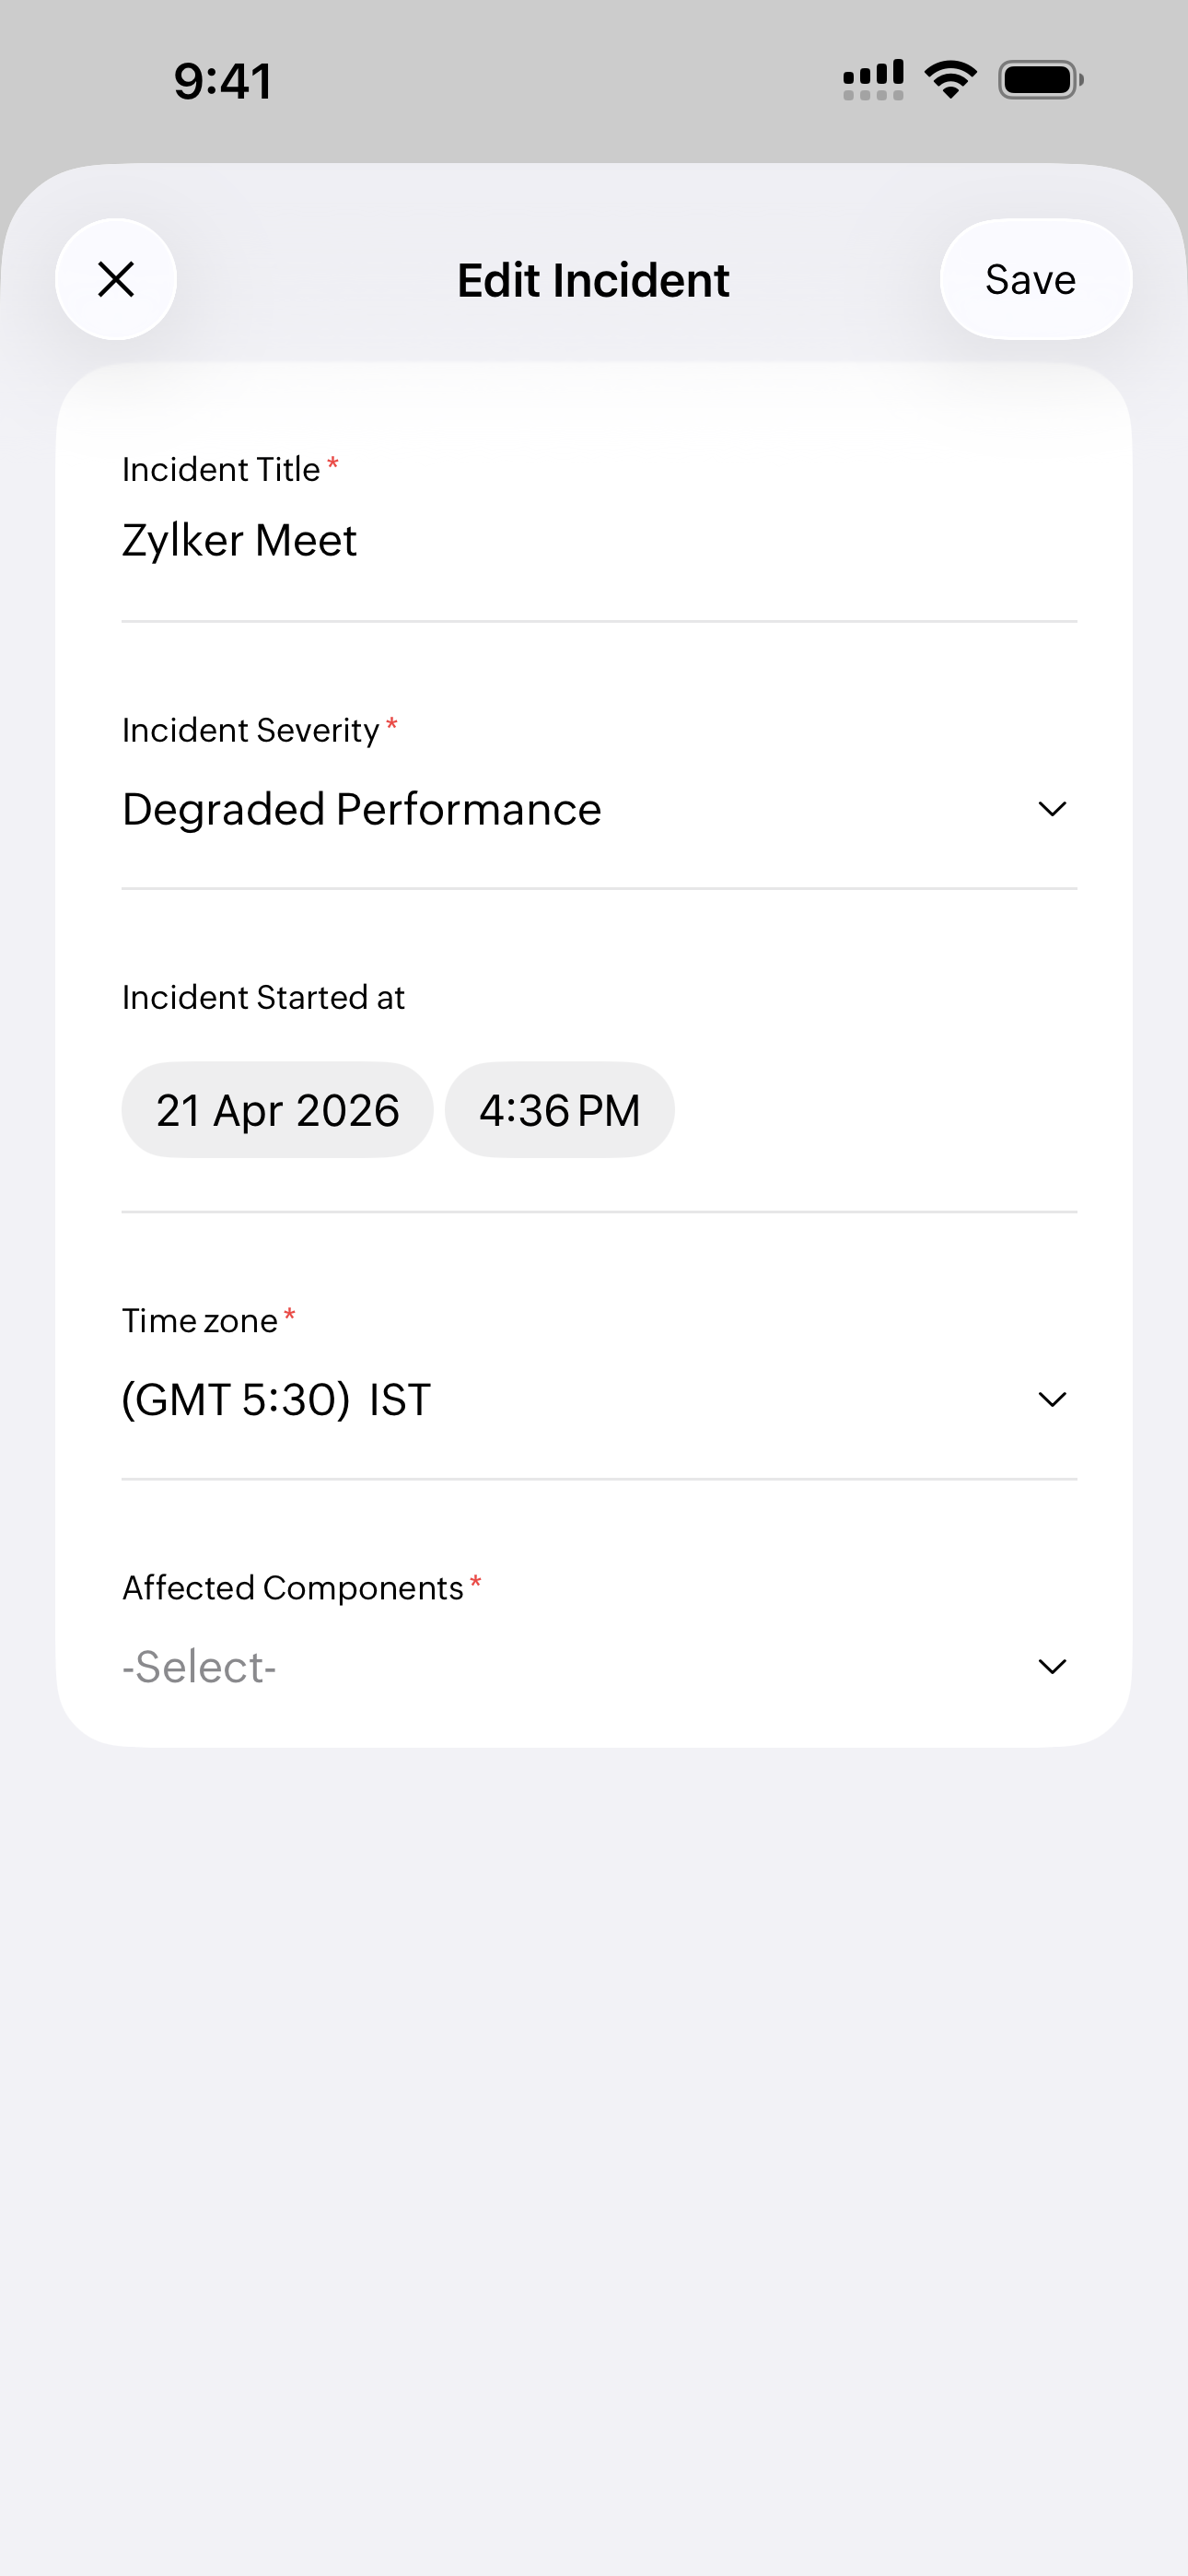
- After editing the details, click Save in the top right corner.
- To delete an incident, click on the
 icon and you will receive the following error message:
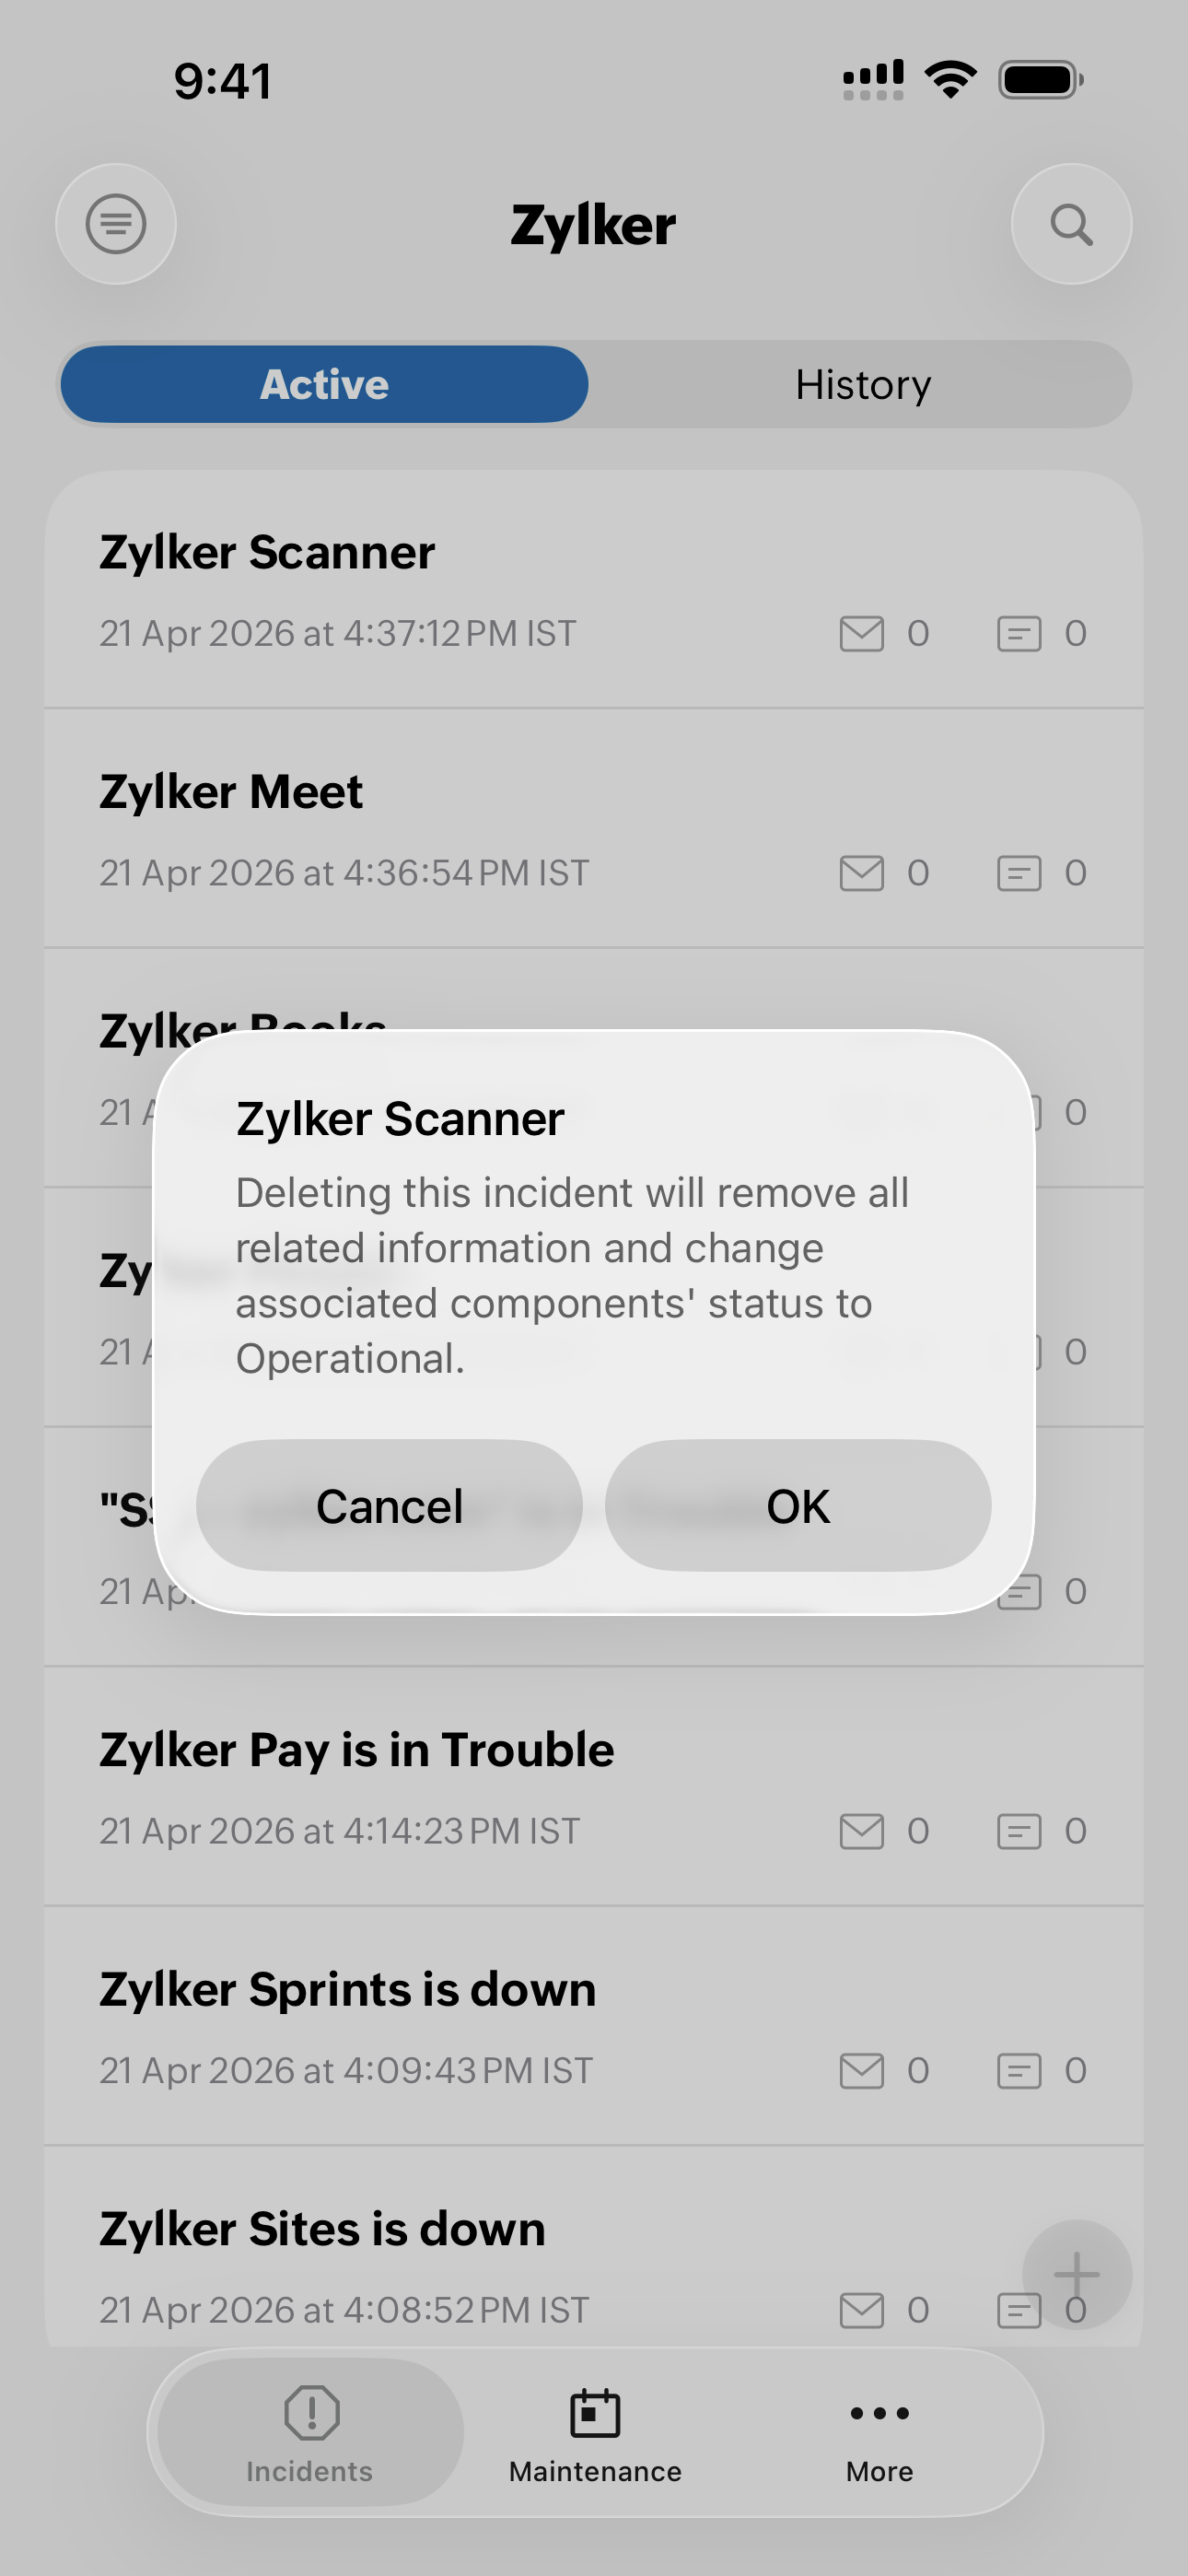
- To proceed with the deletion process, click OK or click Cancel.
Understanding incidents
Once you log in to the StatusIQ mobile app, the status page title is displayed on the top with the icon next to it. Click on the ![]() icon to see all the other status pages if you are managing more than one status page.
icon to see all the other status pages if you are managing more than one status page.

Inside the status page, you can:
- View active incidents under the Active section.
- View past incidents under the History section.
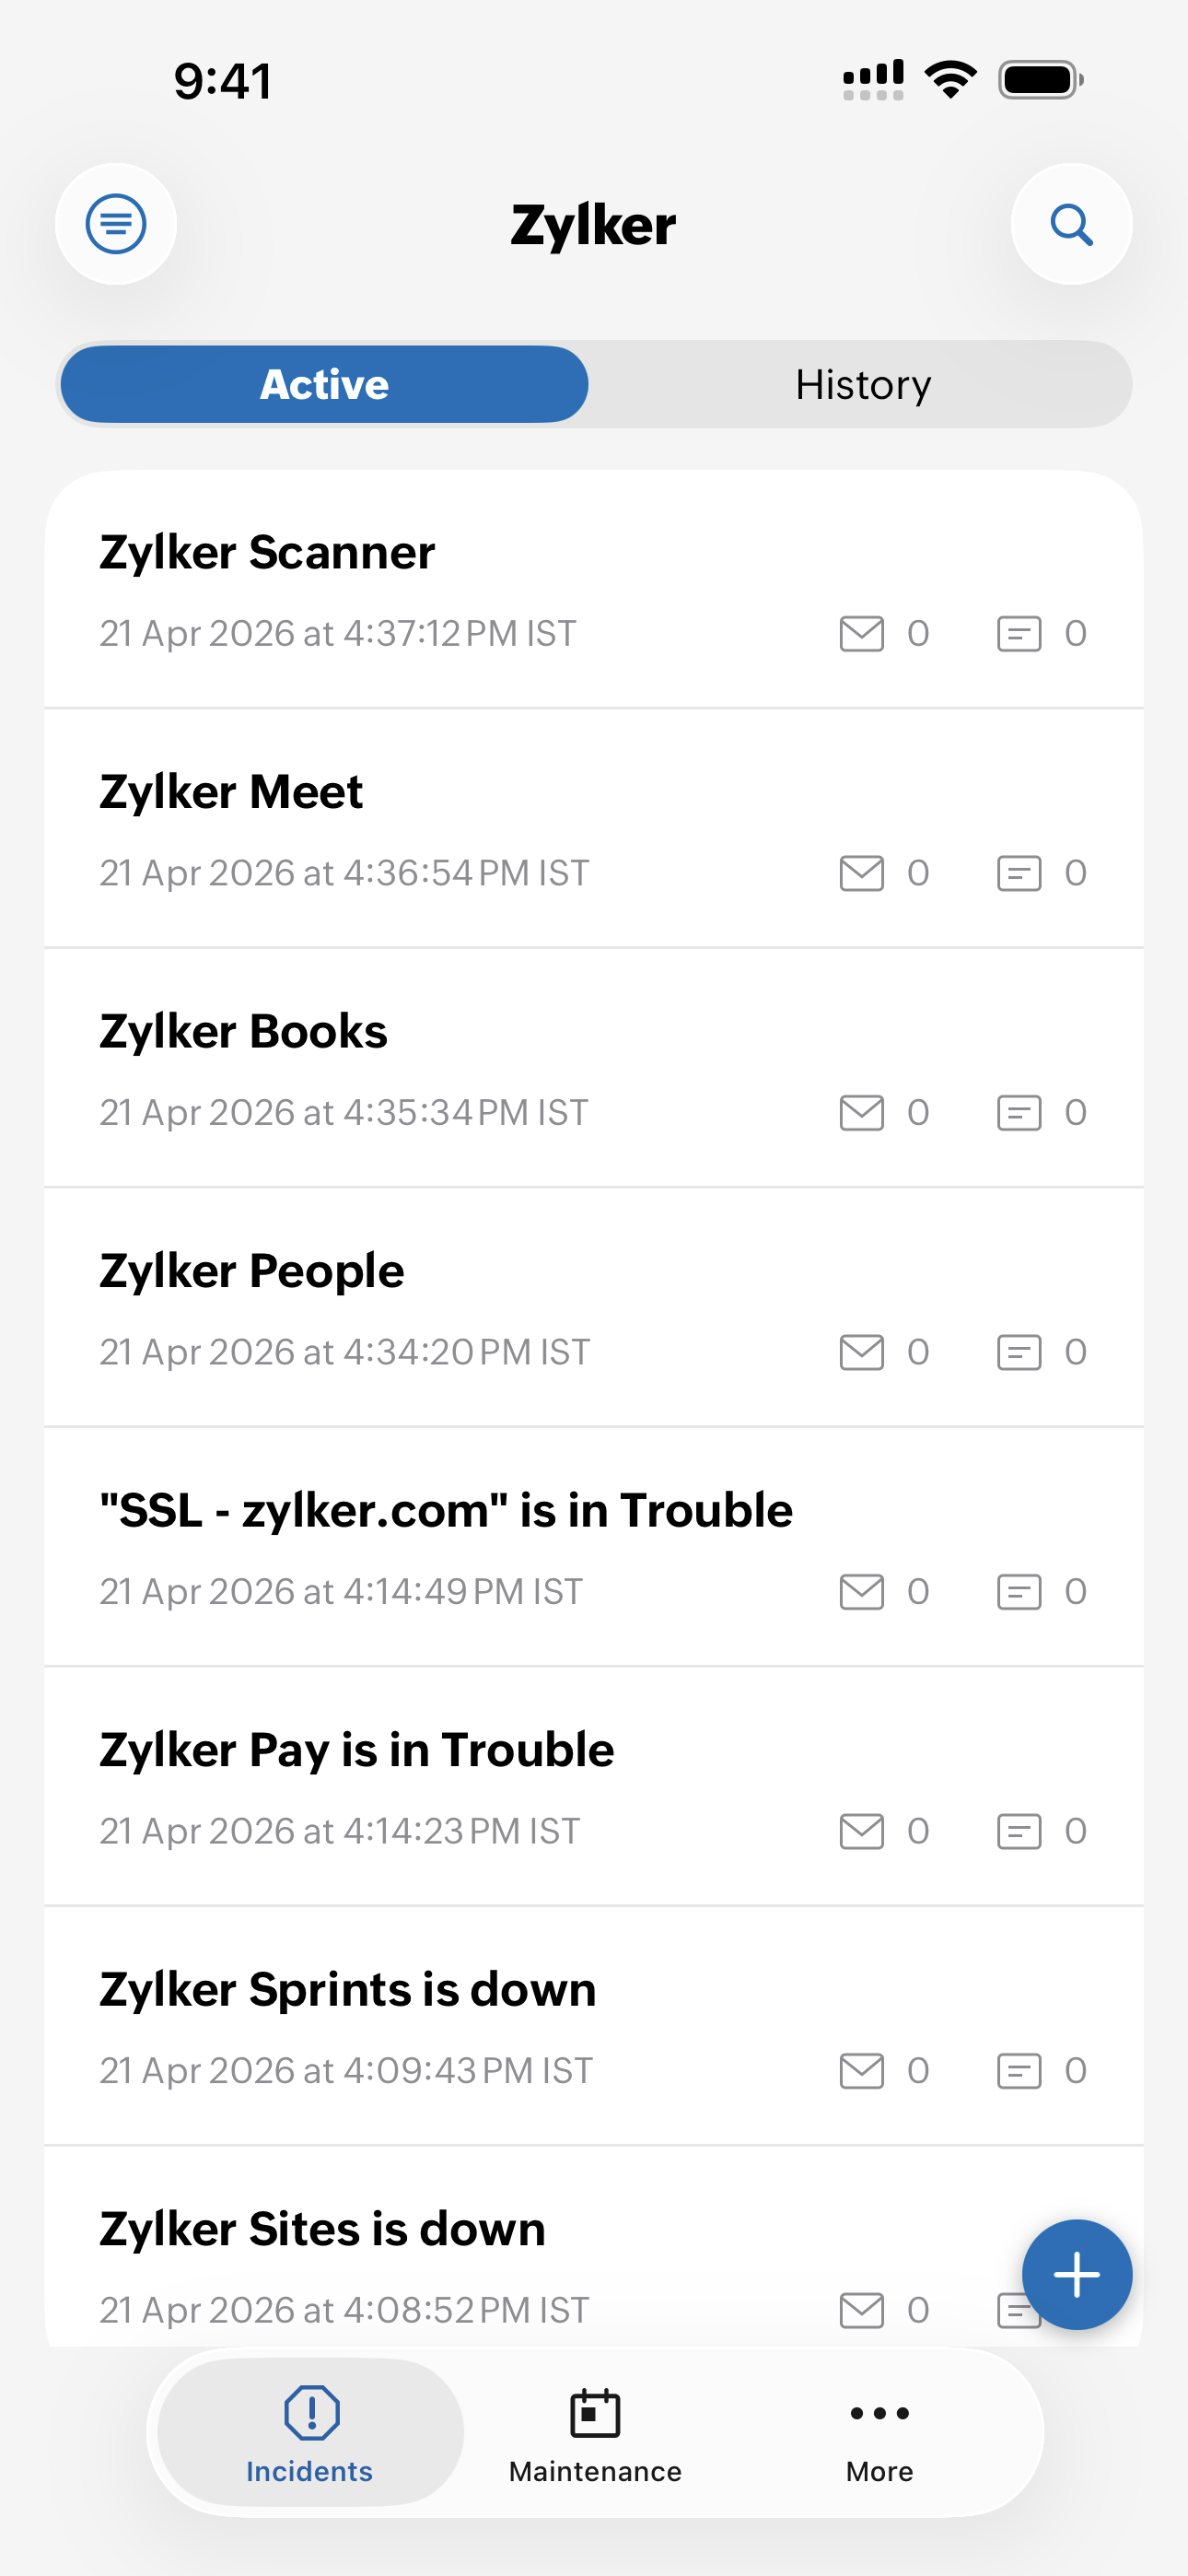
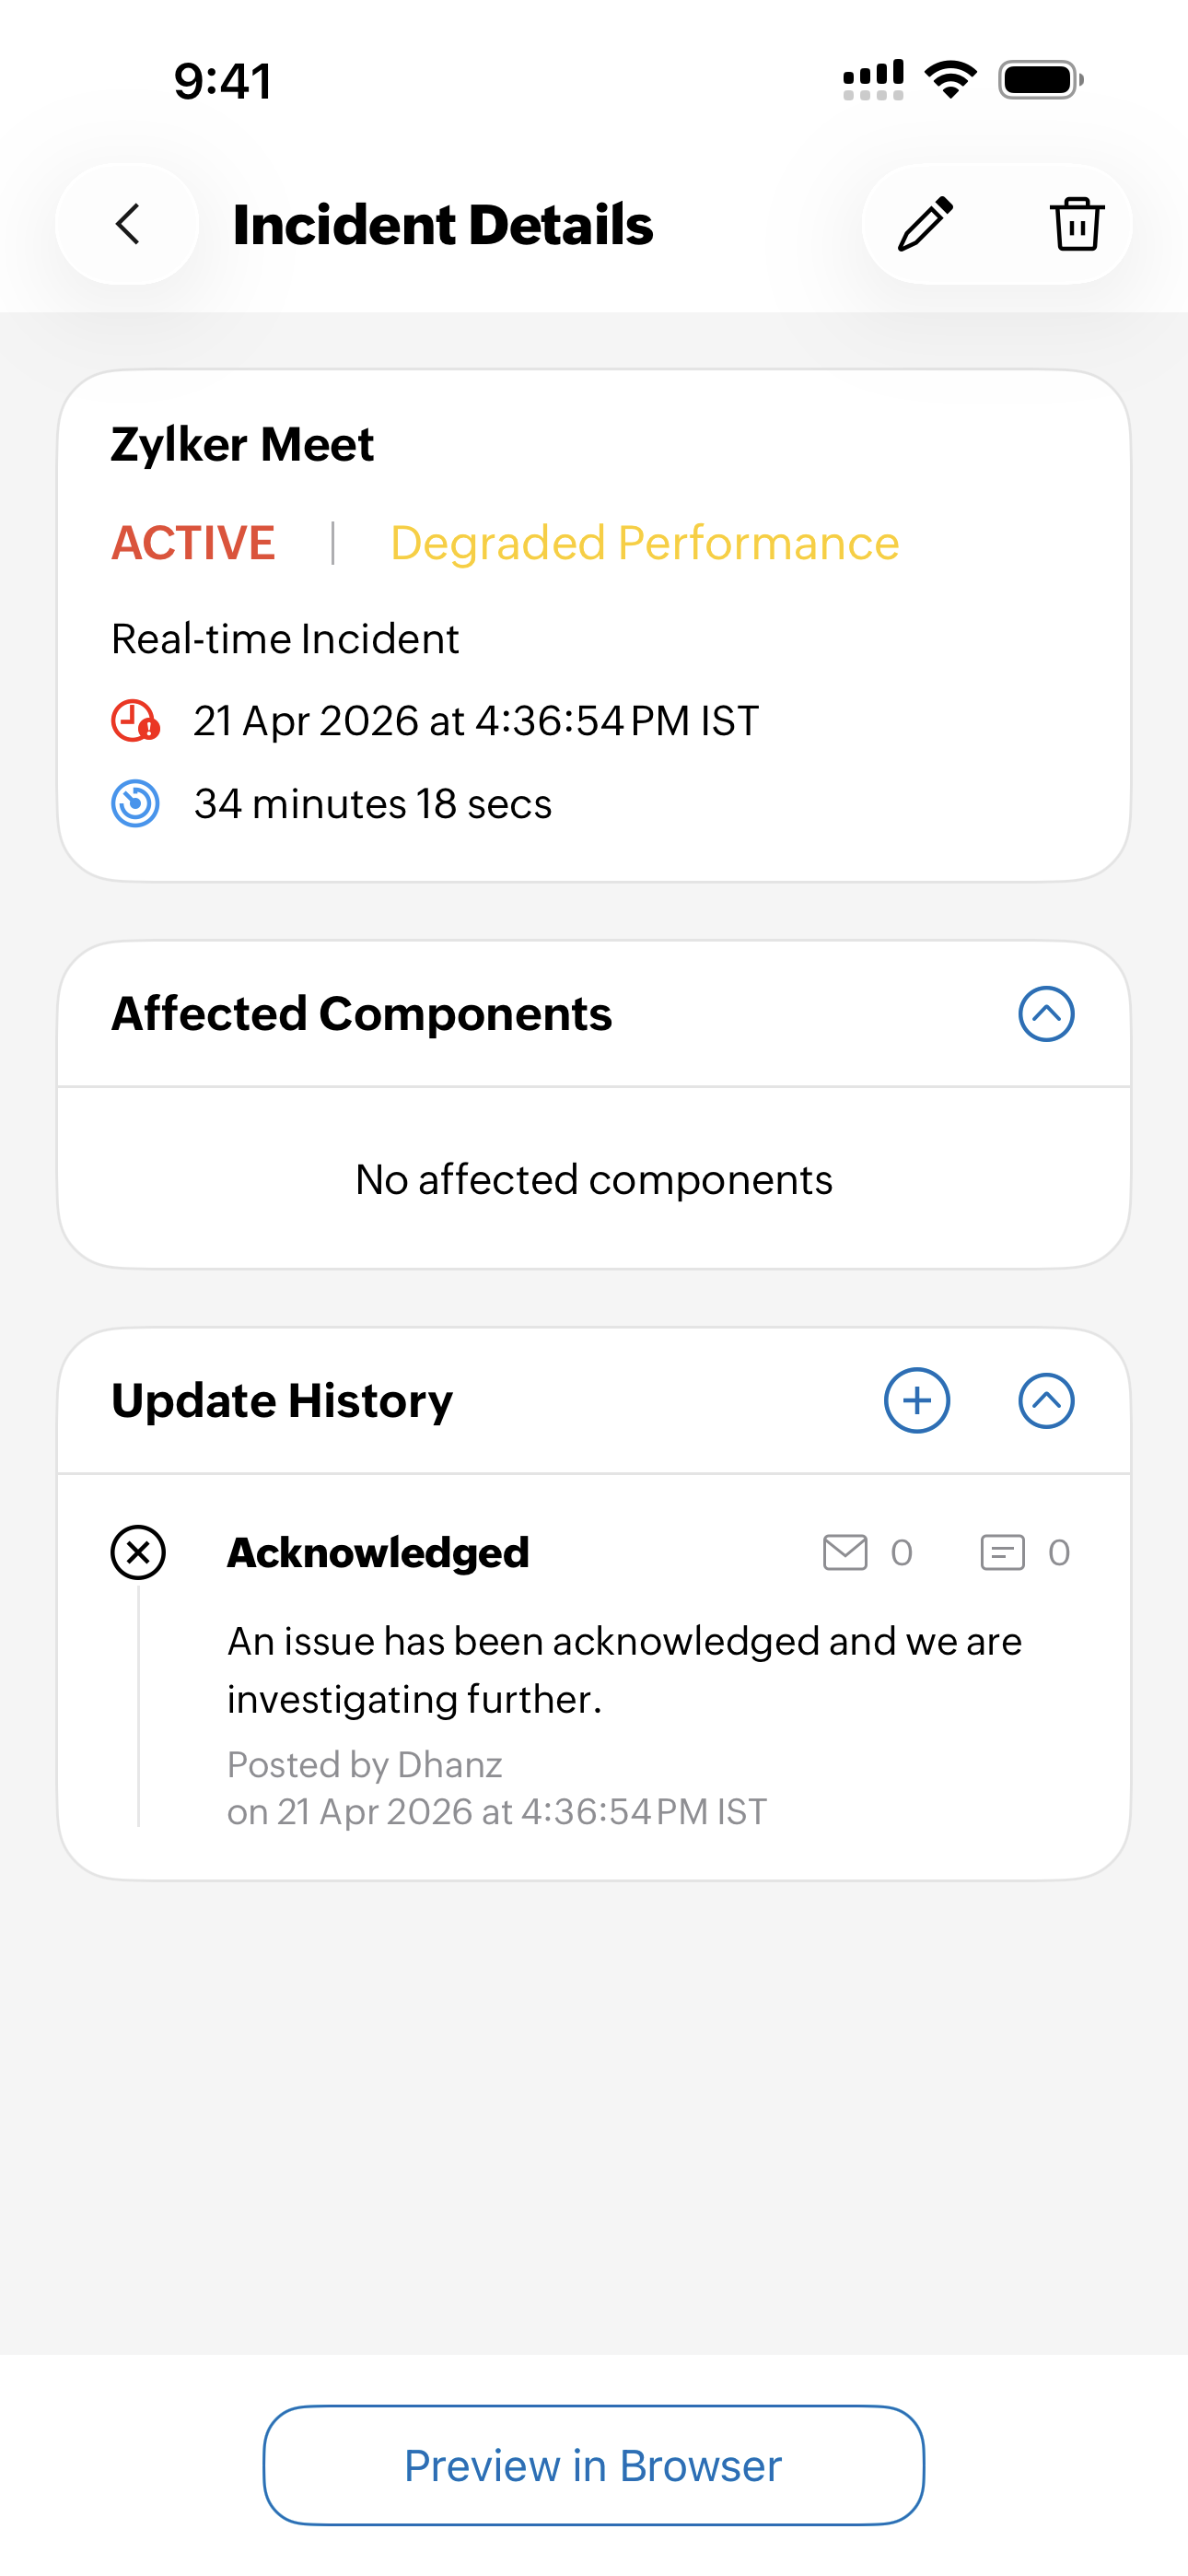
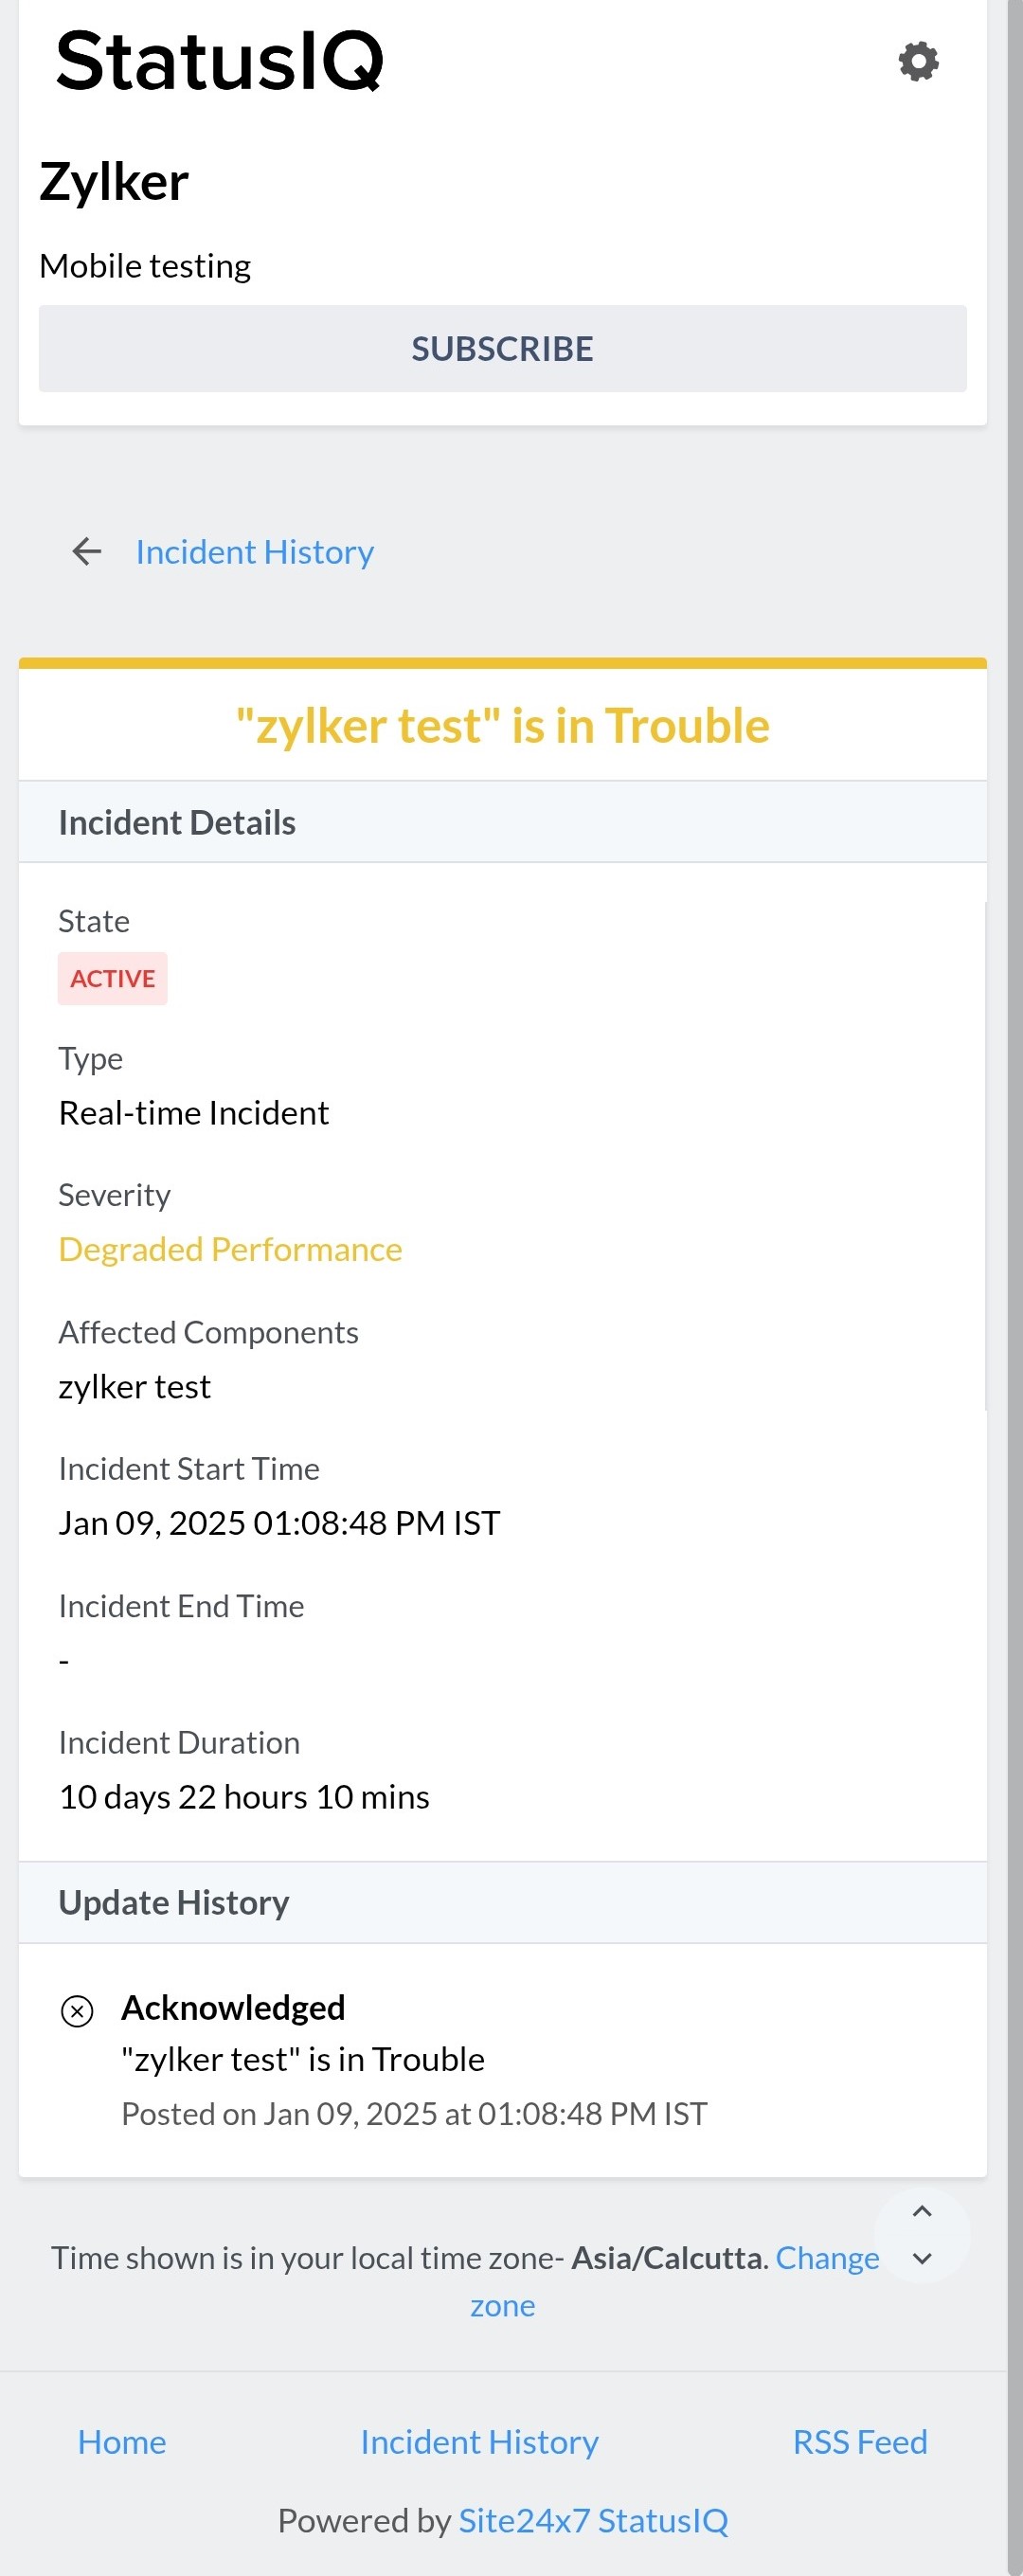
Active incidents
Incidents that are currently active are listed under the Active section. On selecting an incident, the following details are listed:
Incident title: Displays the name assigned for the incident.
Type of the incident: Displays that the incident is a real-time incident.
Status of the incident: That status is in red if it is ACTIVE or is in green if it is RESOLVED.
Incident severity: The severity of the incident is marked as:
- Major Outage
- Partial Outage
- Degraded Performance
- Informational
Incident Start Time: It is displayed near the ![]() icon.
icon.
Incident Duration: It is displayed near the ![]() icon.
icon.
Affected Components: Lists all components that were affected due to the incident.
Update History: Displays the status of the incident as given below:
- Acknowledged: When a technician acknowledged they've been notified about the incident.
- Identified: When the issue that caused the incident was identified.
- Observing: When a possible fix was implemented, but is still being monitored.
- Investigating: When the issue's cause started to be looked into further.
- Resolved: When the issueI was fixed.
You can add details to Update History by clicking on the ![]() icon.
icon.
Preview in Browser: Shows all incident details in the browser.
You cannot assign a future date when editing the Incident Start Time or creating a new incident. You can schedule it as maintenance for anticipated incidents; however, this option is currently unavailable in the mobile app.
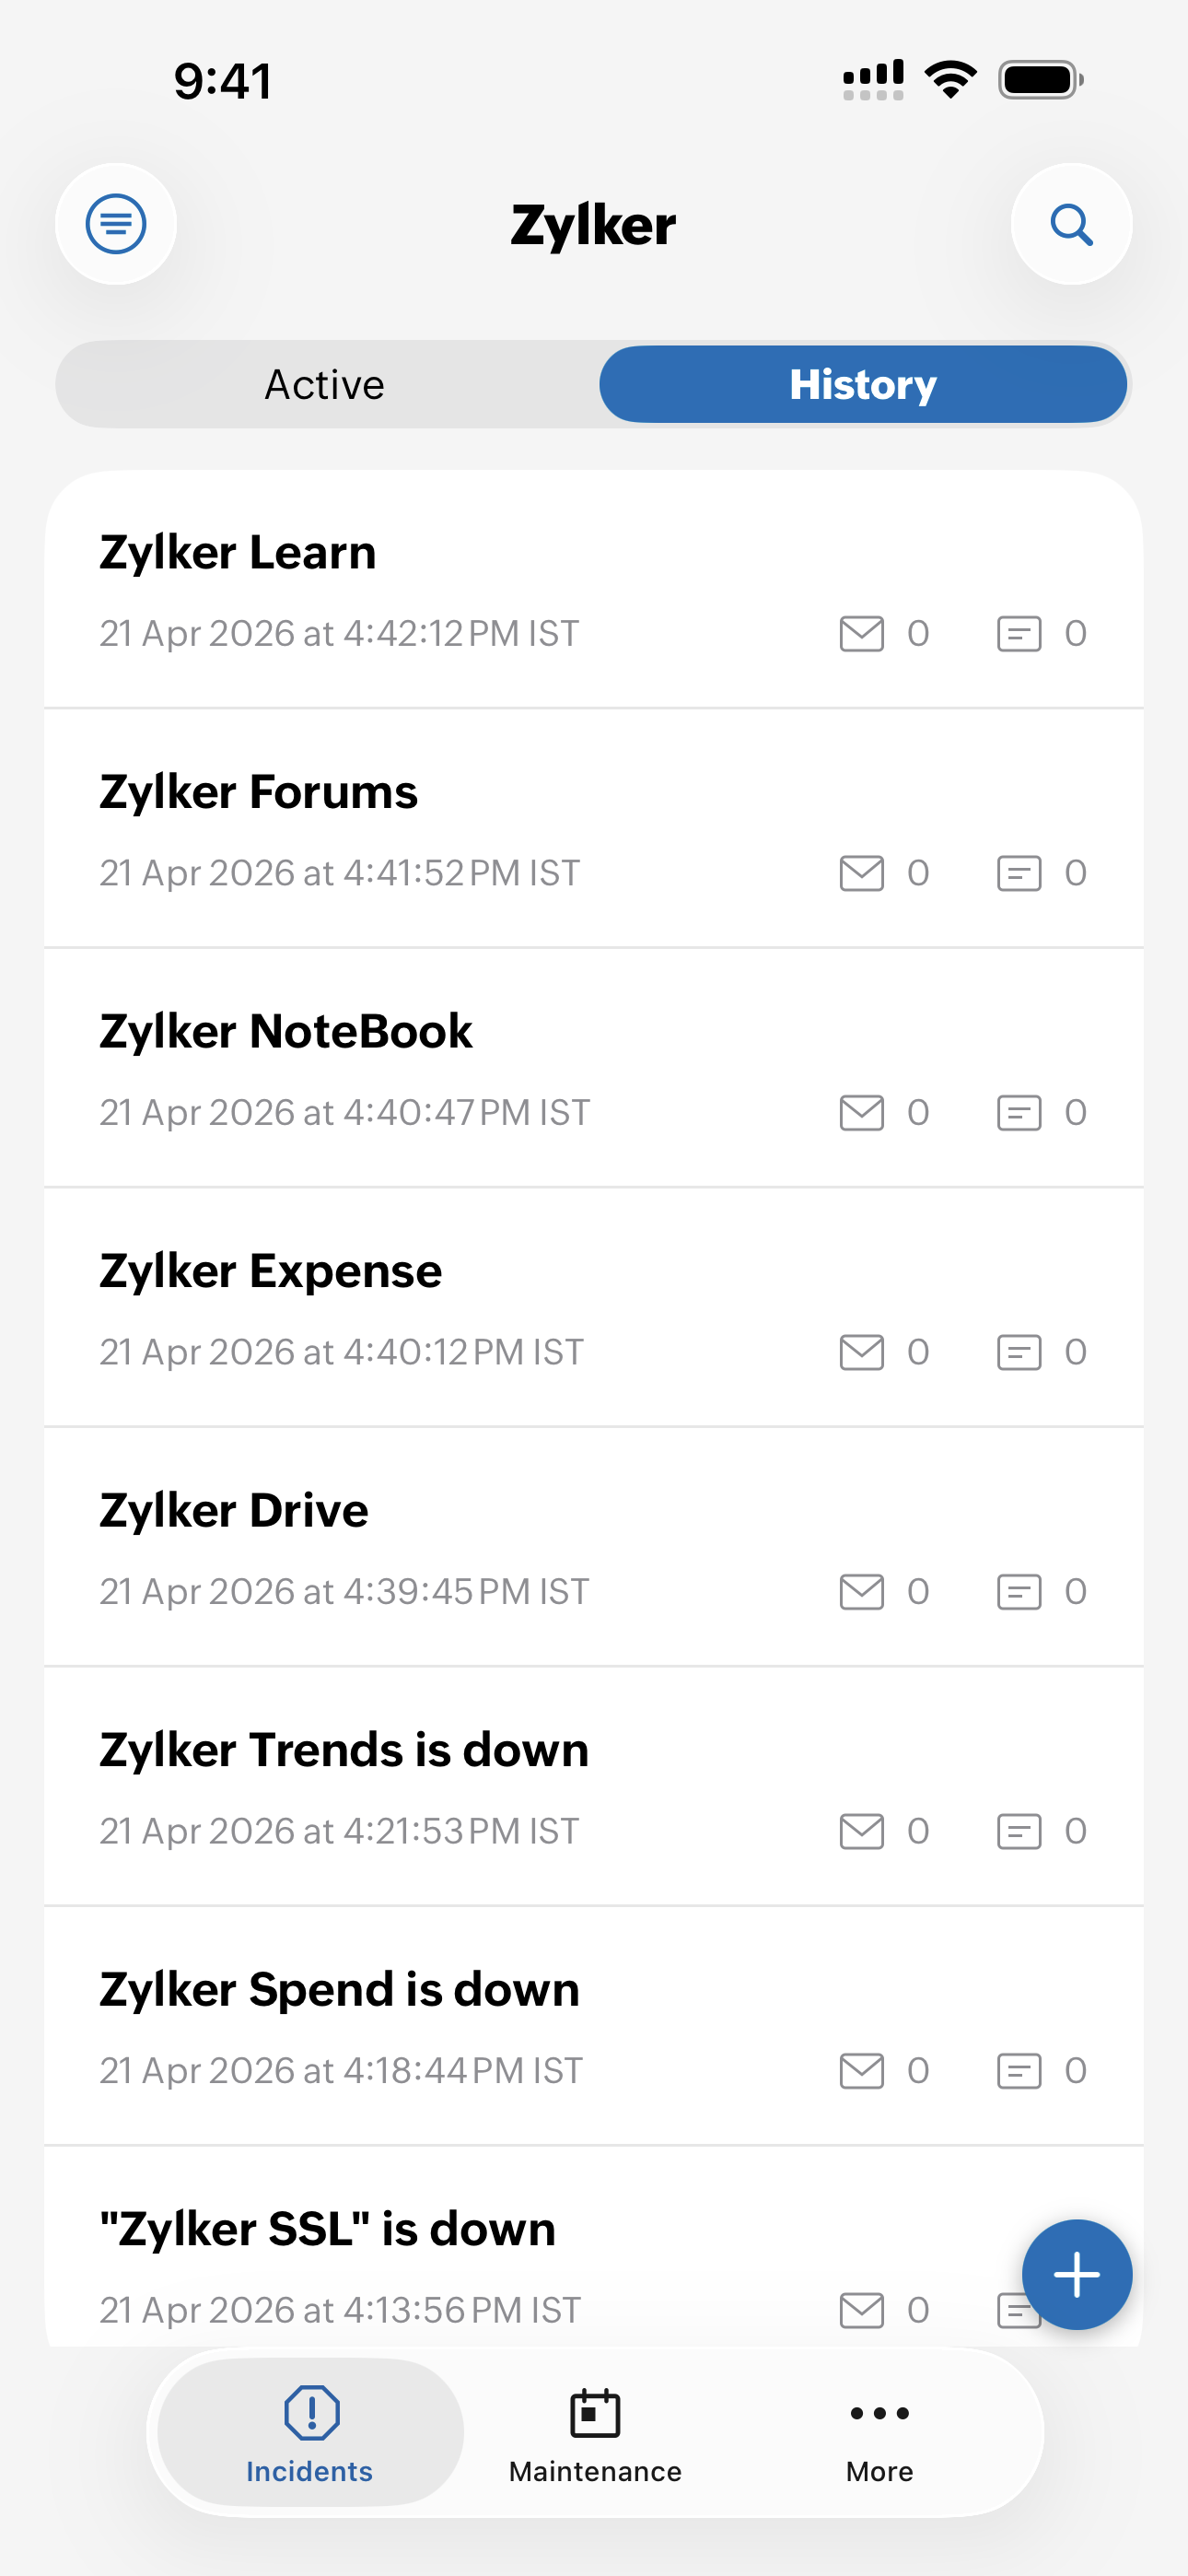
Past incidents
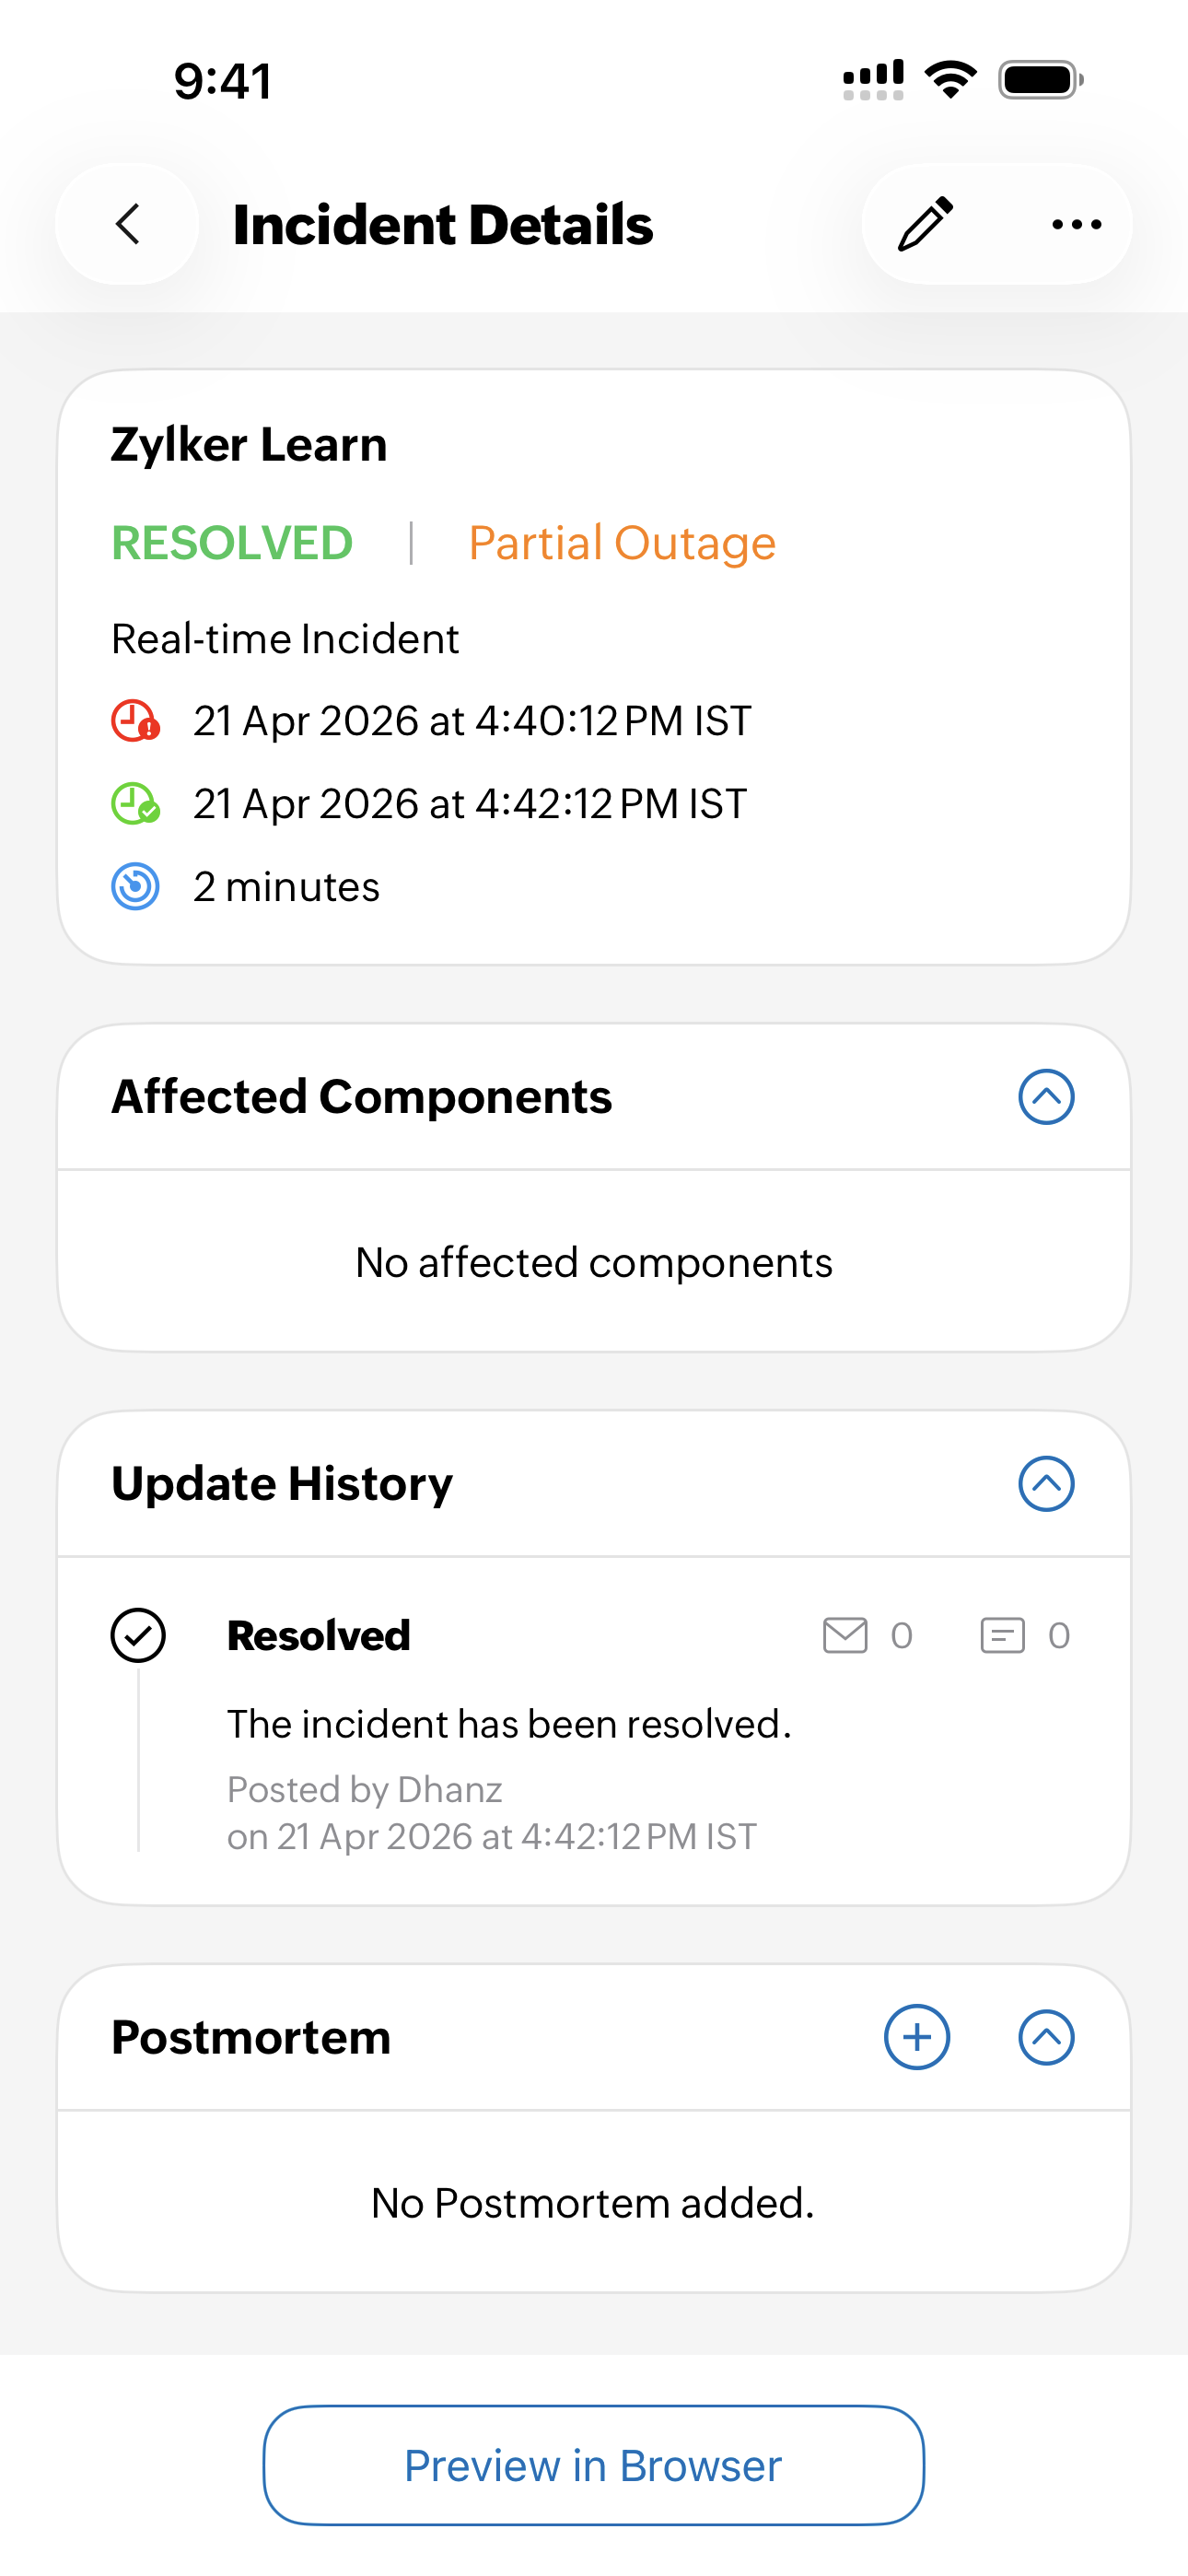
Incidents that are currently inactive or resolved are listed under the History section. When you select an incident, the following details are displayed:
Incident title: Displays the name assigned for the incident.
Type of the incident: Displays that the incident is a real-time incident.
Status of the incident: That status is in red if it is ACTIVE or is in green if it is RESOLVED.
Incident severity: The severity of the incident is marked as:
- Major Outage
- Partial Outage
- Degraded Performance
- Informational
Incident Start Time: It is displayed near the  icon.
icon.
Incident End Time: It is displayed near the  icon.
icon.
Incident Duration: It is displayed near the  icon.
icon.
Affected Components: Lists all components that were affected due to the incident.
Update History: Displays the status of the incident as given below:
- Acknowledged: When a technician acknowledged they've been notified about the incident.
- Identified: When the issue that caused the incident was identified.
- Observing: When a possible fix was implemented, but is still being monitored.
- Investigating: When the issue's cause started to be looked into further.
- Resolved: When the issueI was fixed.
Postmortem: You can add all possible root cause analyses.
Preview in Browser: Shows all incident details in the browser.
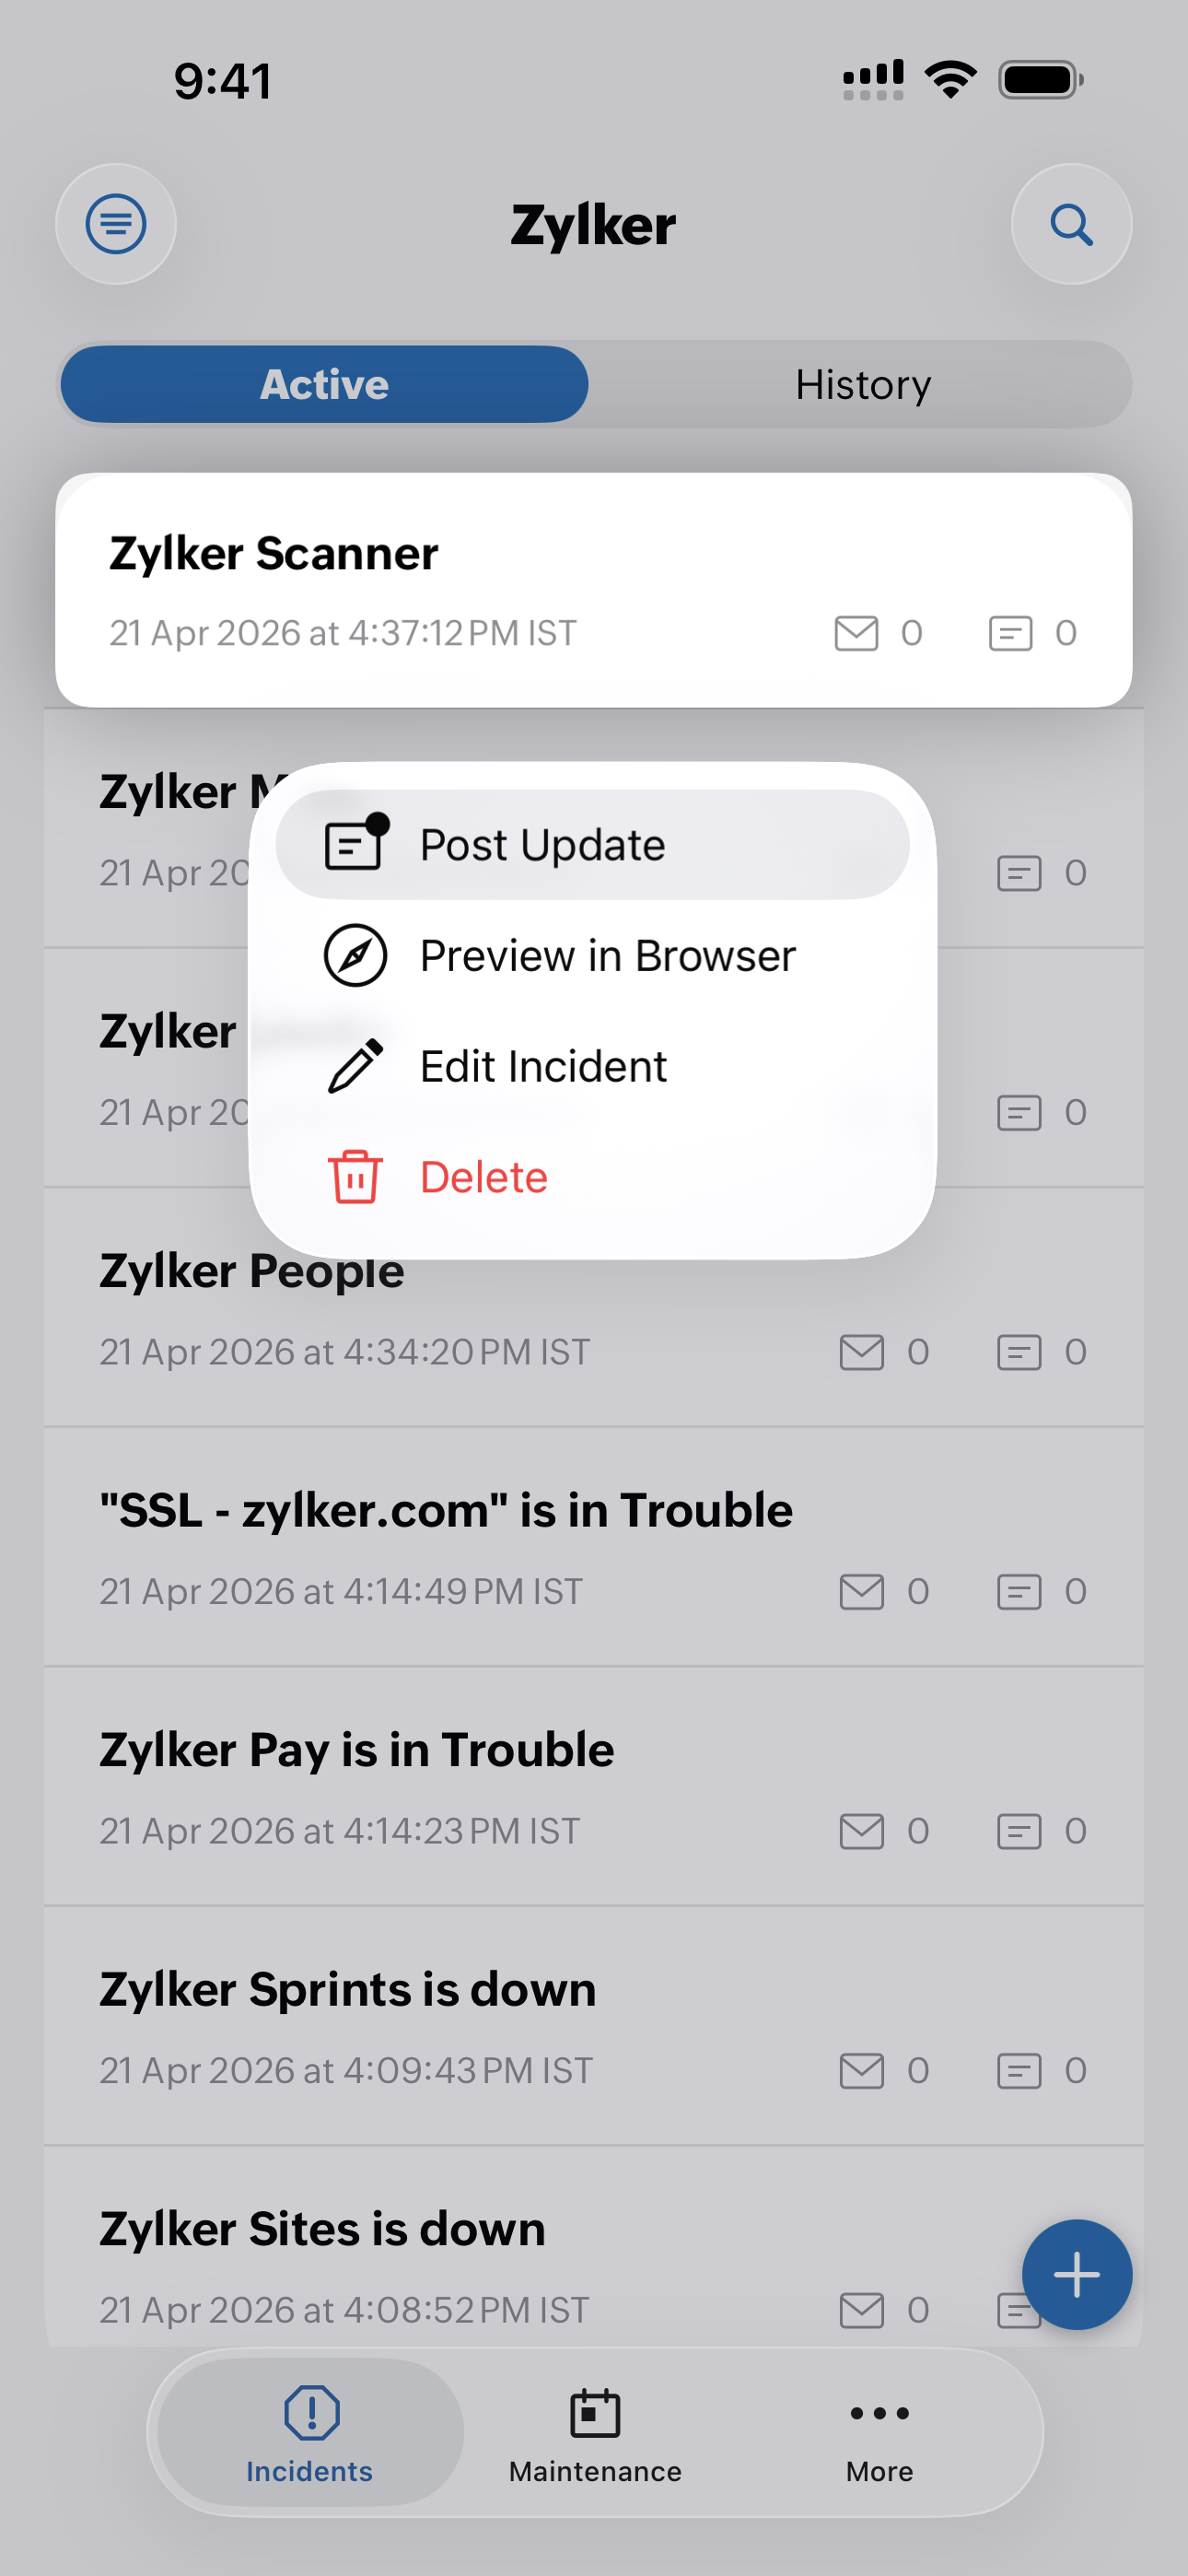
More actions
On long pressing the incident, you can:
-
Post Update: This is available only for an active incident. You can modify Updated at time, Time zone, Incident Status, Status Update, Post as a Private Note, Notify email, and SMS subscribers.
- Preview in Browser: See all incident details in the browser.
- Mark as Maintenance: This option is available only for historic incidents. It allows you to mark past incidents as maintenance, helping reclassify events that were part of planned work.
- Edit Incident: Modify Incident Title, Incident Severity, Incident Start Time, Time Zone, and Affected Components.
- Delete: Delete the incident.
Maintenance
Maintenance
Click the Maintenance tab in the StatusIQ mobile app. From the Maintenance page, you can view the following tabs:
Ongoing
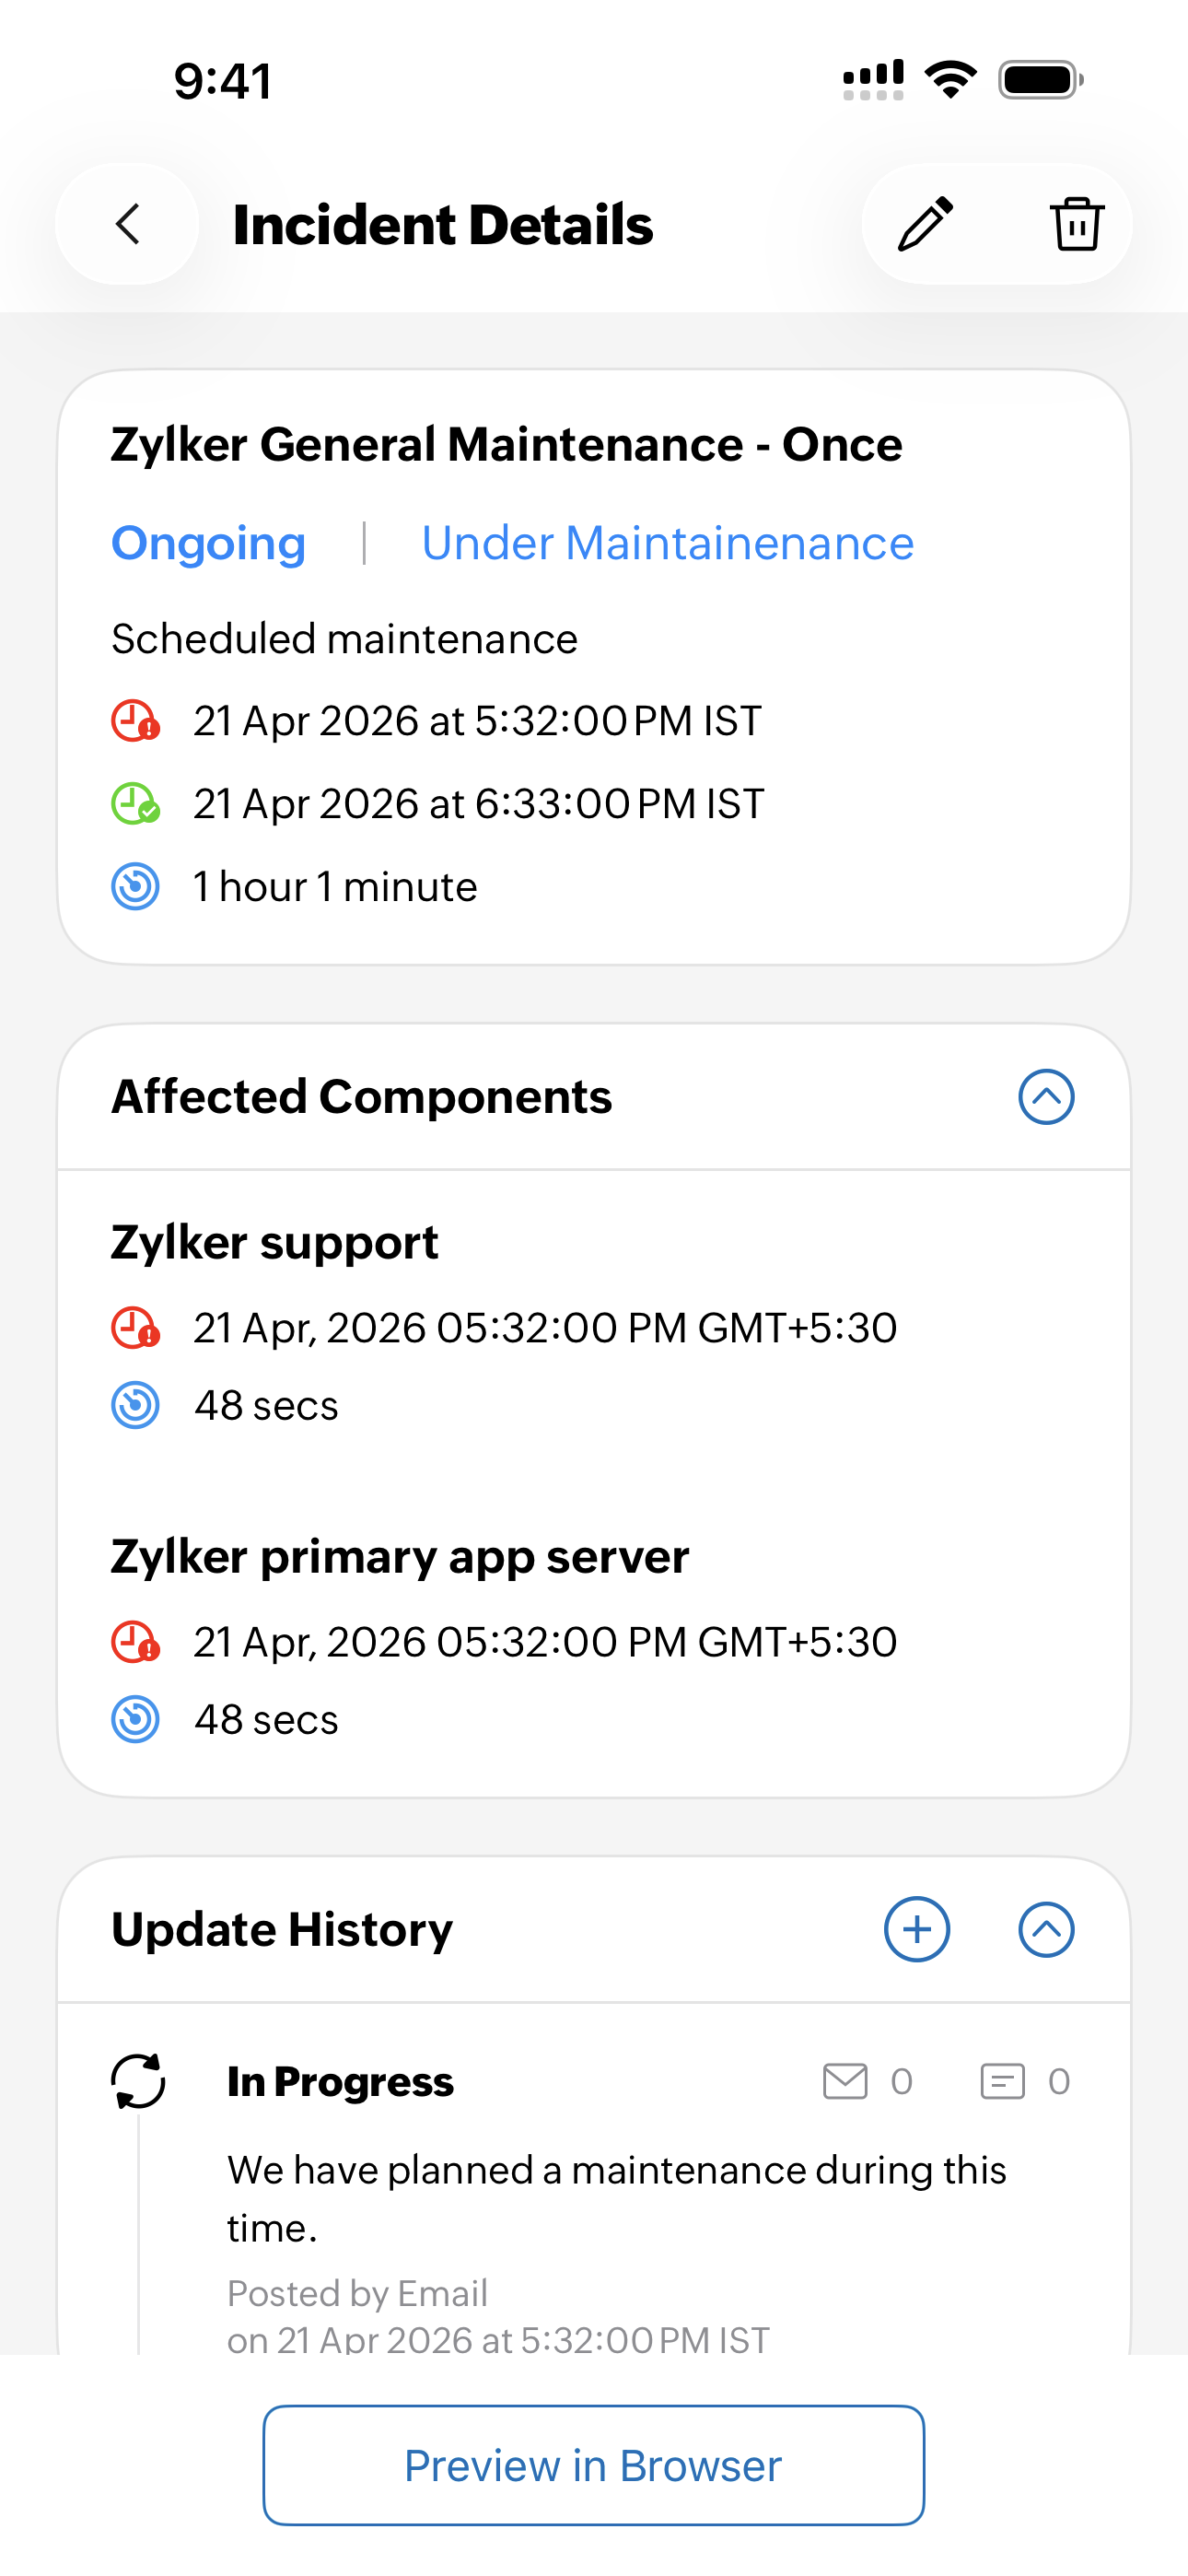
Select individual maintenance title to drill down into the maintenance details. The Ongoing section shows:

- Maintenance title: Displays the name of the active maintenance.
- Maintenance status: Displays the status as Ongoing.
- Schedule start time: Displays the time when the maintenance began near the icon.
- Schedule duration: Displays how long the maintenance has been running near the icon.
- List of affected components: Lists the components that are impacted during this maintenance.
- Update History: Shows the progress of the maintenance. The available statuses are:
- Acknowledged: The team has confirmed that they are aware of the issue.
- Identified: The source of the issue has been found.
- Observing: A possible fix is applied and the system is being monitored.
- Investigating: The team is checking further to understand the issue.
- Resolved: The issue has been fixed and service is back to normal.
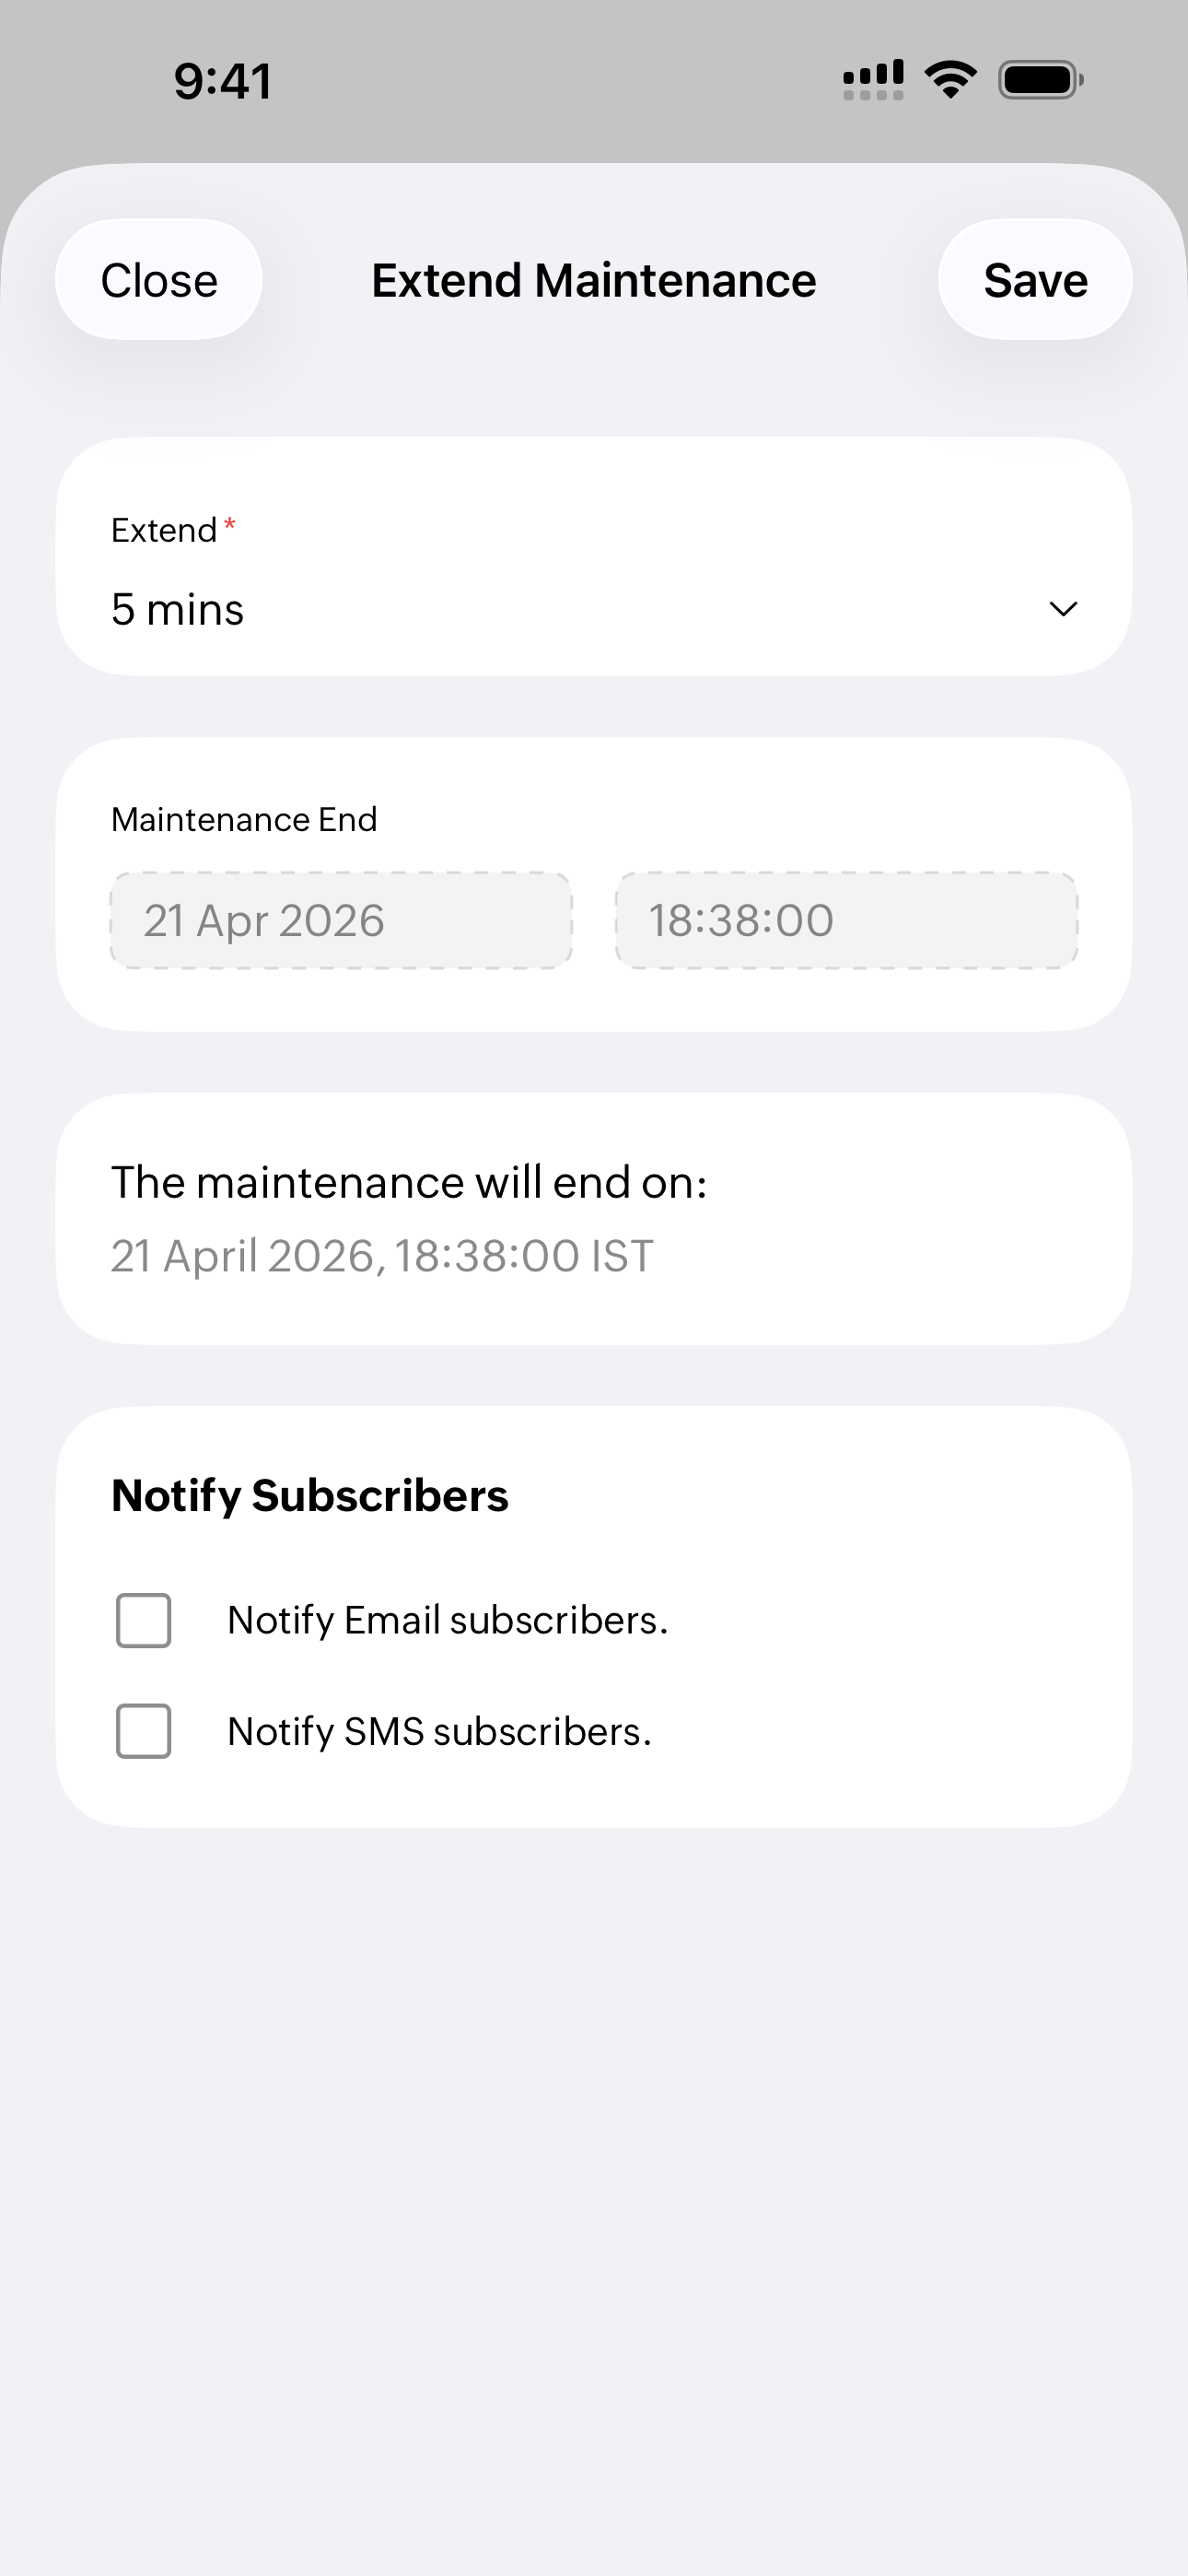
Extend maintenance
In case, the maintenance is taking longer than expected, you can extend your maintenance window. To extend the maintenance window, follow the steps below:
- Long press your ongoing maintenance.
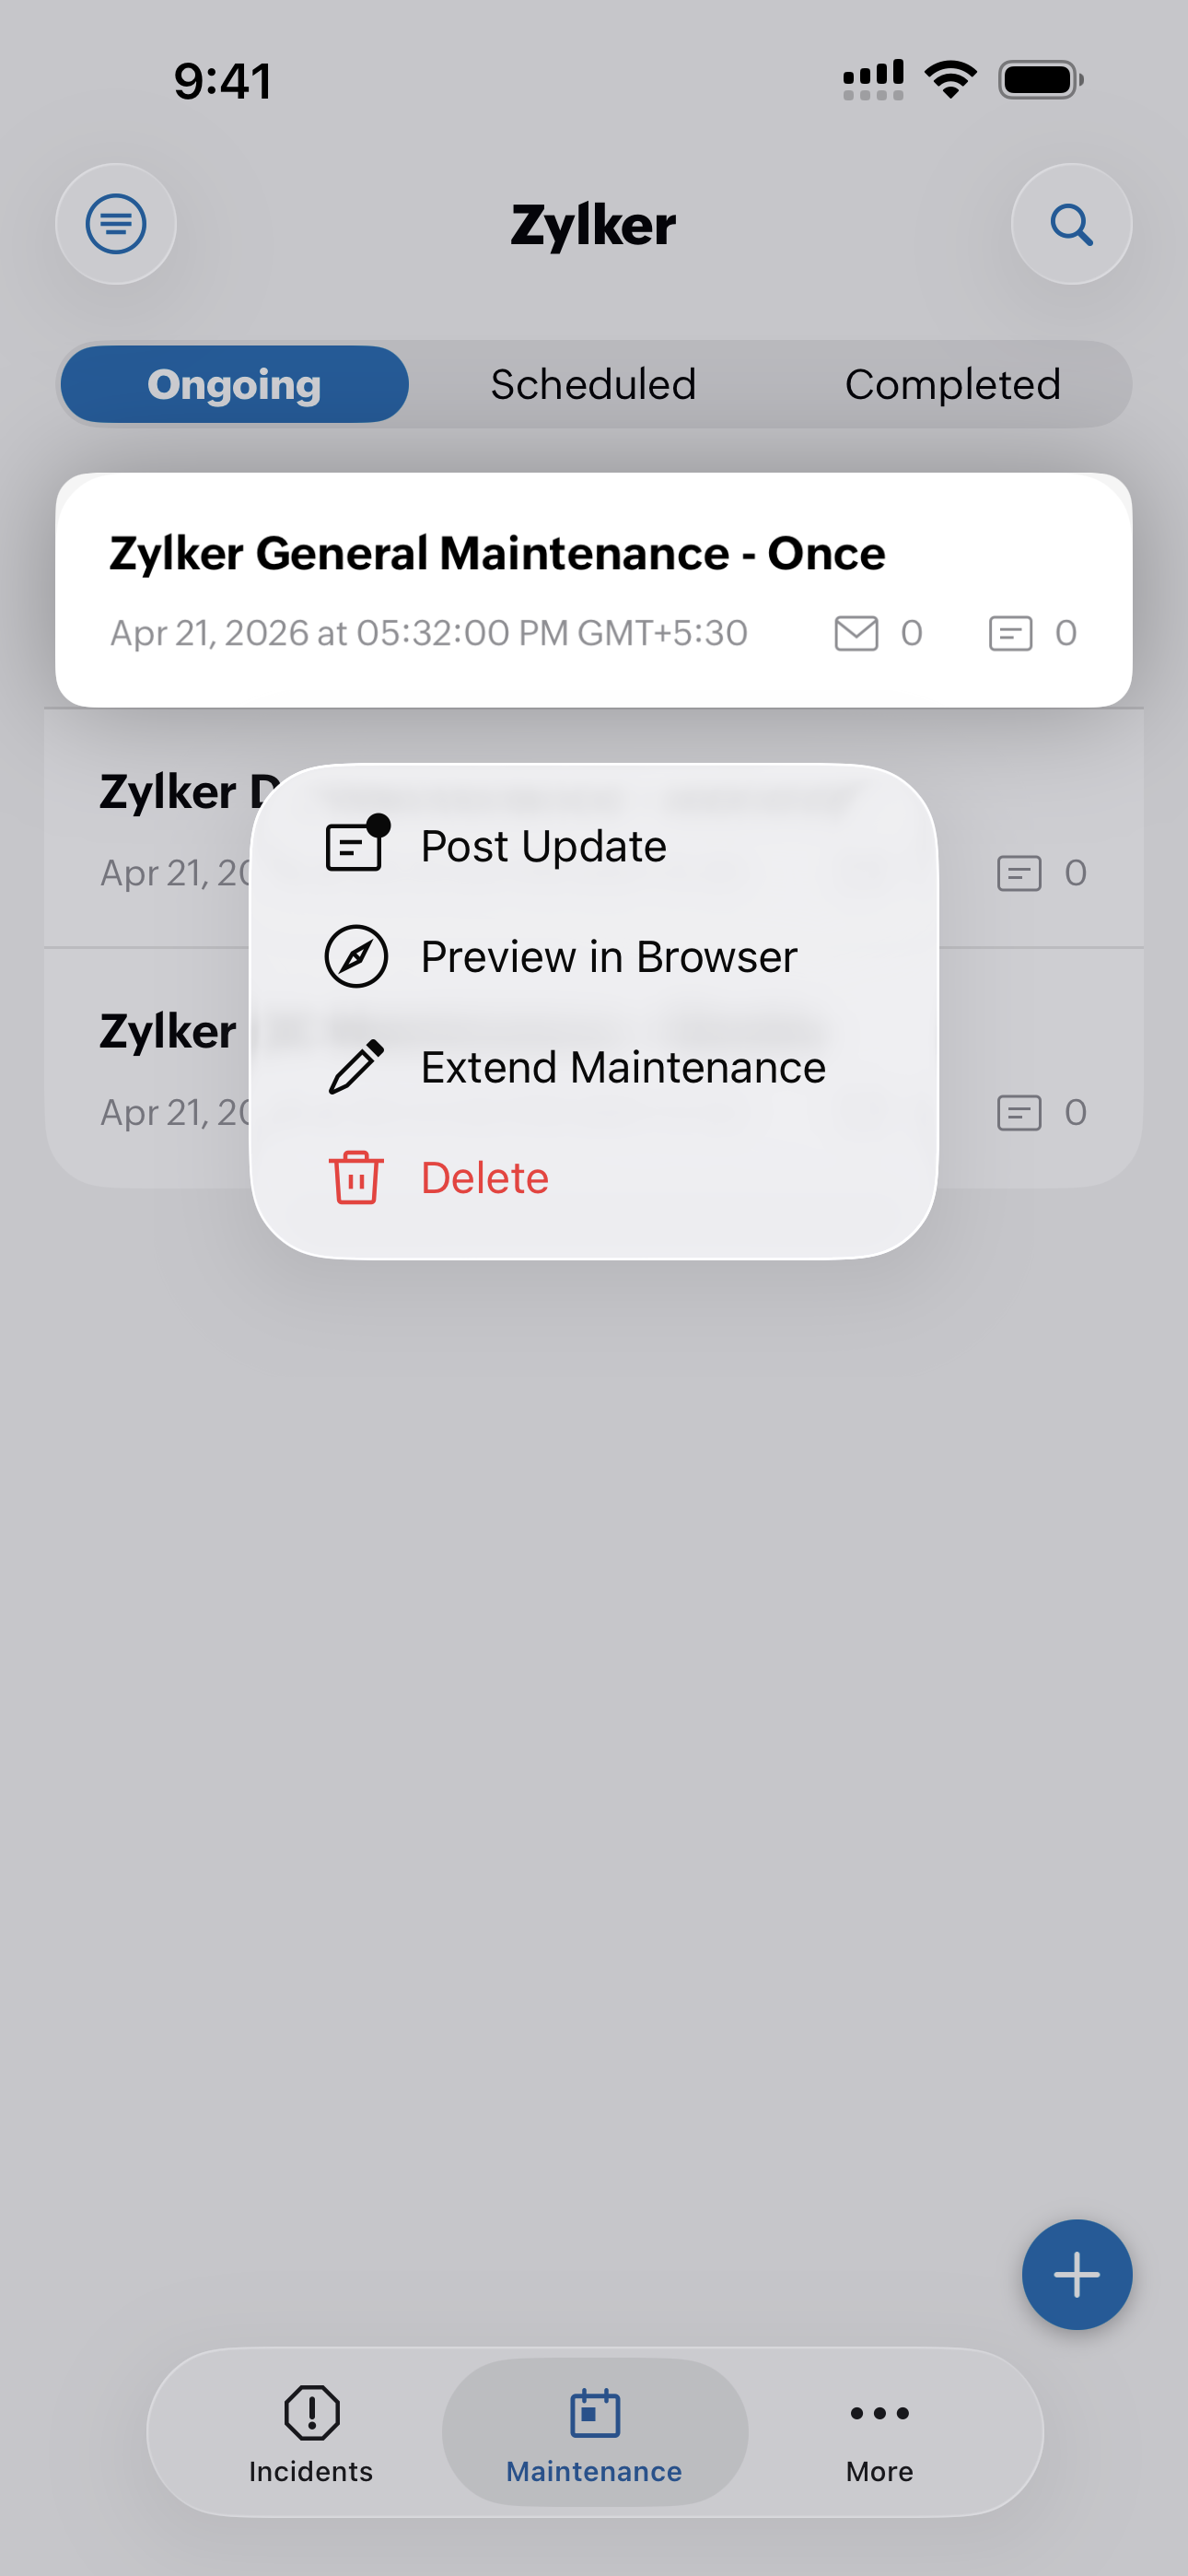
- Select Extend Maintenance.
- On the Extend Maintenance page, specify how long you want to extend the maintenance and choose whether to notify your email subscribers and SMS subscribers about the extension.
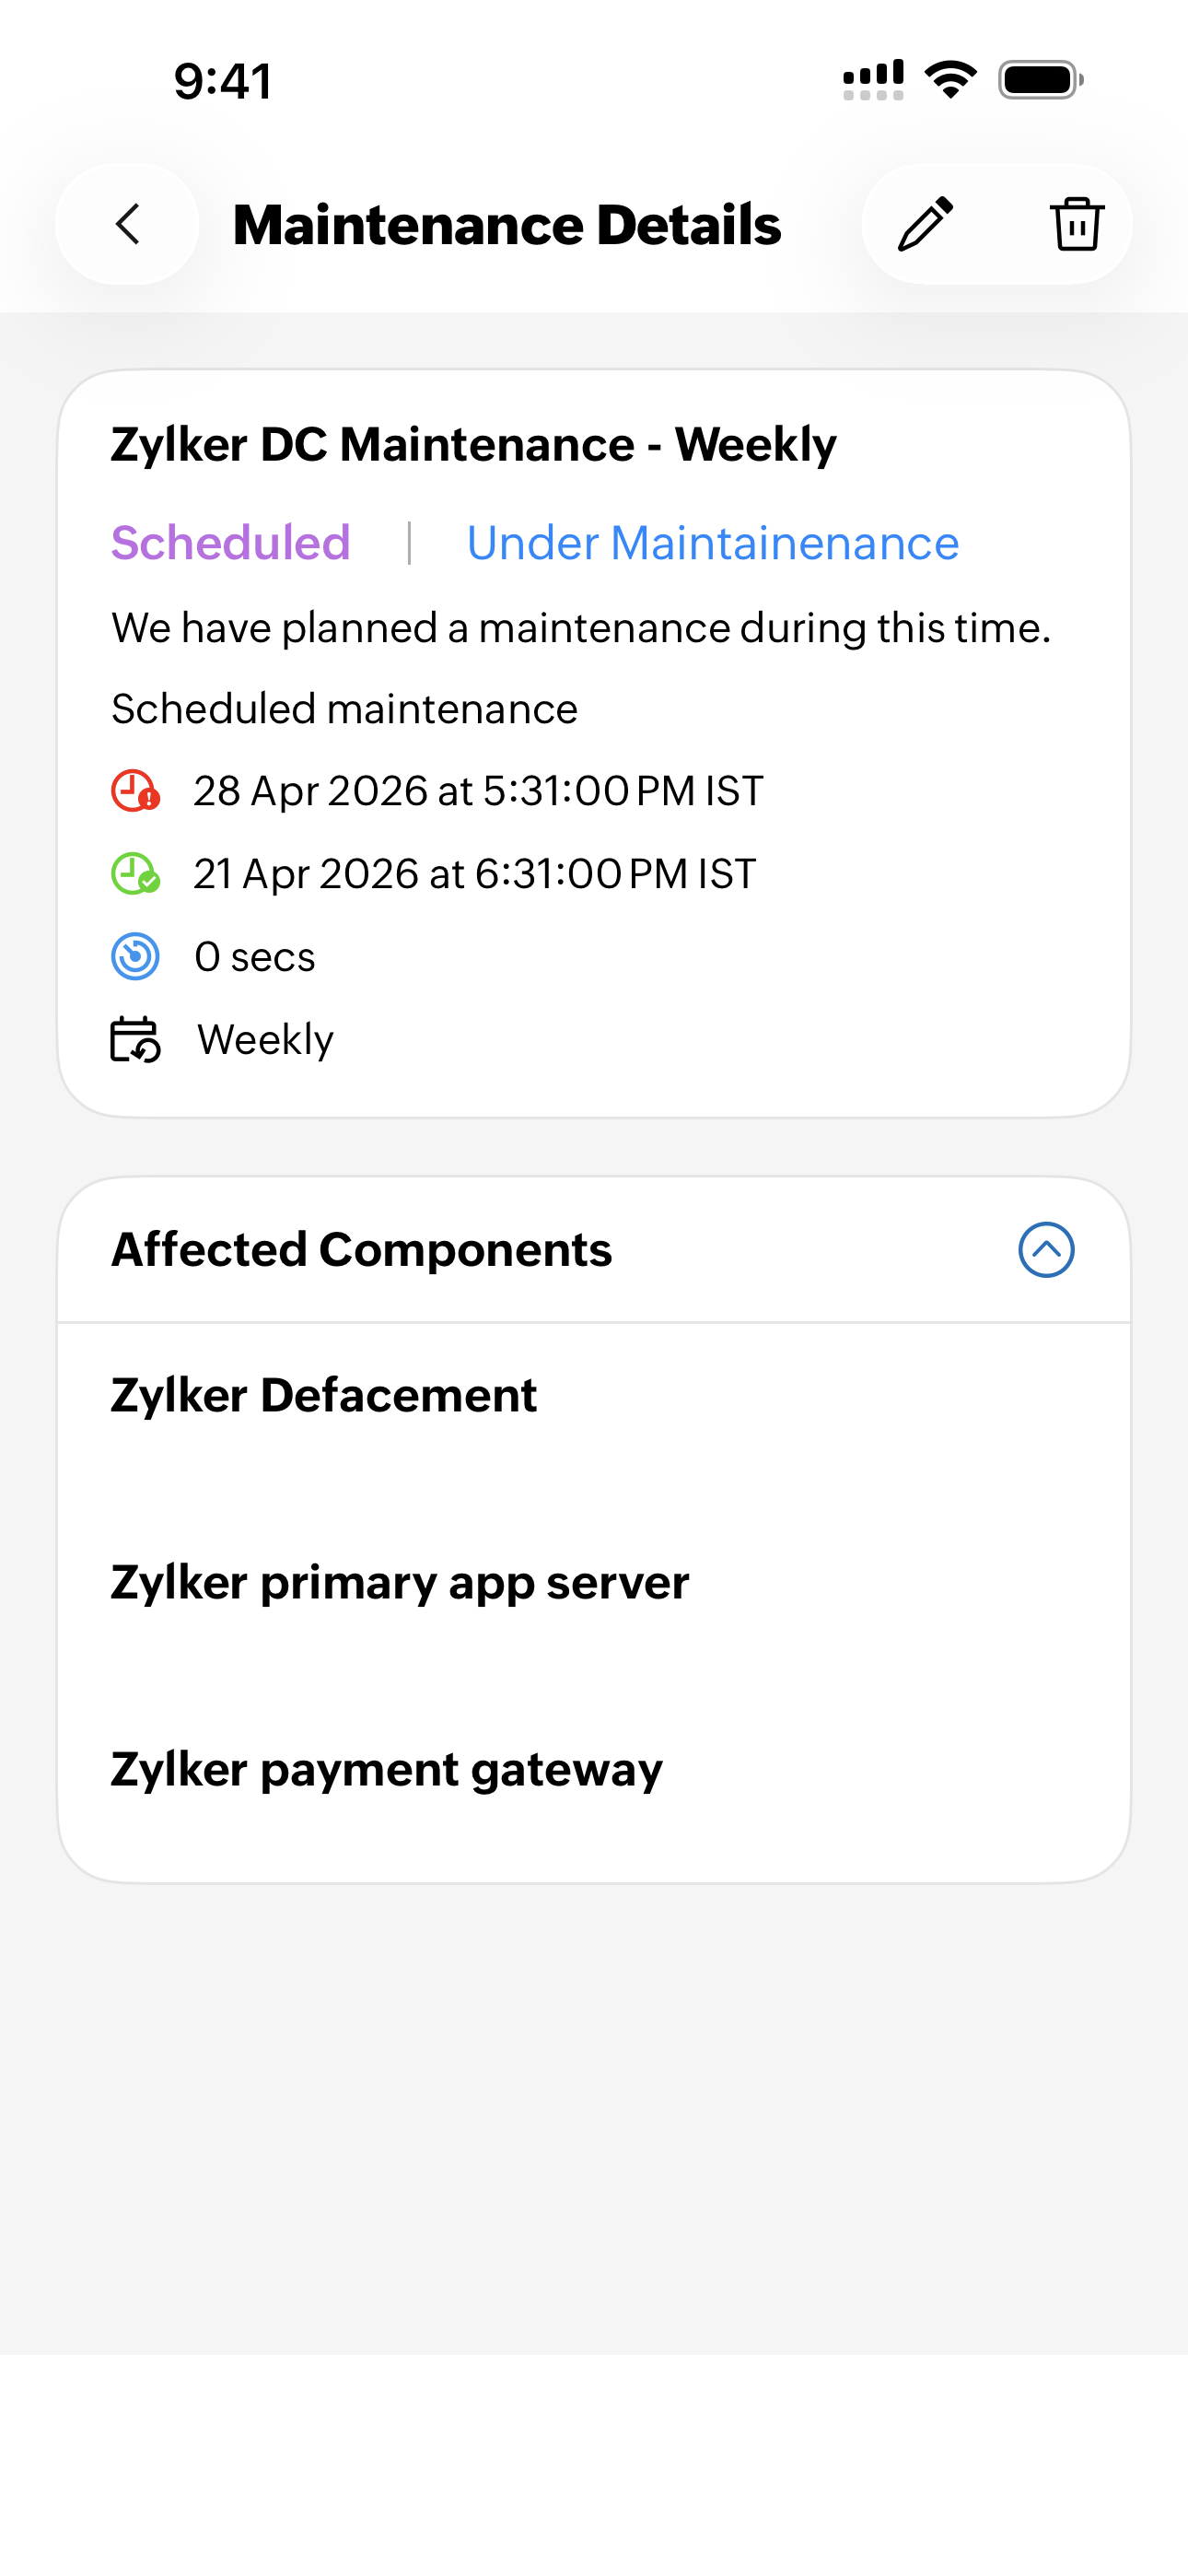
Scheduled
Switch to Scheduled tab to view the list of the maintenance scheduled for your status pages. Select individual schedule title to drill down into the maintenance details.
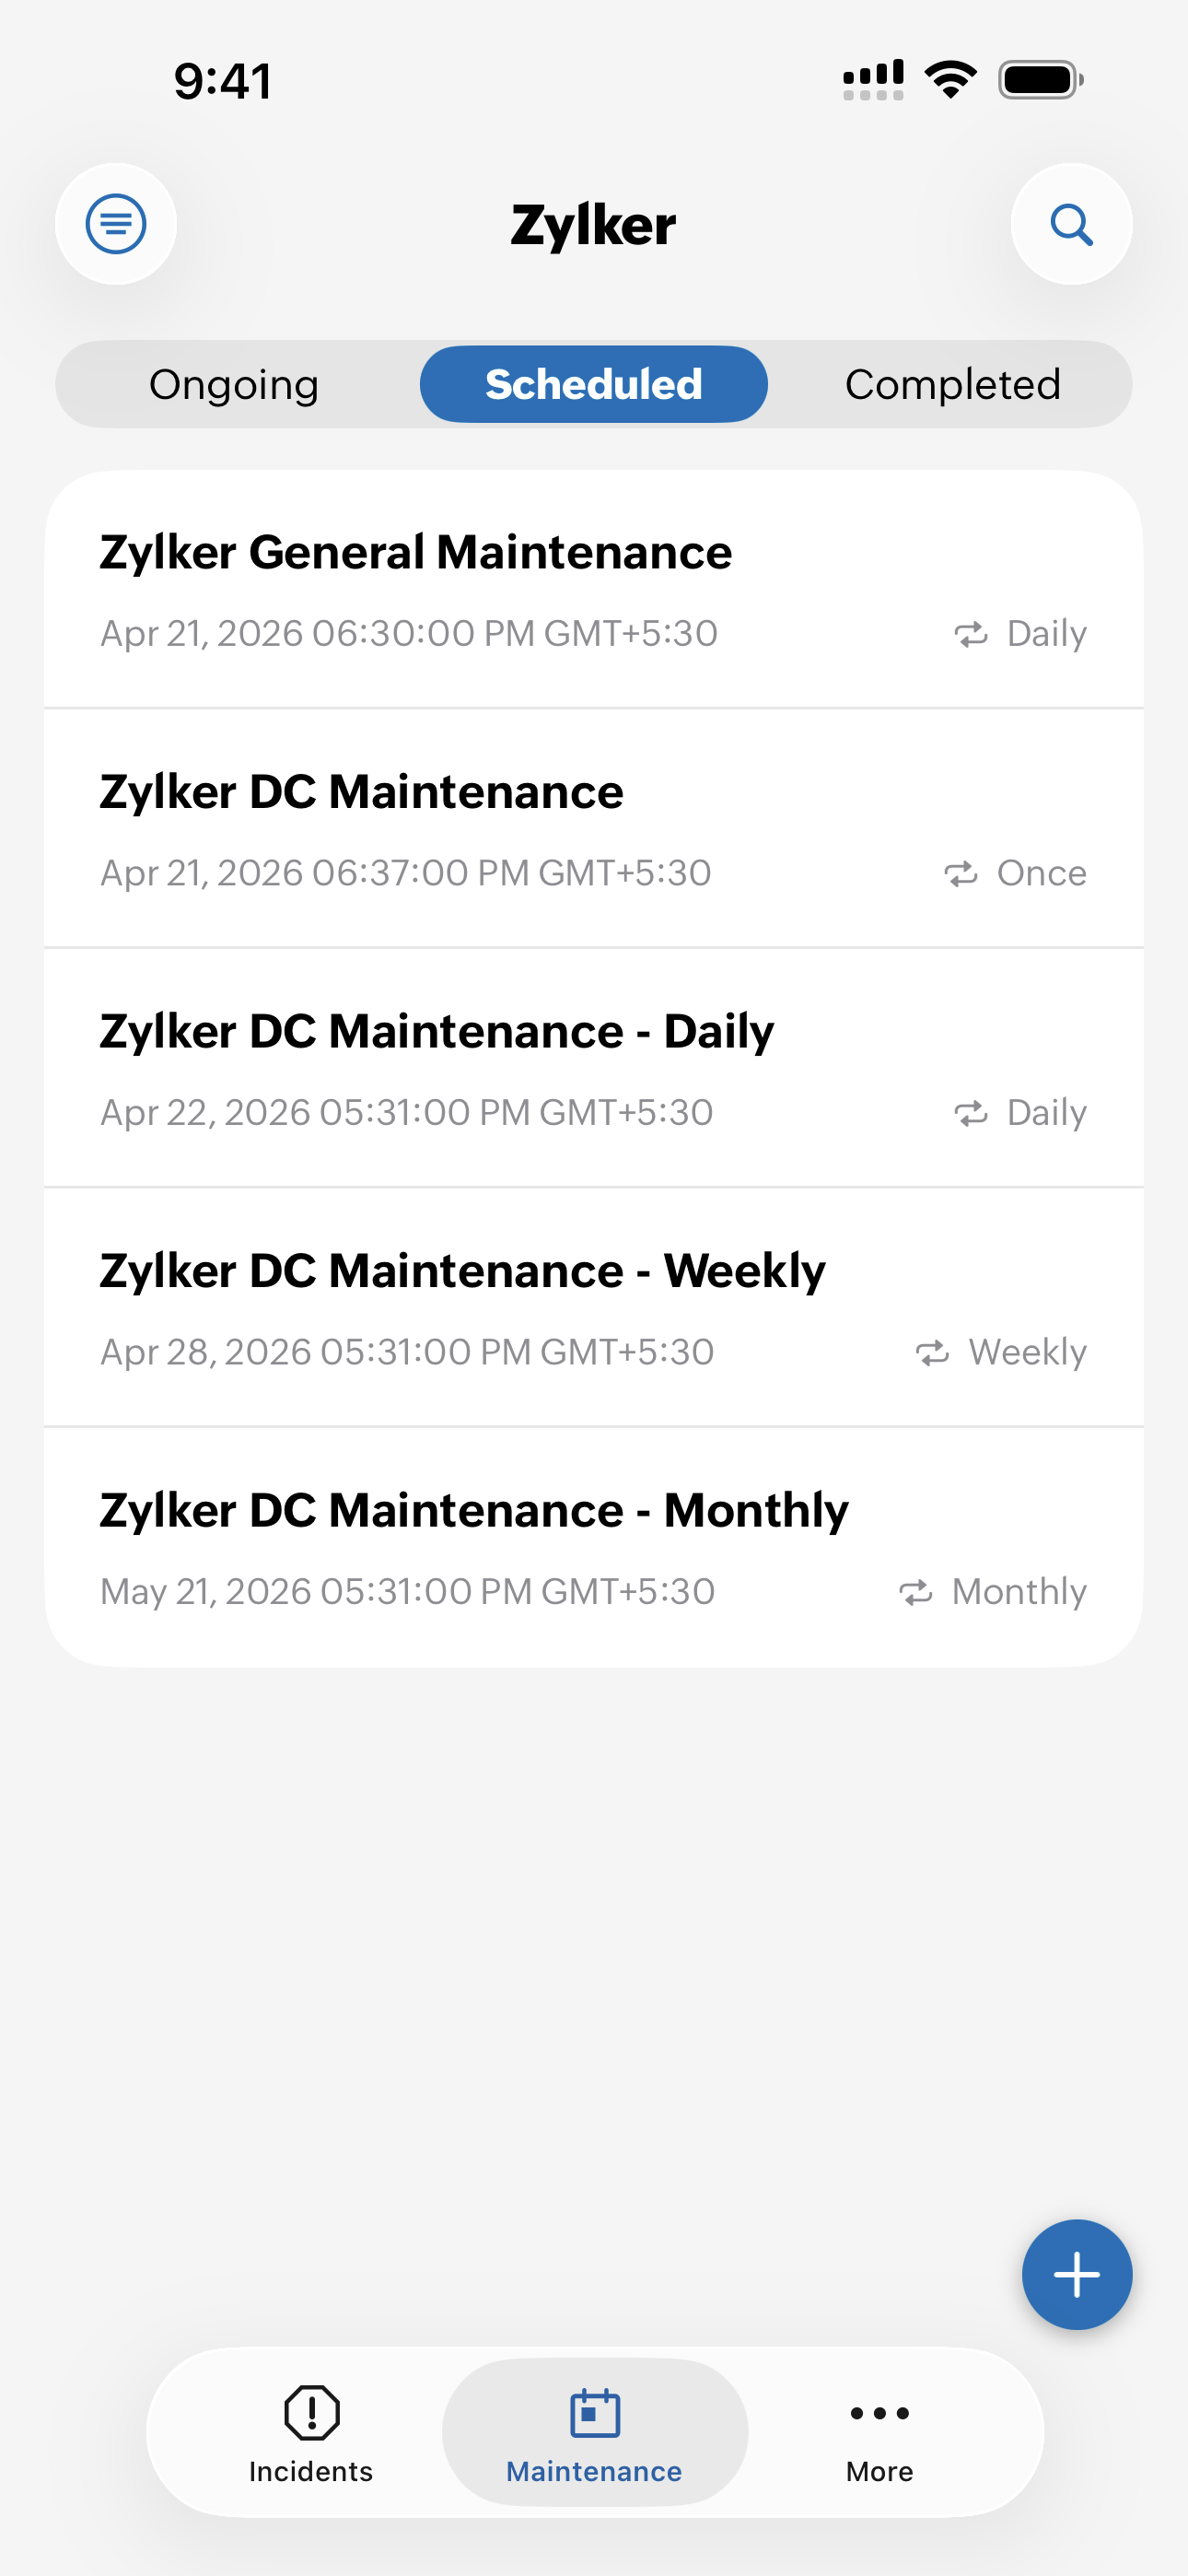
The Scheduled details section shows:
- Maintenance title: Displays the name of the maintenance that has been planned.
- Maintenance status: Displays the status as Scheduled.
- Schedule start time: Displays when the maintenance is set to begin near the icon.
- Schedule end time: Displays when the maintenance is expected to finish near the icon.
- Schedule duration: Displays how long the maintenance is planned to run near the icon.
- Schedule frequency: Displays how often this maintenance repeats, if it is recurring.
- List of affected components: Lists the components that will be impacted during this maintenance window.
Completed
Switch to the Completed tab to view the list of the completed maintenance schedules for your status pages. Select individual maintenance title to drill down into the maintenance details.
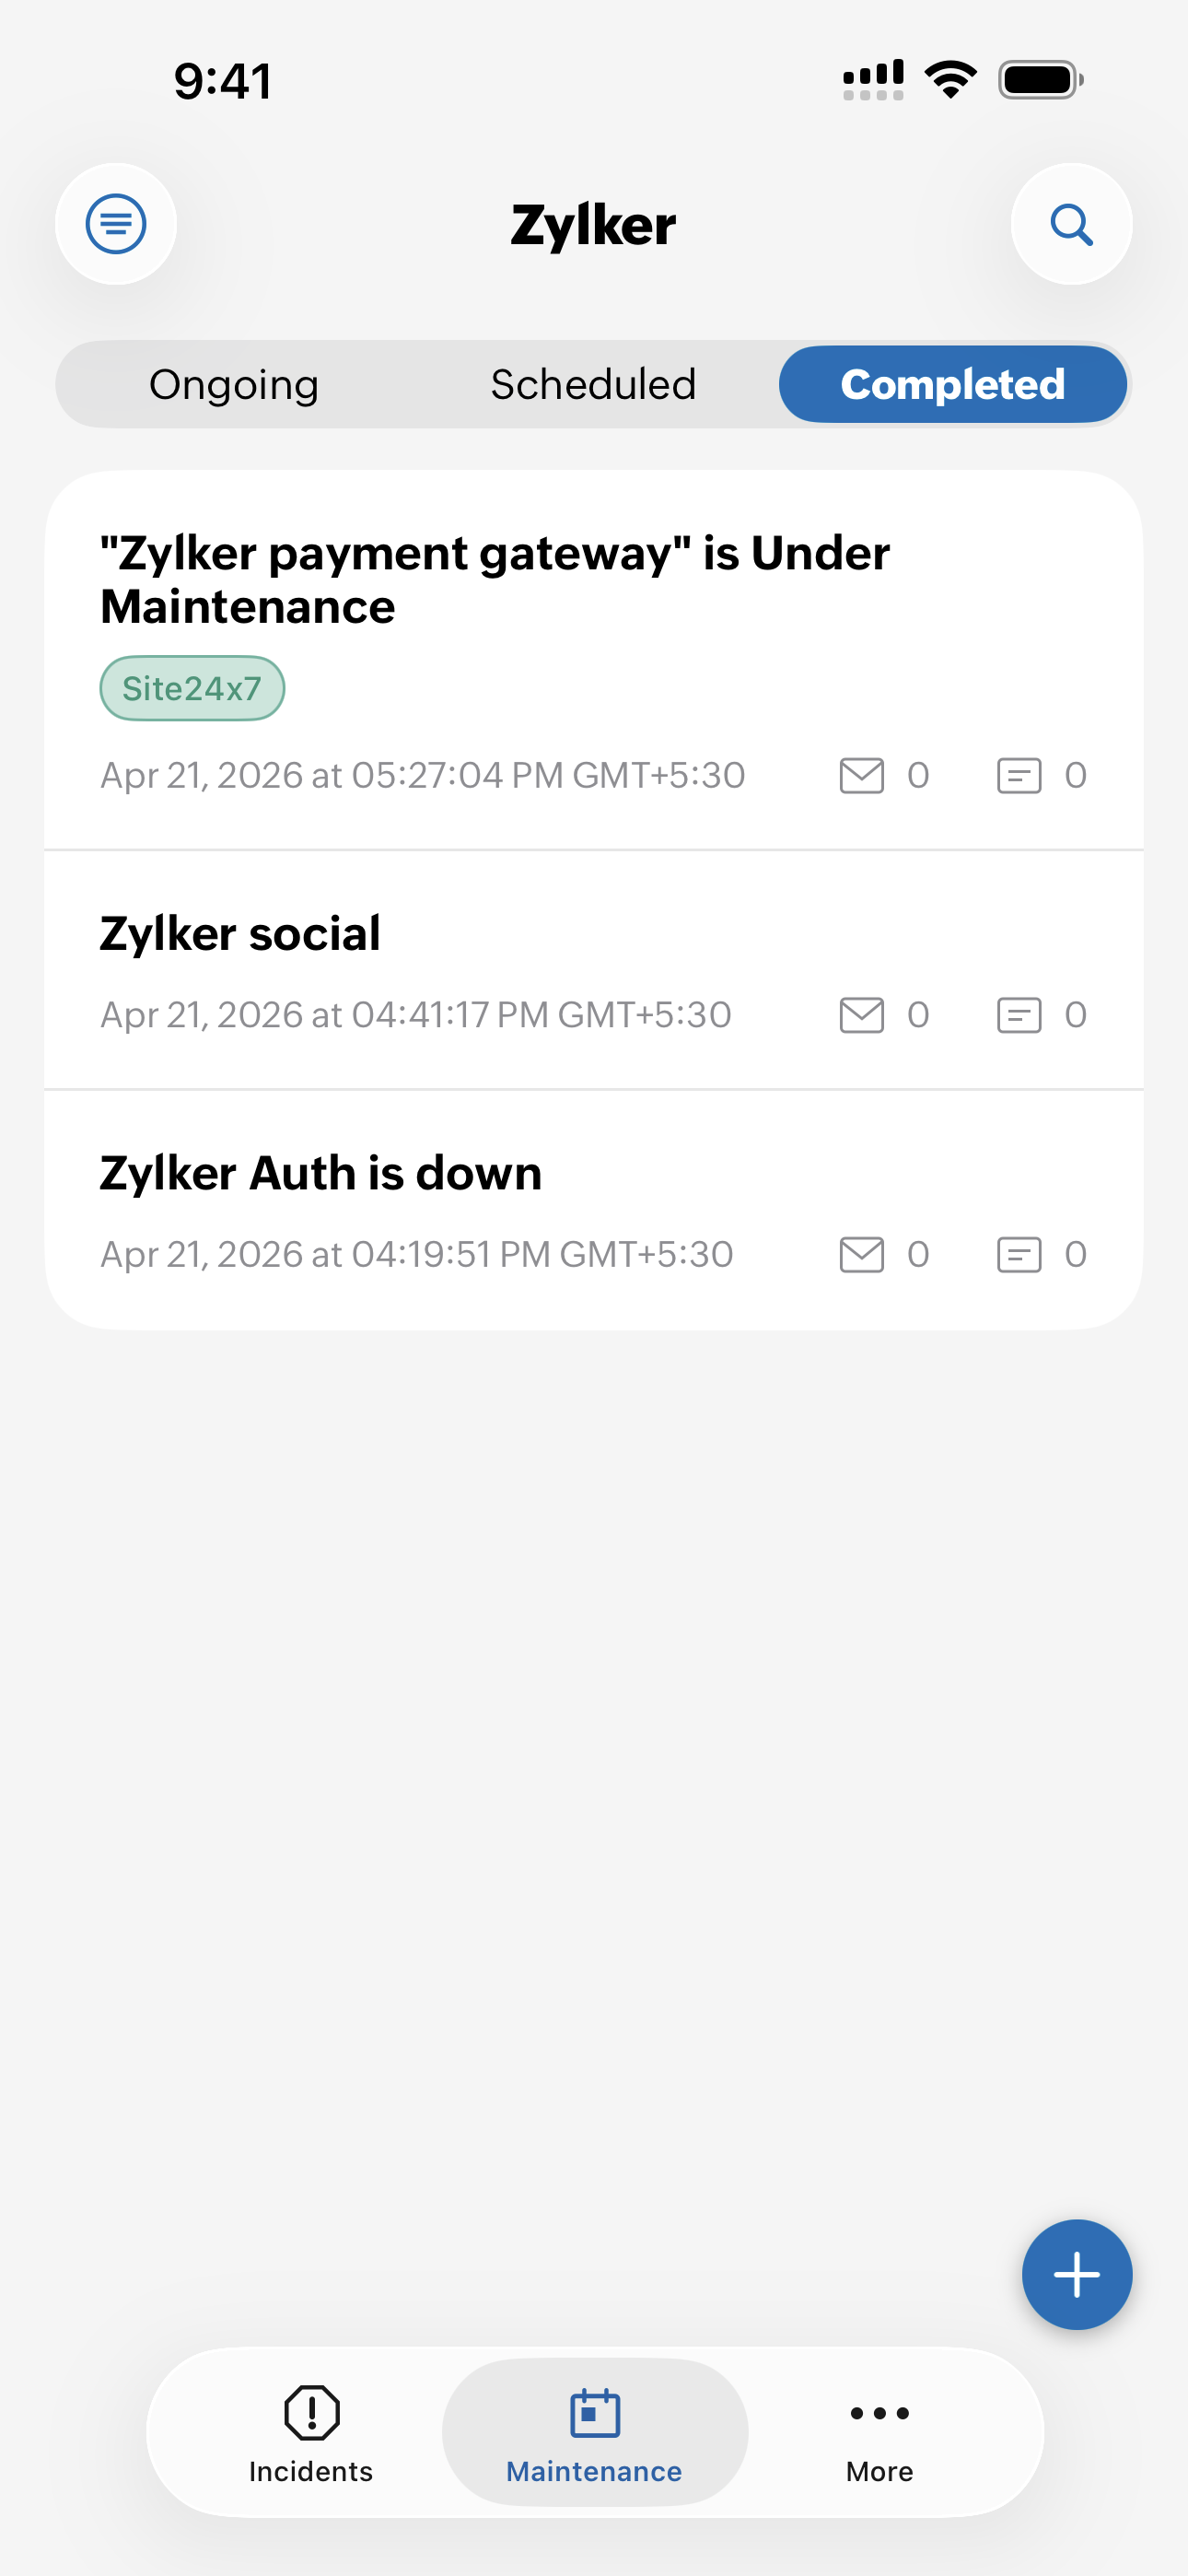
The Completed section shows:
- Maintenance title: Displays the name of the maintenance that has been completed.
- Maintenance status: Displays the status as Completed.
- Schedule start time: Displays when the maintenance began near the icon.
- Schedule end time: Displays when the maintenance ended near the icon.
- Schedule duration: Displays how long the maintenance ran near the icon.
- List of affected components: Displays the components that were impacted by this maintenance.
- Update History: Shows the progress of the maintenance. The available statuses are:
- Acknowledged: The team has confirmed that they are aware of the issue.
- Identified: The source of the issue has been found.
- Observing: A possible fix is applied and the system is being monitored.
- Investigating: The team is checking further to understand the issue.
- Resolved: The issue has been fixed and service is back to normal.
- Postmortem: Allows documenting the final analysis of what happened and why.
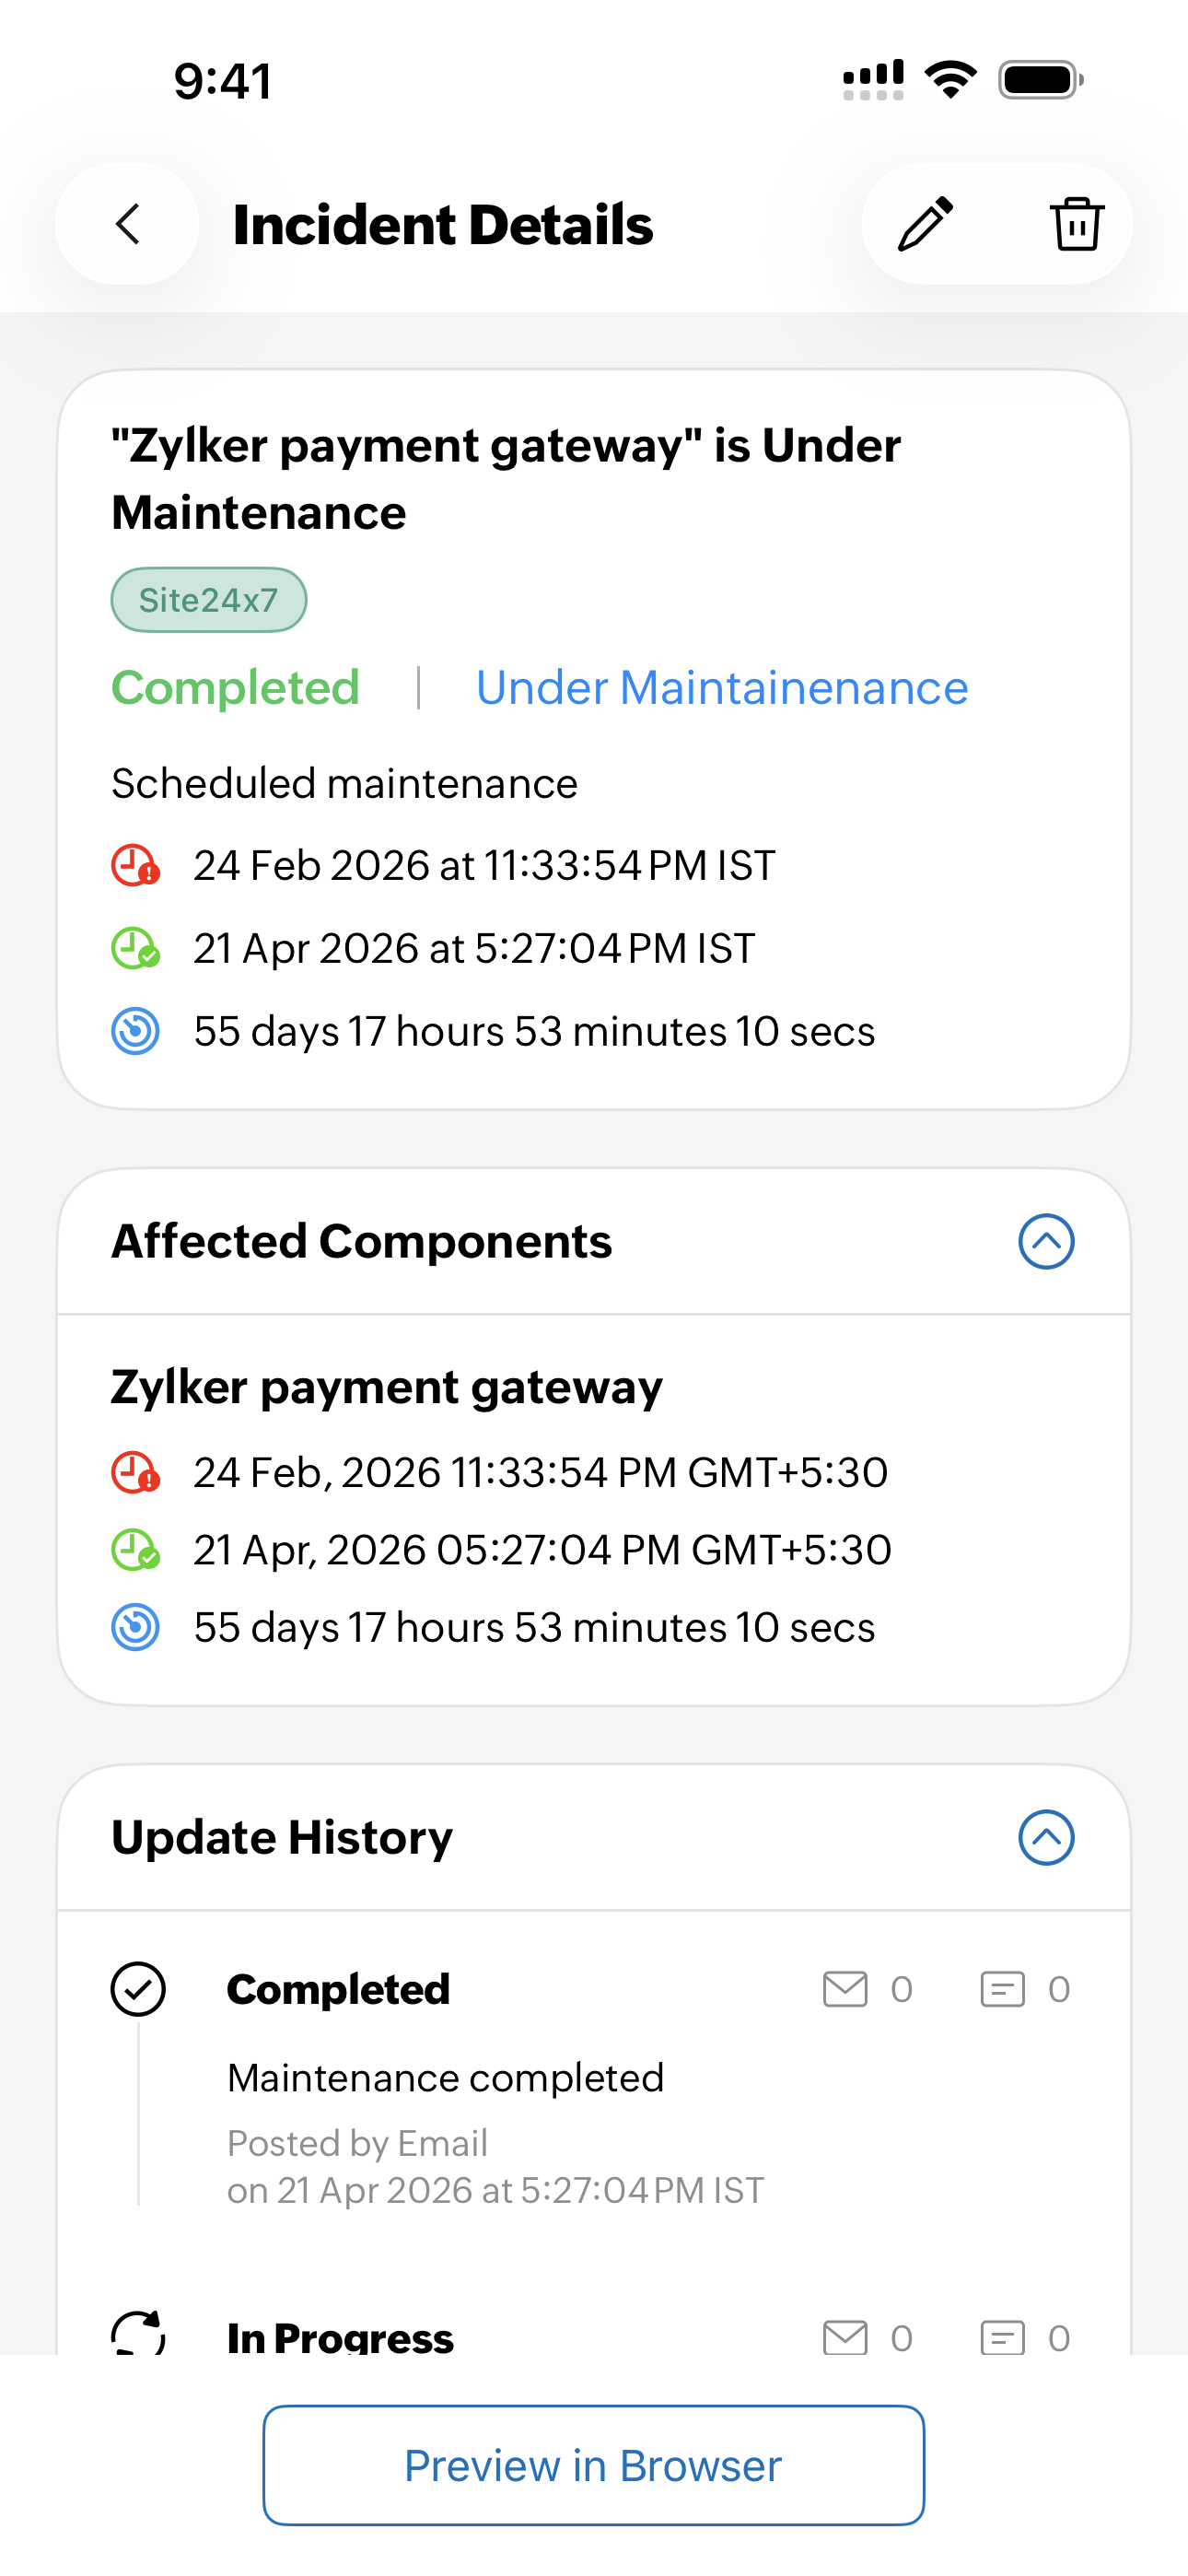
You can shrink Affected Components and Update History using the ![]() icon.
icon.
Settings
To manage the StatusIQ mobile application settings, click on the settings ![]() icon.
icon.
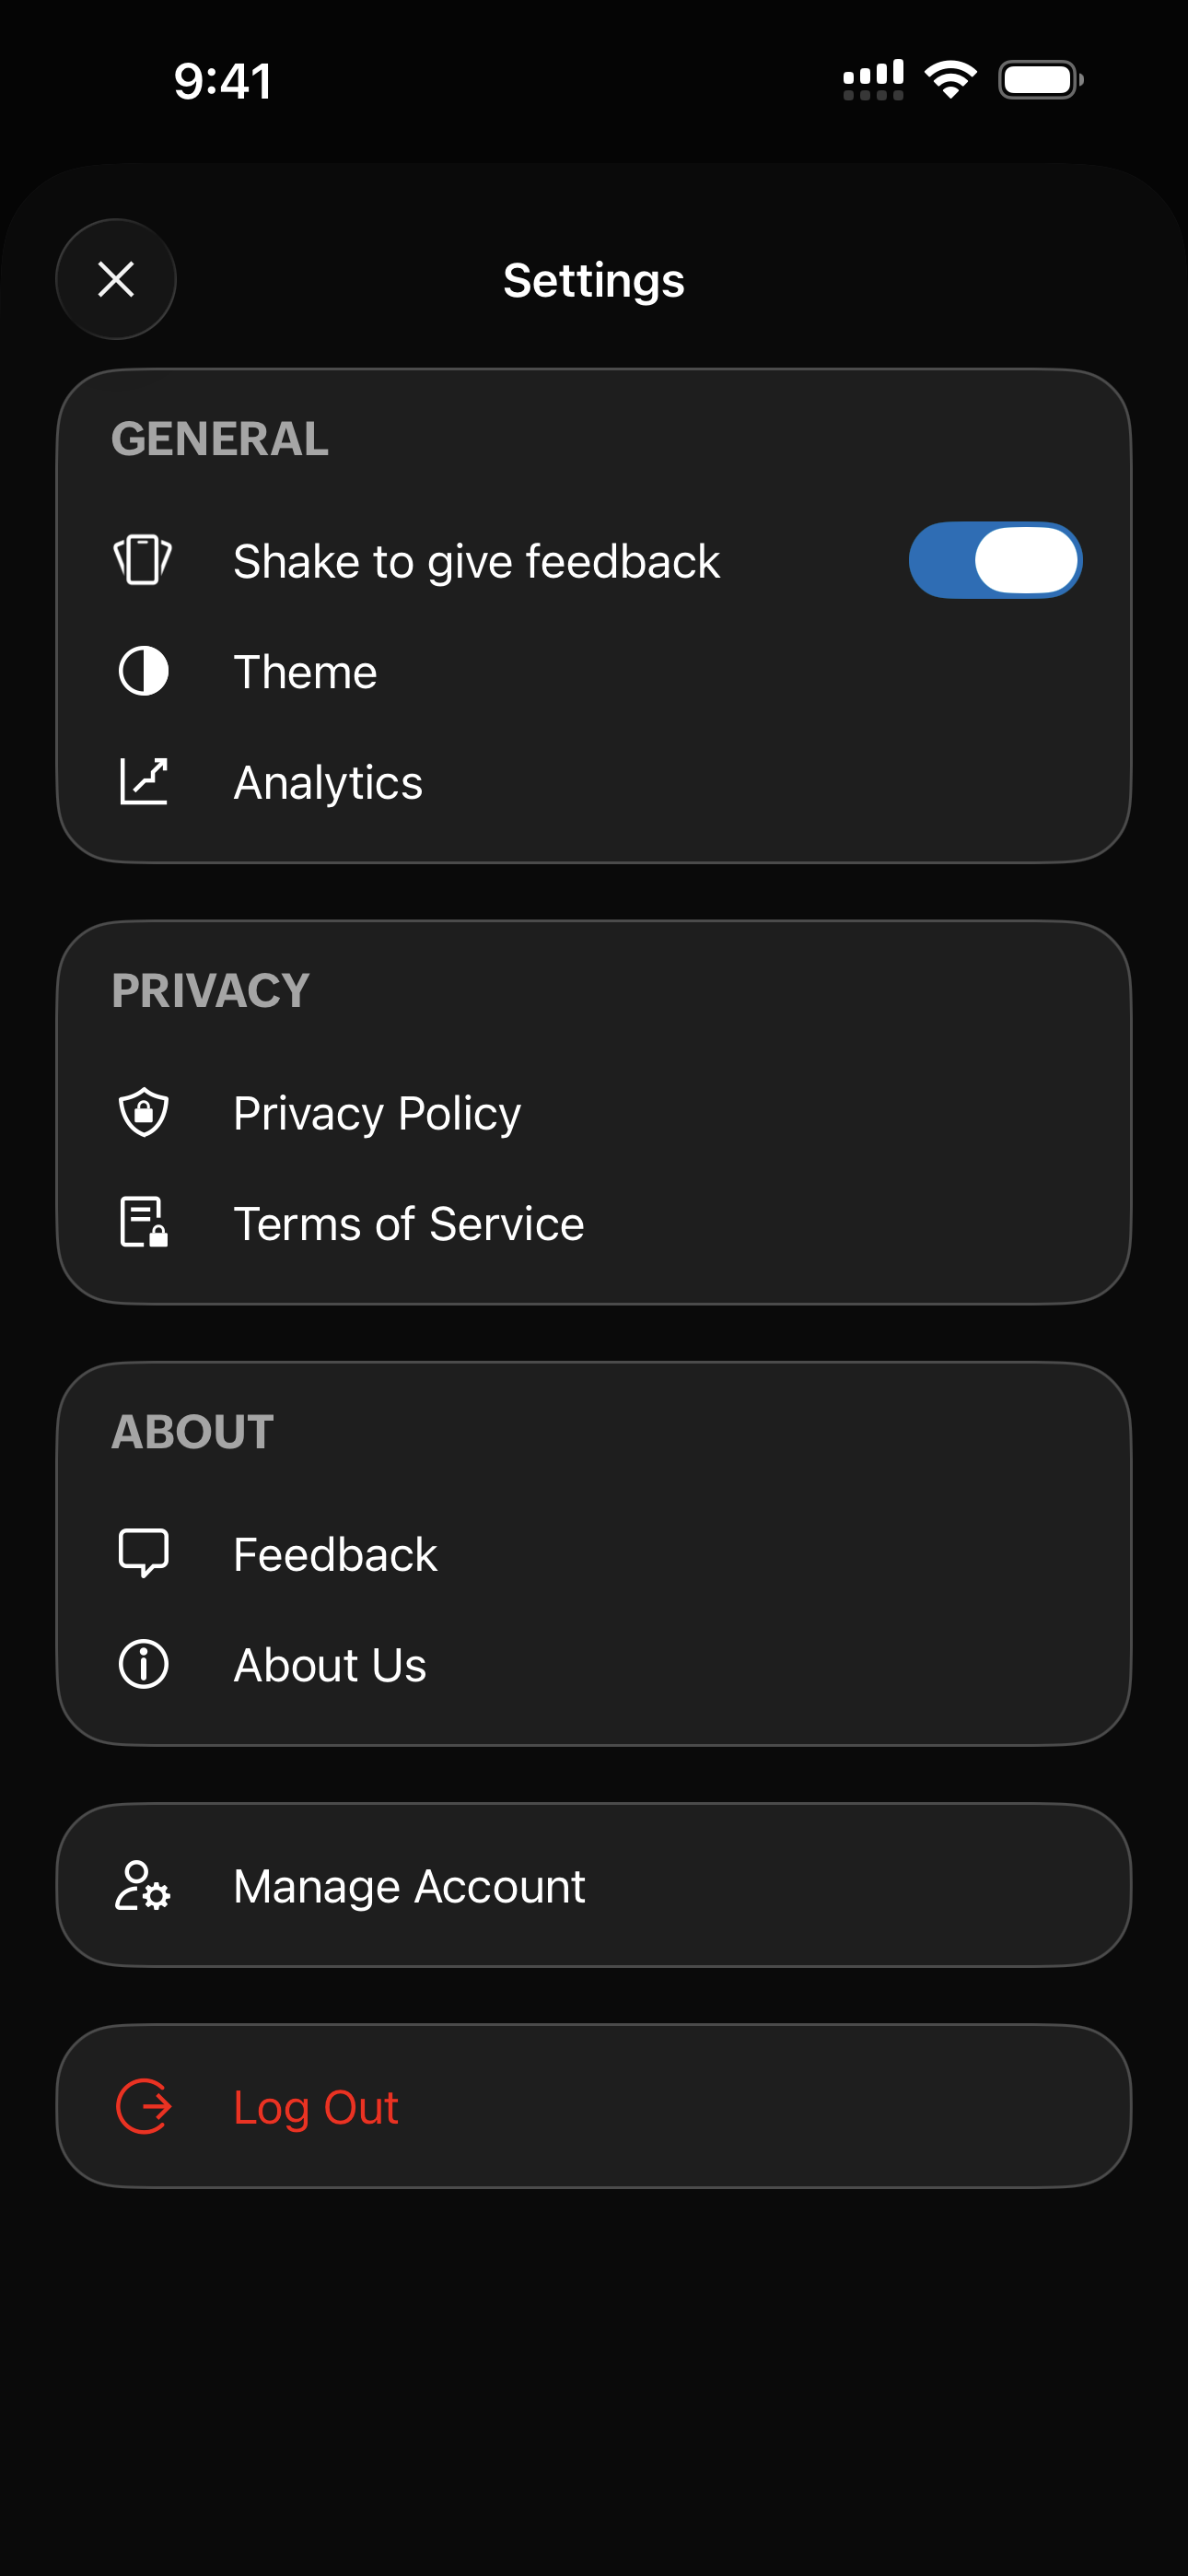
- Shake To Feedback: Switch it ON to give quick feedback by shaking your mobile device. On shaking the mobile device, you can see the screen with the following options:
- Feedback: You can reach the support team by taking a screenshot of an issue and attaching it with a detailed description. In the feedback, you can include the system logs and diagnostic information such as User details and Device and App details.
- Report Bug: Shake your mobile device from any page of the app, such as the Incident Details or Edit page, to share feedback with our technical team. Use the highlighting options at the bottom of the page to mark relevant areas and click
 .
. - Don't Show Again: Select to disable the Shake To Feedback.
- Theme: Click on Theme to modify StatusIQ theme as
- System Default: Chooses the same theme as your mobile device.
- Light: Sets the light theme.
- Dark: Sets the dark theme.
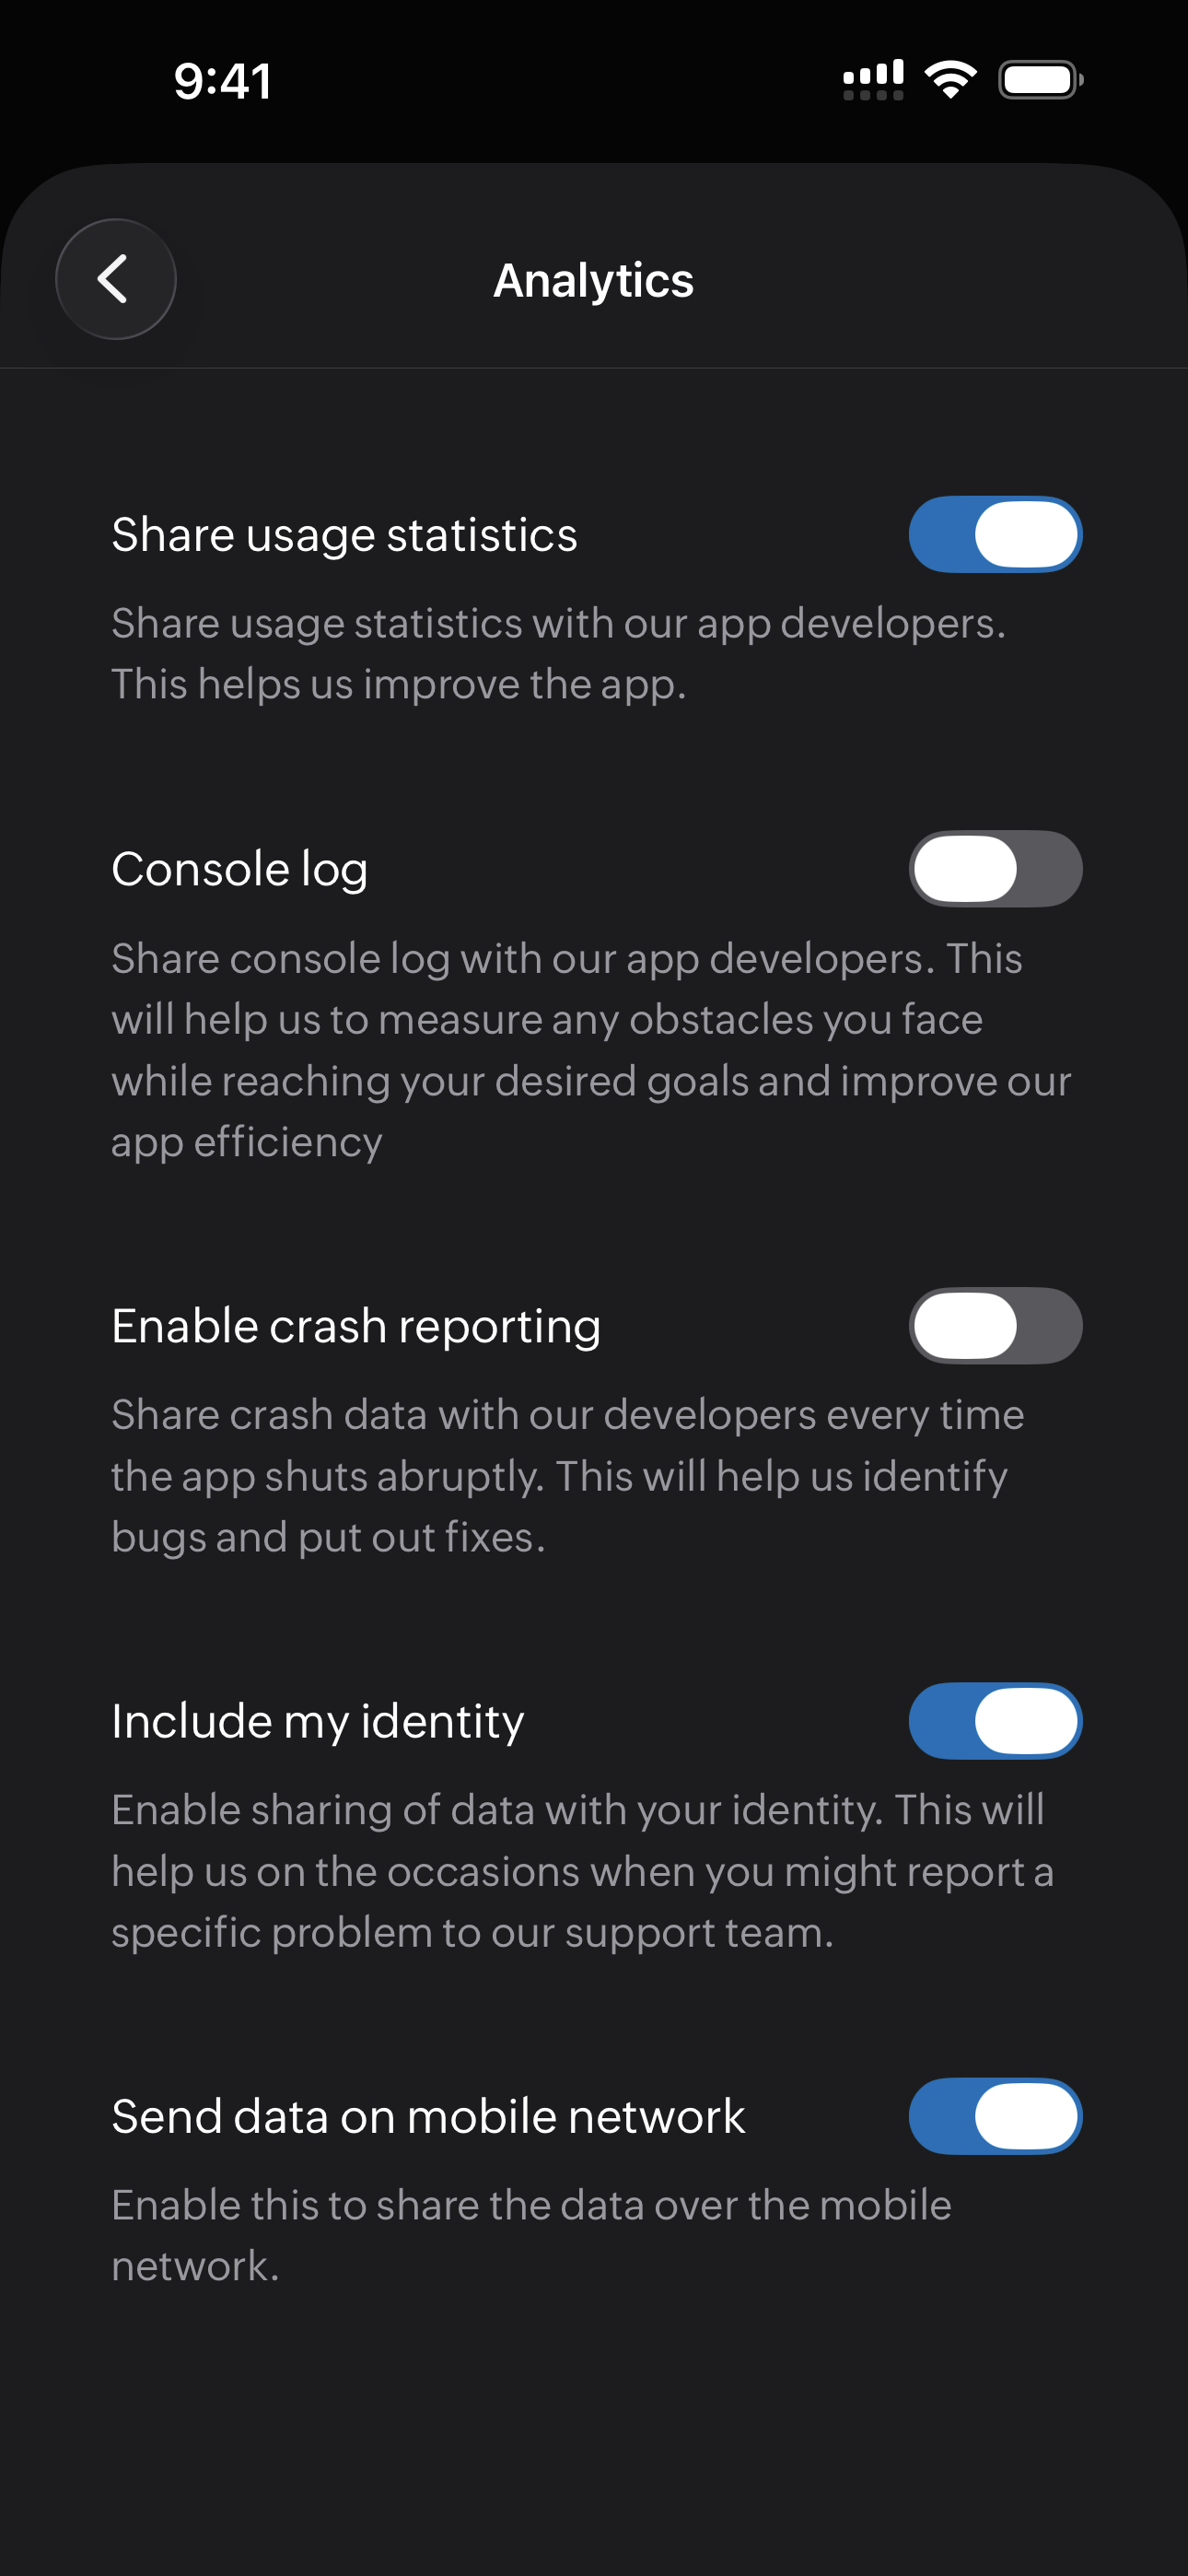
- Analytics: Share the following app diagnostic data with the developers to help improve the app:
- Share usage statistics
- Console Log
- Enable crash
- Include my identity: Enable it to attach your identity to the data shared with the developers. This helps to fix user-specific issues.
- Privacy Policy: Informs users about how their data is collected, used, stored, and shared, and the limitations in maintaining this transparency.
- Terms of Service: Provides the rules for using the StatusIQ mobile app.
- Feedback: Enables users to share their feedback with the StatusIQ support team.
- About Us: This section describes StatusIQ, and explains its purpose, and key features, including how StatusIQ helps businesses manage status pages, track incidents, communicate real-time updates, and ensure service transparency.
Manage Account
- Click on Delete Account to permanently delete all data associated with your account and Zoho apps that you use.
- After clicking, you will see the following error message:
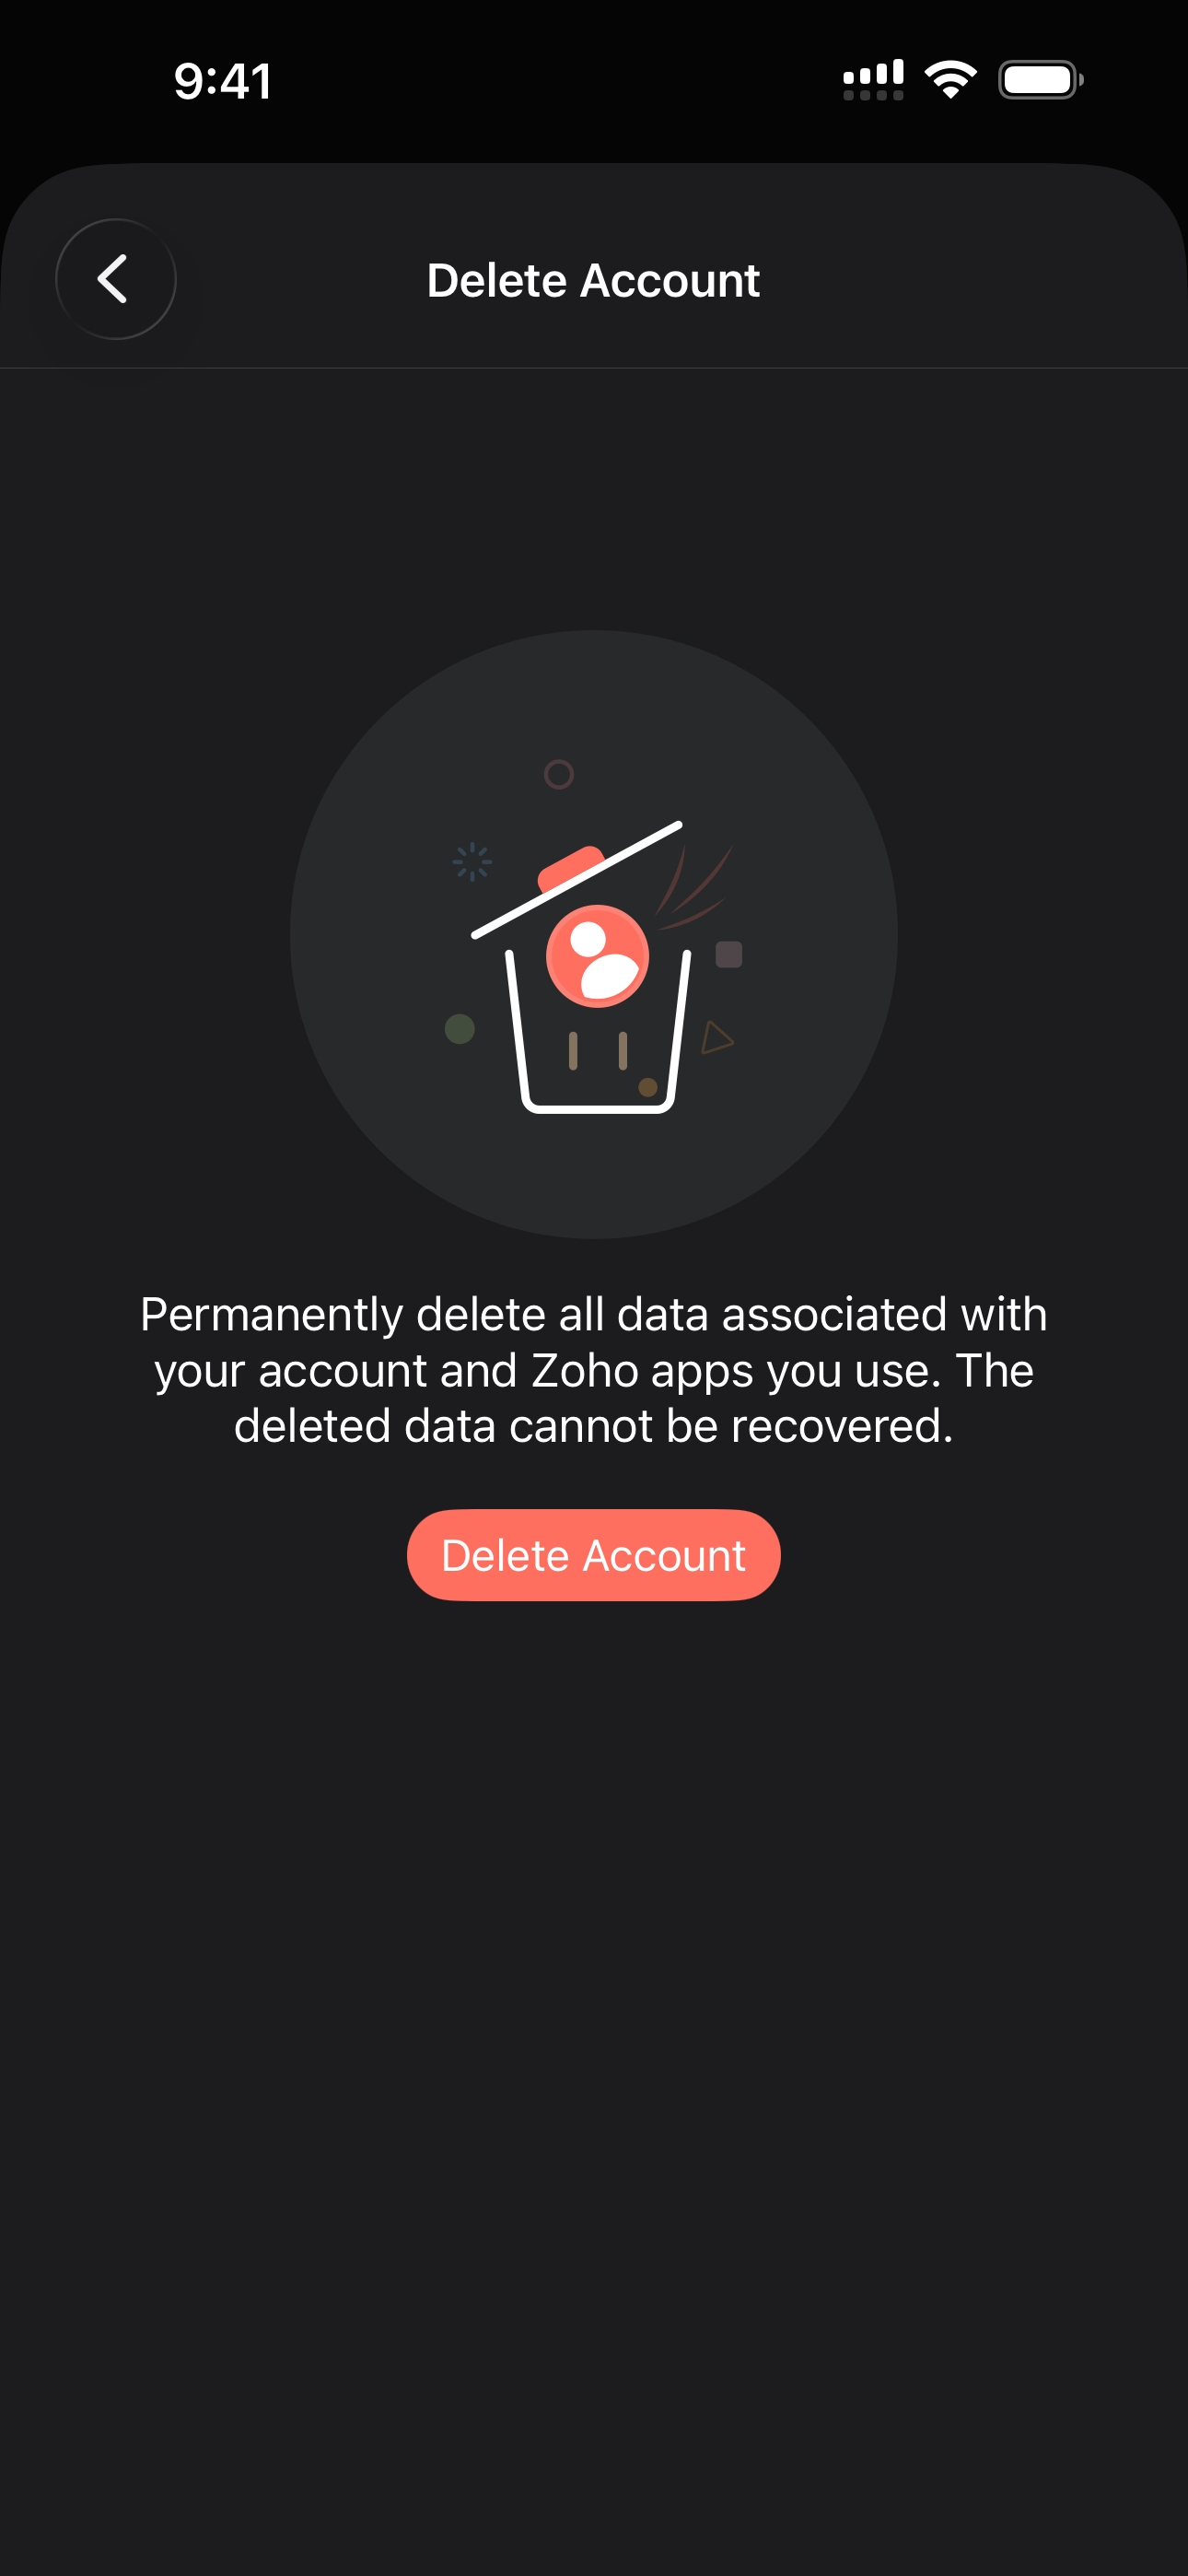
- Click Proceed to delete the account or click Cancel.
Manage multiple accounts
Follow the steps below to switch between your multiple accounts:
- Click the ellipsis icon
 adjacent to the More tab.
 - In the More section, click the caret icon
 to view the list of all your other status page accounts.
 - Click the desired account to switch to it and continue working seamlessly.
- This page also shows your StatusIQ role and time zone.
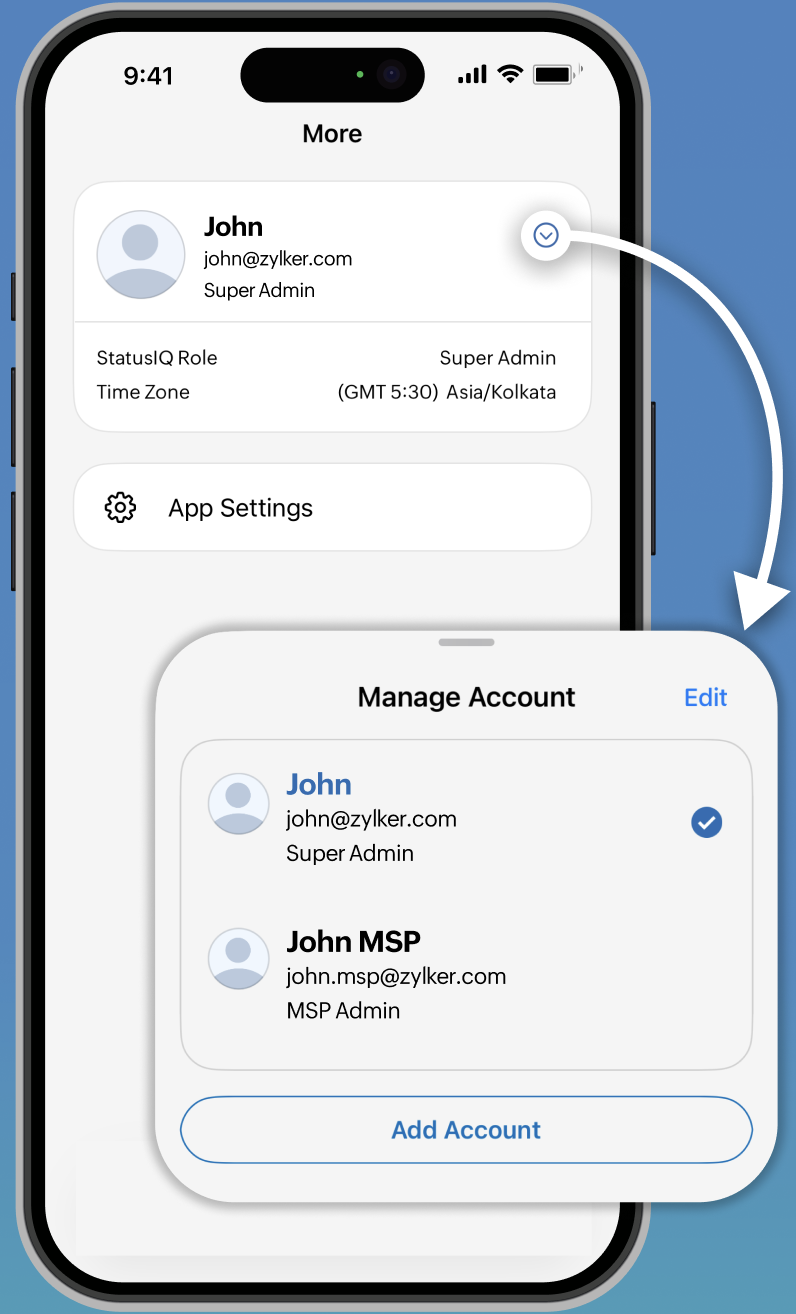
- Additionally, click App Settings, to access Settings.
Signing out of StatusIQ mobile app in iOS devices
To sign out of the StatusIQ mobile app, follow these steps:
- Click on the settings
 icon on the top right corner.
 - Scroll down to the bottom of the page and click on the Log Out button and you will see the following error message:
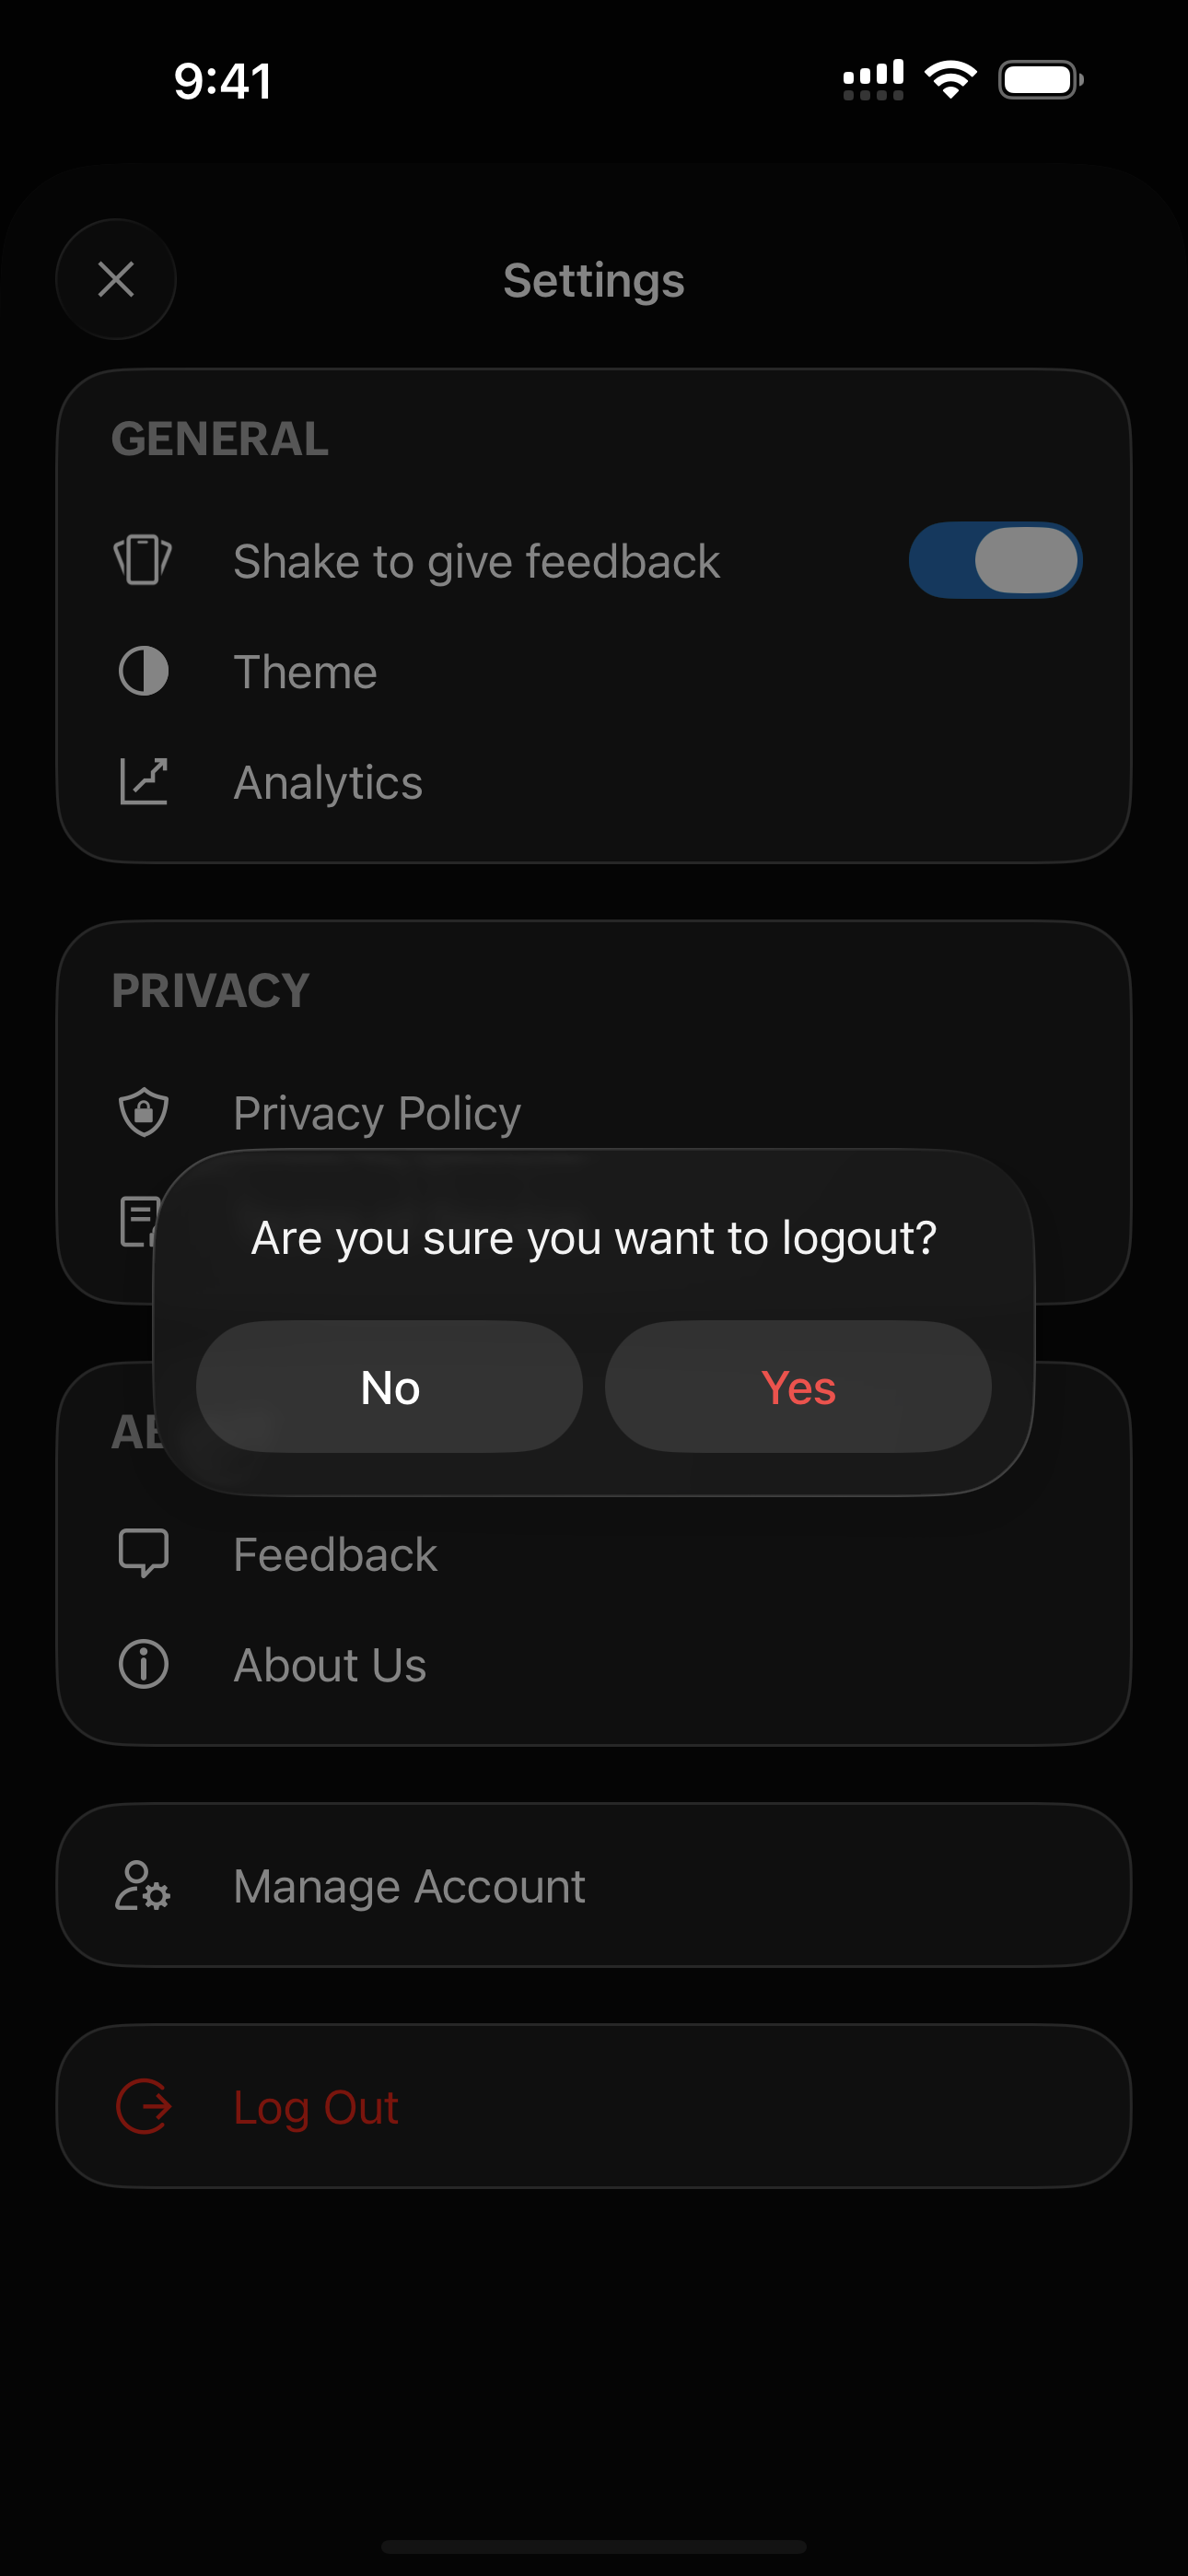
- Click Yes to continue signing out or click No.
MSP and BU accounts
MSP and BU customers can streamline multi-account management and communication through the StatusIQ mobile app. It delivers instant notifications, allowing you to monitor issues, track progress, and keep stakeholders informed—all from your mobile device, without needing a laptop or desktop.
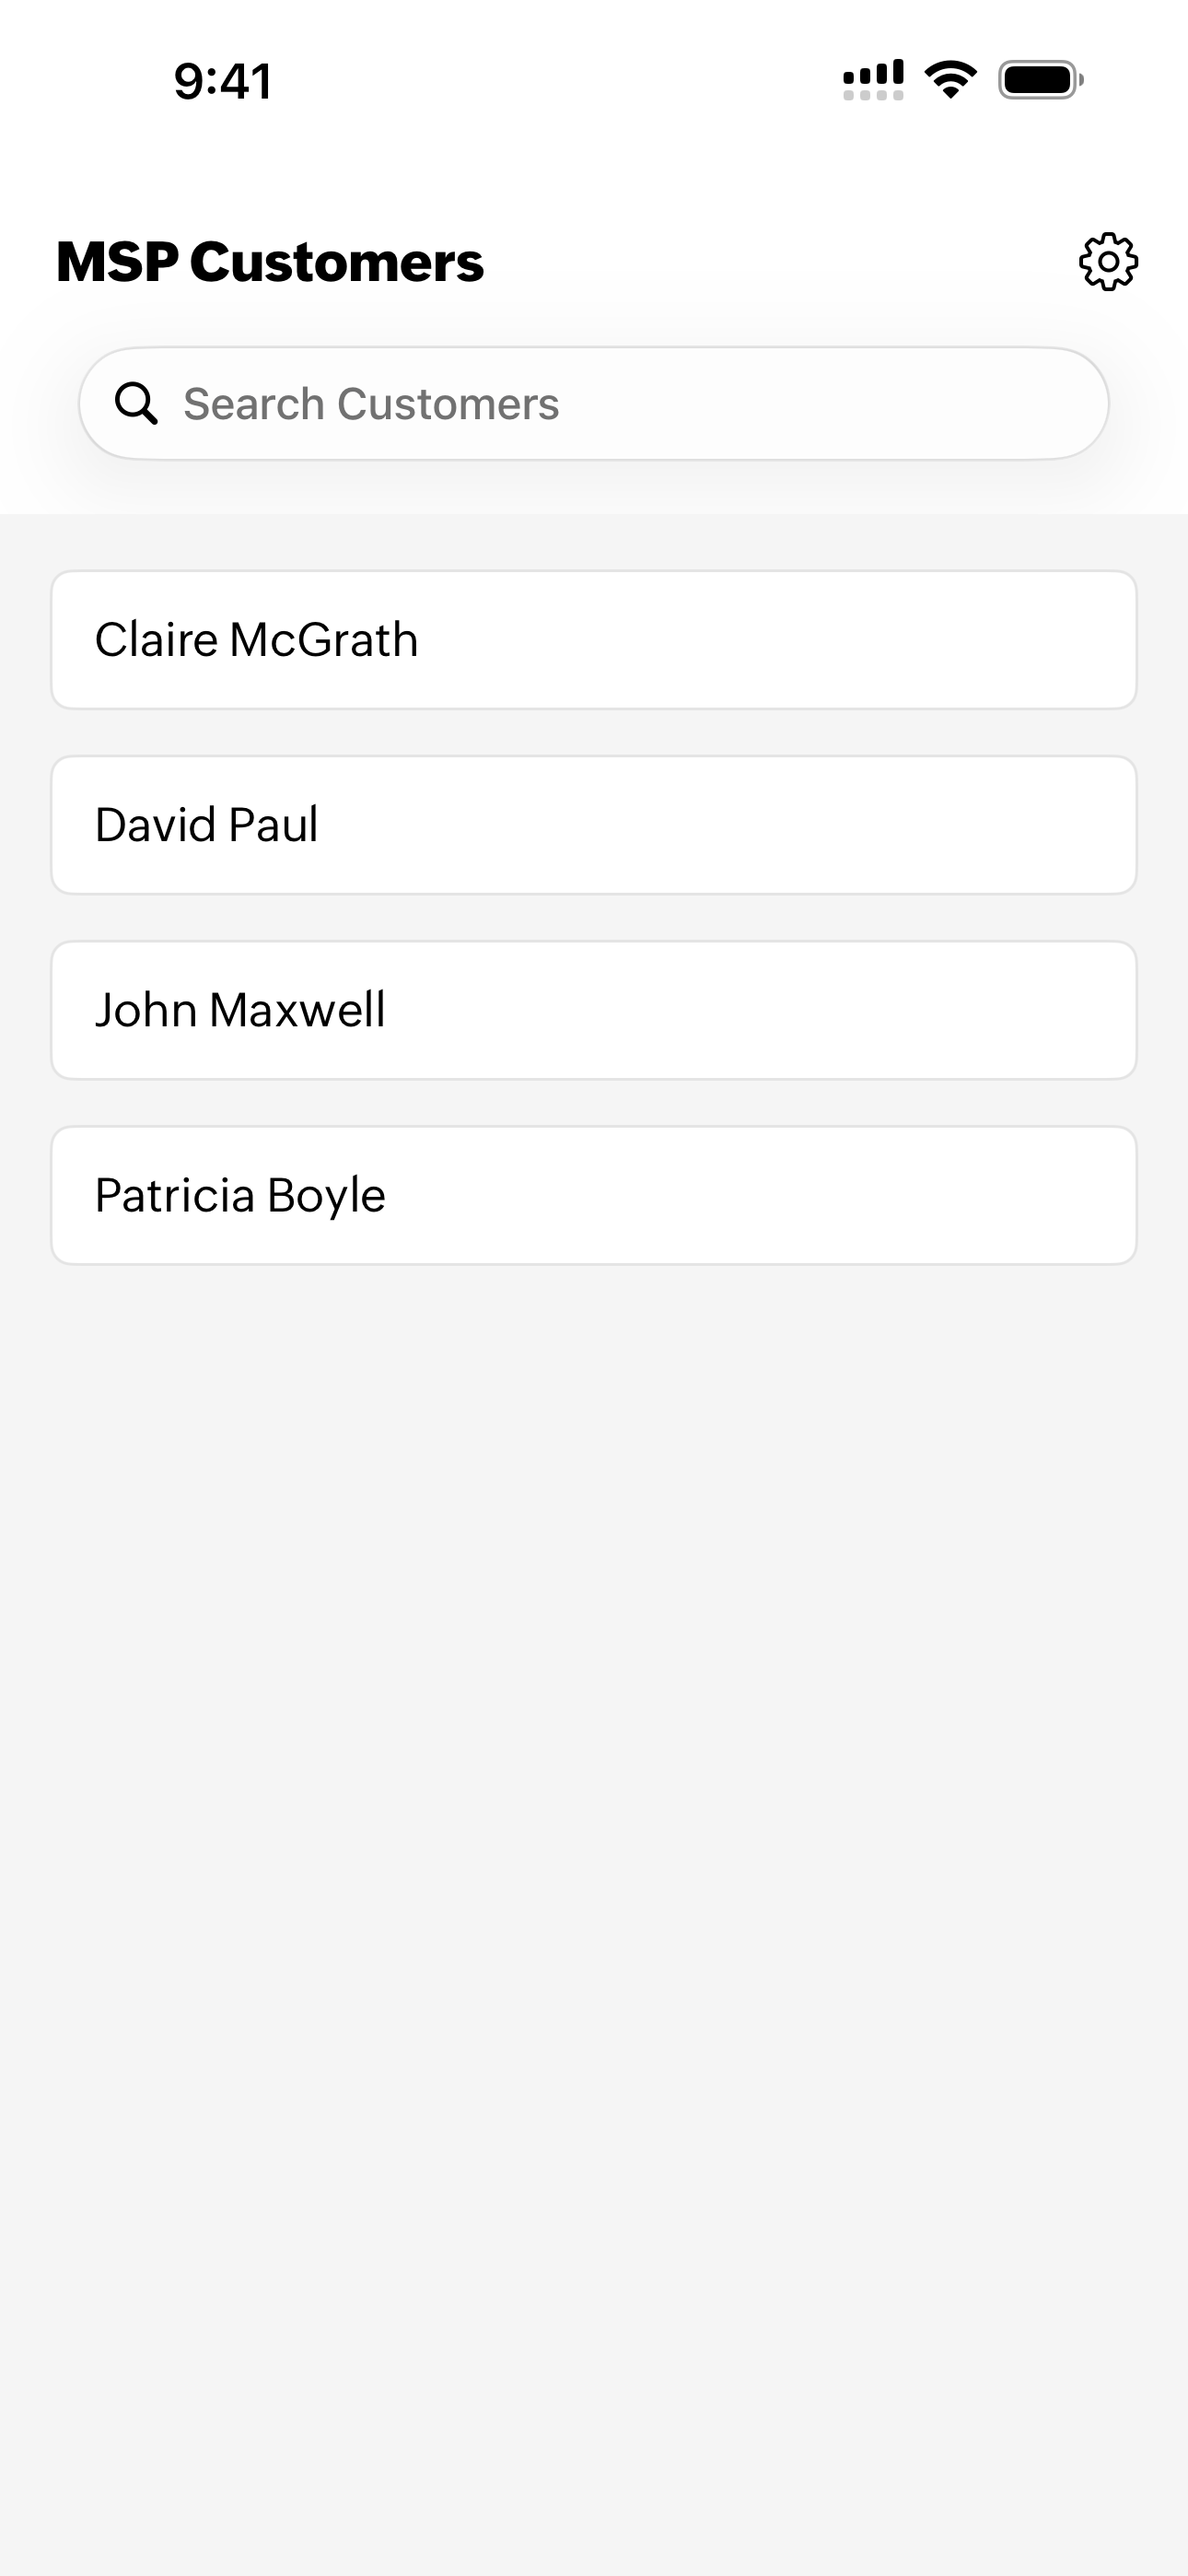
MSP accounts
The StatusIQ mobile app for MSP customers includes a dedicated dashboard as the initial step. All customer accounts are listed under the MSP Customers dashboard, allowing you to select any one of them and access their status page. Once selected, you can access the app’s full functionality, including real-time incident monitoring, status updates, and notifications.
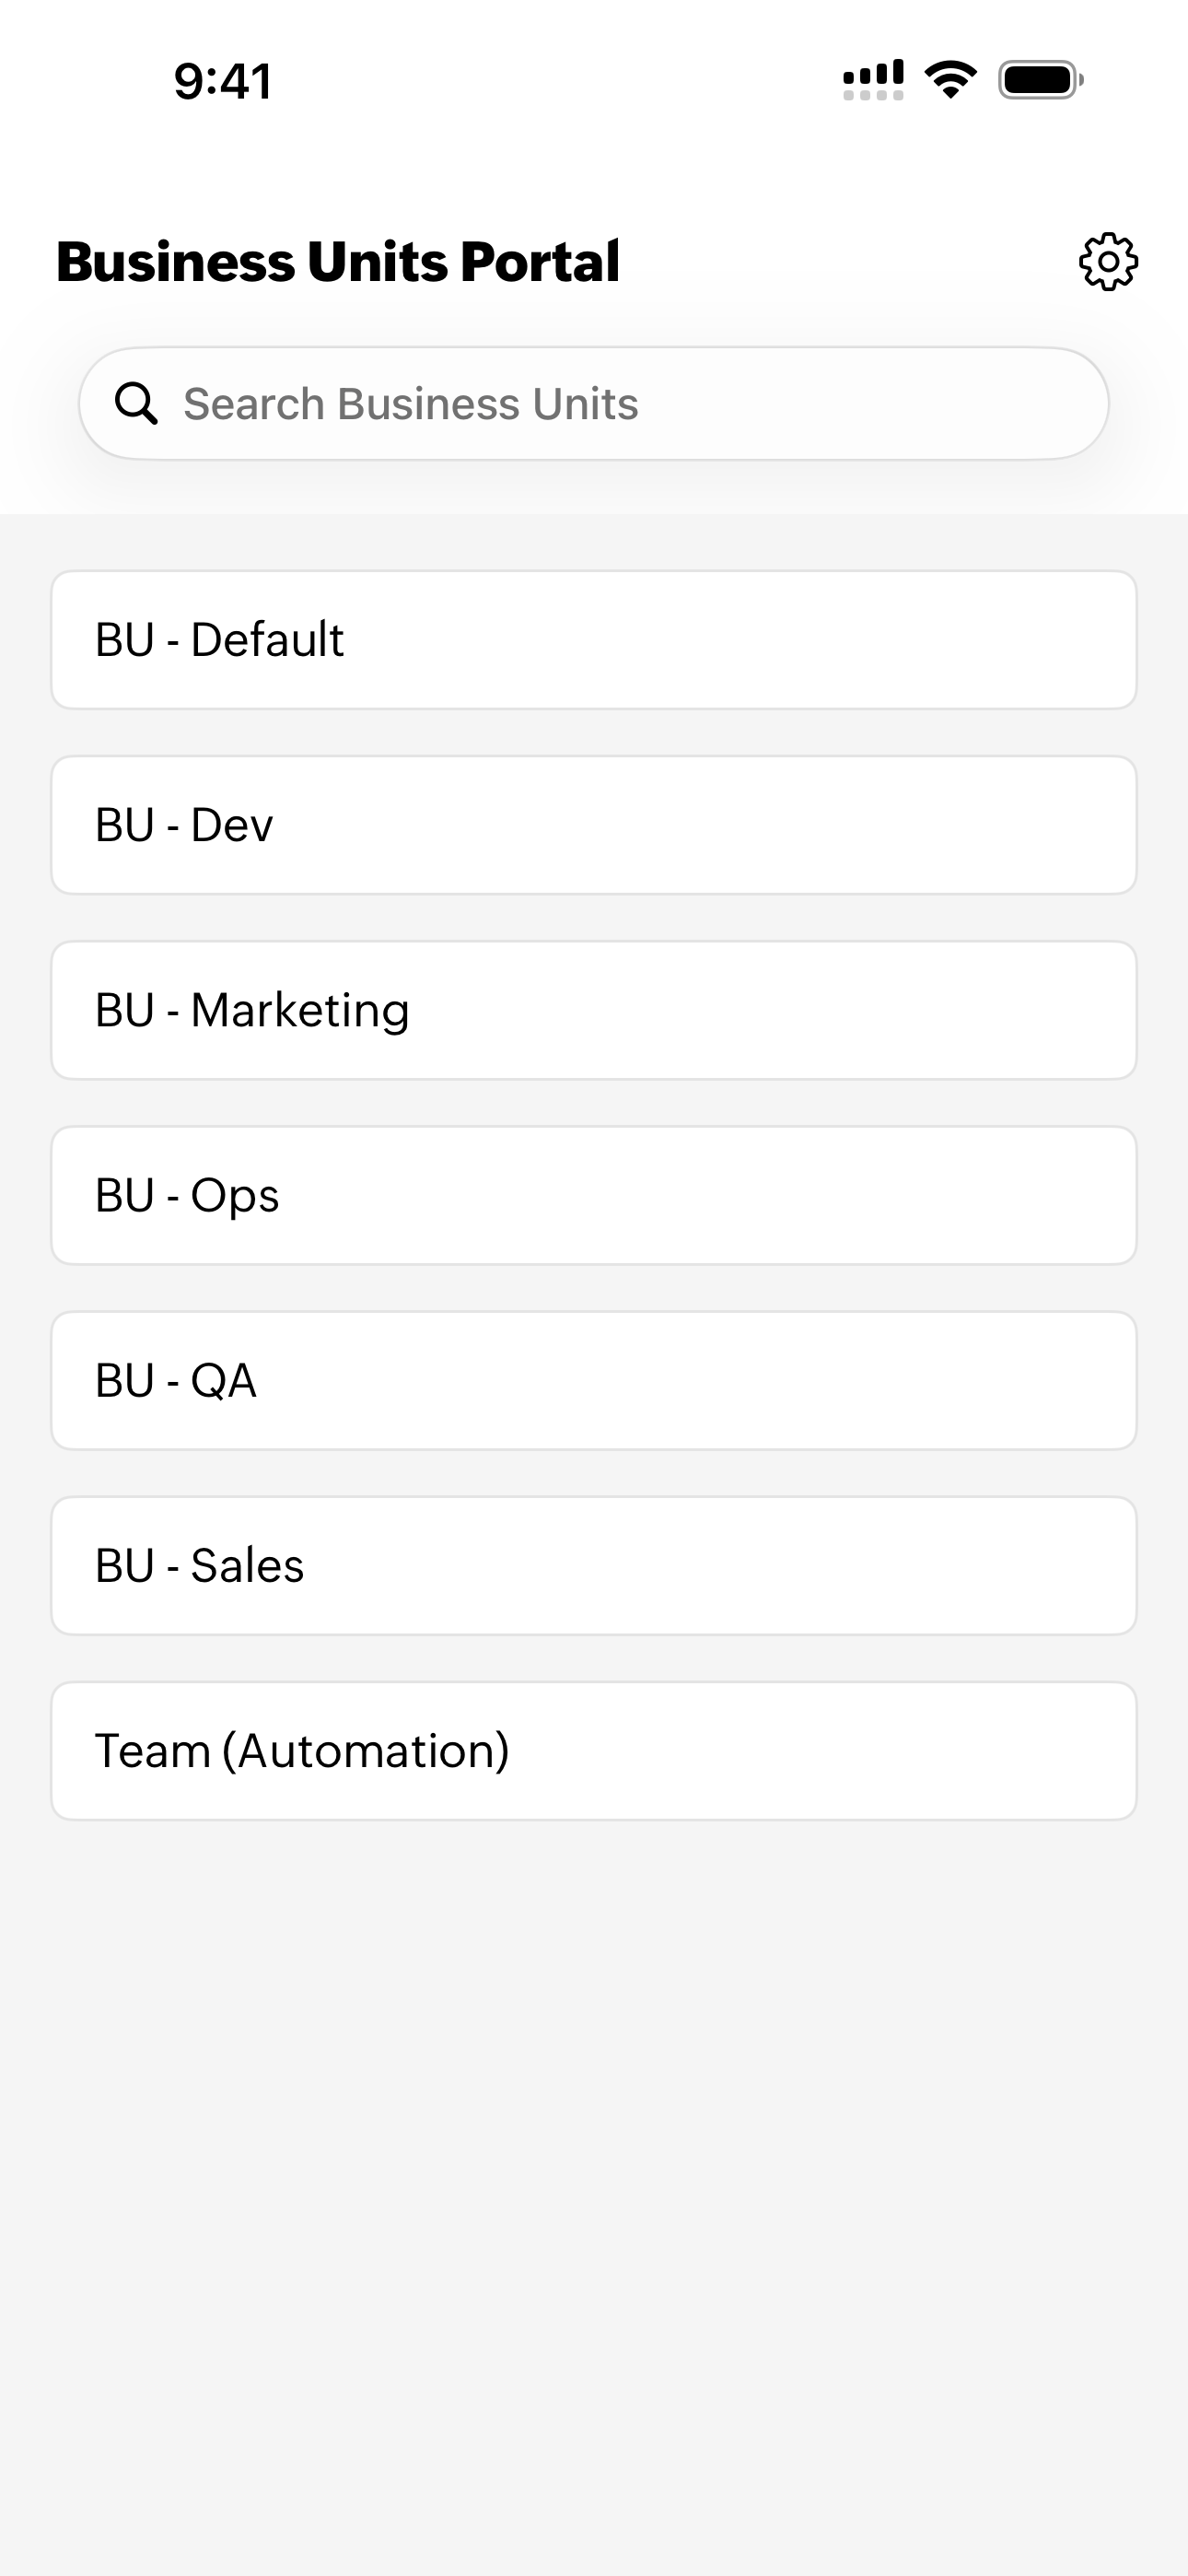
BU accounts
The StatusIQ mobile app for BU customers includes a dedicated dashboard with all portals of your business accounts listed under the Business Units Portal dashboard. You can select any one of them and access their status page to monitor real-time incidents, status updates, and notifications.
Related article
-
On this page
- Benefits of StatusIQ mobile app
- Use cases
- Installing StatusIQ mobile app
- Log in to StatusIQ mobile app
- Incidents
- Create a new incident
- Edit or delete an incident
- Understanding incidents
- Active incidents
- Past incidents
- More actions
- Maintenance
- Settings
- Manage Account
- Manage multiple accounts
- Signing out of StatusIQ mobile app in iOS devices
- MSP and BU accounts