Enable access to your accounts using the Delegated Admin method
For comprehensive AWS infrastructure monitoring, Site24x7 needs to automatically discover all instances of various supported services currently running in your accounts. To enable this, you need to authenticate and authorize Site24x7 to access your resources. You can achieve this by manually creating IAM user roles or cross-account IAM roles. You can also use the AWS CloudFormation template, AWS Control Tower, and AWS IAM Identity Center methods to integrate your AWS accounts with Site24x7.
The Delegated Admin method enables seamless integration of your AWS accounts with Site24x7 by designating a member account as a delegated administrator within your AWS organization. This approach allows the delegated admin account to manage the integration and monitoring of AWS resources across all member accounts, streamlining operations and enhancing security.
While integrating your AWS accounts with Site24x7 using the Delegated Admin method, ensure that you are logged in to the member account designated as the administrator account in AWS during this workflow. The StackSet must be run from the delegated admin account for seamless account integration.
Use cases
- Consider that you have multiple AWS accounts and want to monitor their resources centrally. By designating a member account as a delegated admin, you can integrate all AWS accounts with Site24x7, allowing for unified monitoring and management.
- Imagine that you are a growing organization that frequently adds new AWS accounts and needs a streamlined process for integration and monitoring. Using the Register with Delegated Admin method, you can quickly integrate new AWS accounts that you wish to monitor with Site24x7, ensuring consistent monitoring.
Prerequisites
Make sure you have the following before you begin:
- A delegated admin account
- The following permissions for the CloudFormation stack to create the resources that are required for discovery:
- "iam:AttachRolePolicy"
- "iam:CreatePolicy"
- "iam:CreateRole"
- "iam:PassRole"
- "iam:GetRole"
- "lambda:AddPermission"
- "lambda:CreateFunction"
- "lambda:GetFunction"
- "lambda:InvokeFunction"
- "logs:CreateLogGroup"
- "logs:DescribeLogGroups"
- "cloudformation:CreateStackSet"
- "cloudformation:DescribeStackSet*"
- "cloudformation:ListStackSet*"
- "cloudformation:CreateStackInstances"
- "cloudformation:ListStackInstances"
- "cloudformation:DeleteStackInstances"
- "cloudformation:DeleteStackSet"
- "organizations:ListAccounts"
- "organizations:ListAccountsForParent"
- "organizations:ListChildren"
- "sts:GetCallerIdentity"
Benefits of using the Delegated Admin method for integration
You gain the following benefits by integrating your AWS accounts with Site24x7 using the Delegated Admin method:
- Centralized management: Assigning a delegated admin account facilitates centralized oversight of AWS resources across multiple accounts, simplifying monitoring and management tasks.
- Enhanced security: By minimizing the need for direct access to the AWS management account, the Delegated Admin method reduces potential security risks associated with broad access privileges.
- Scalability: This method allows for efficient scaling by enabling the delegated admin account to integrate and monitor new AWS accounts as they are added to the organization.
- Improved governance and compliance: The Delegated Admin method helps organizations enforce governance and compliance standards across all AWS accounts under the delegated admin account. This approach simplifies compliance reporting and audit-readiness while reducing manual oversight efforts.
How to set up a delegated admin account
When you assign a member account as a delegated administrator, users and roles from that account can manage AWS CloudFormation StackSets without needing access to the organization's management account. This allows you to keep organizational management separate from StackSets administration, improving security and control.
If you do not have a delegated admin account already set up, follow the steps below to register one:
- Sign in to AWS as an administrator of the management account and open the AWS CloudFormation console.
- From the navigation pane, select StackSets.
- Under Delegated administrators, select Register delegated administrator.
- In the Register delegated administrator dialog box, select Register delegated administrator.
A success message will indicate that the member account has been registered successfully as a delegated administrator.
Integrate your AWS accounts with Site24x7 using the Delegated Admin method
To integrate all your AWS accounts with Site24x7 using the Delegated Admin method, follow the steps below:
- Log in to the Site24x7 web console.
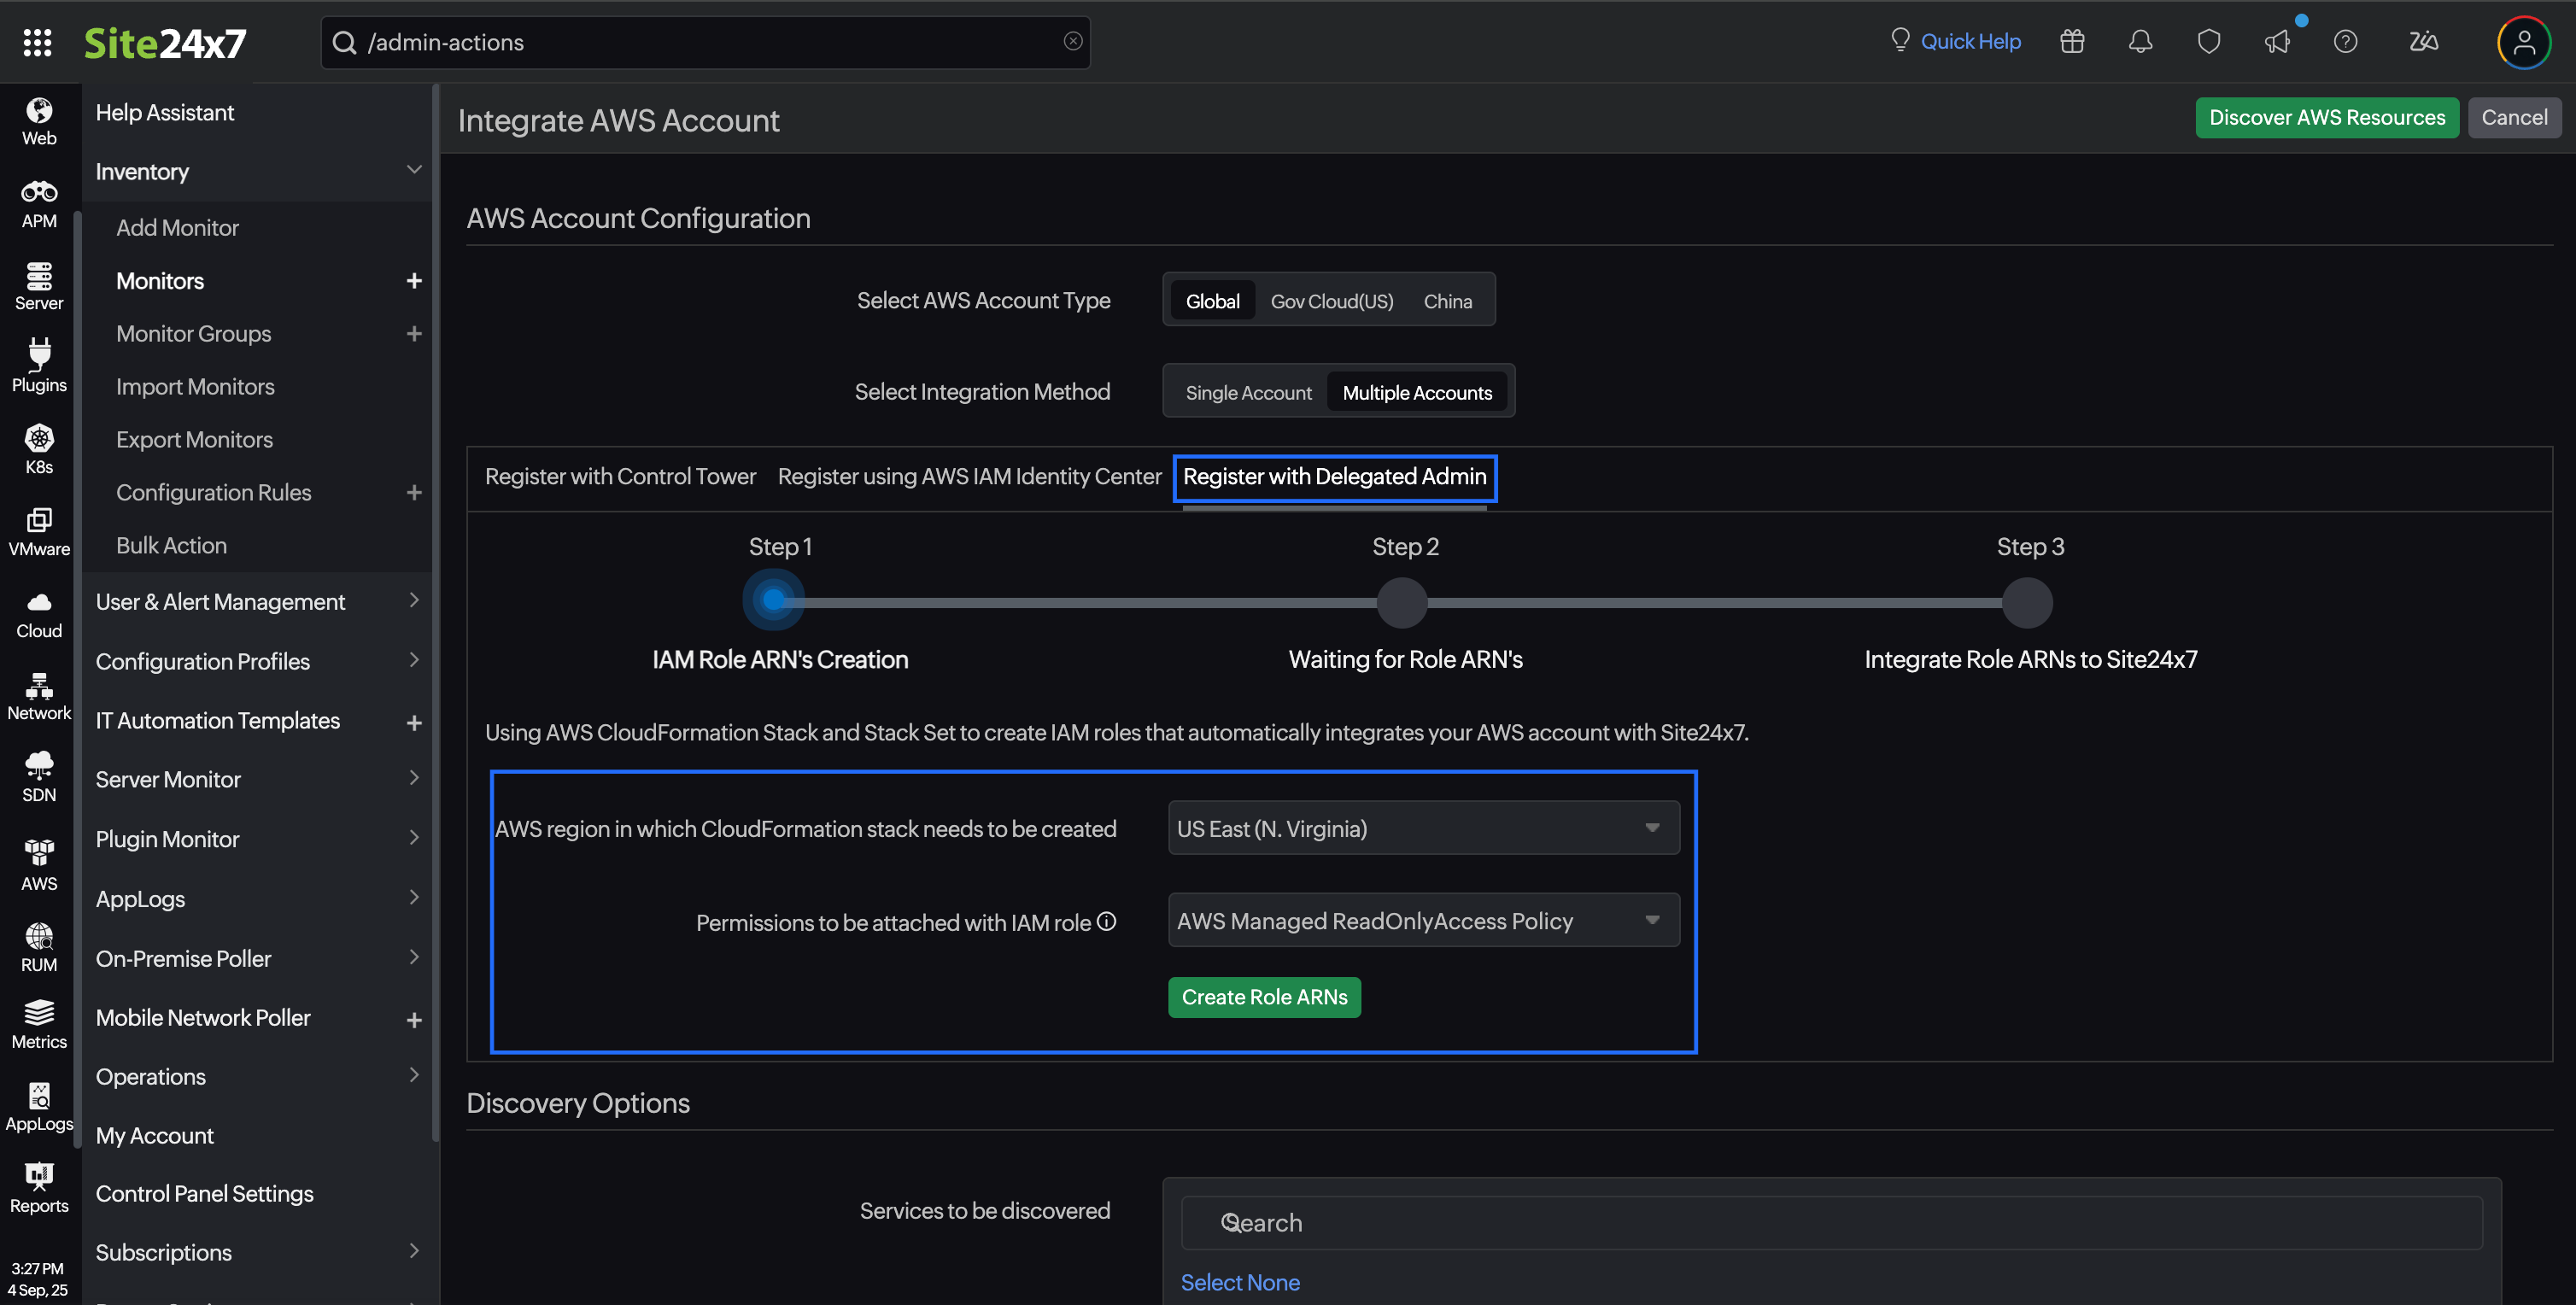
- Go to Cloud > AWS > Integrate AWS Account.
- Select the AWS Account Type. The available options are Global, Gov Cloud (US), and China.
- Select Multiple Accounts as the integration method.
- Select Register with Delegated Admin.

- Select the AWS region in which CloudFormation stack needs to be created.
- Select the preferred Permissions to be attached with IAM role. Site24x7 provides two options for IAM role permissions:
- AWS Managed ReadOnlyAccess Policy: The IAM role will be created with the ReadOnlyAccess policy, which is managed by AWS for all services.
- Site24x7 Custom Policy: The IAM role will be created with the in-line policy formulated with the read-only permissions required for Site24x7-supported services. Learn more.
- Click Create Role ARNs. The CloudFormation stack in your account will automatically create all the necessary components in your account. Learn more.
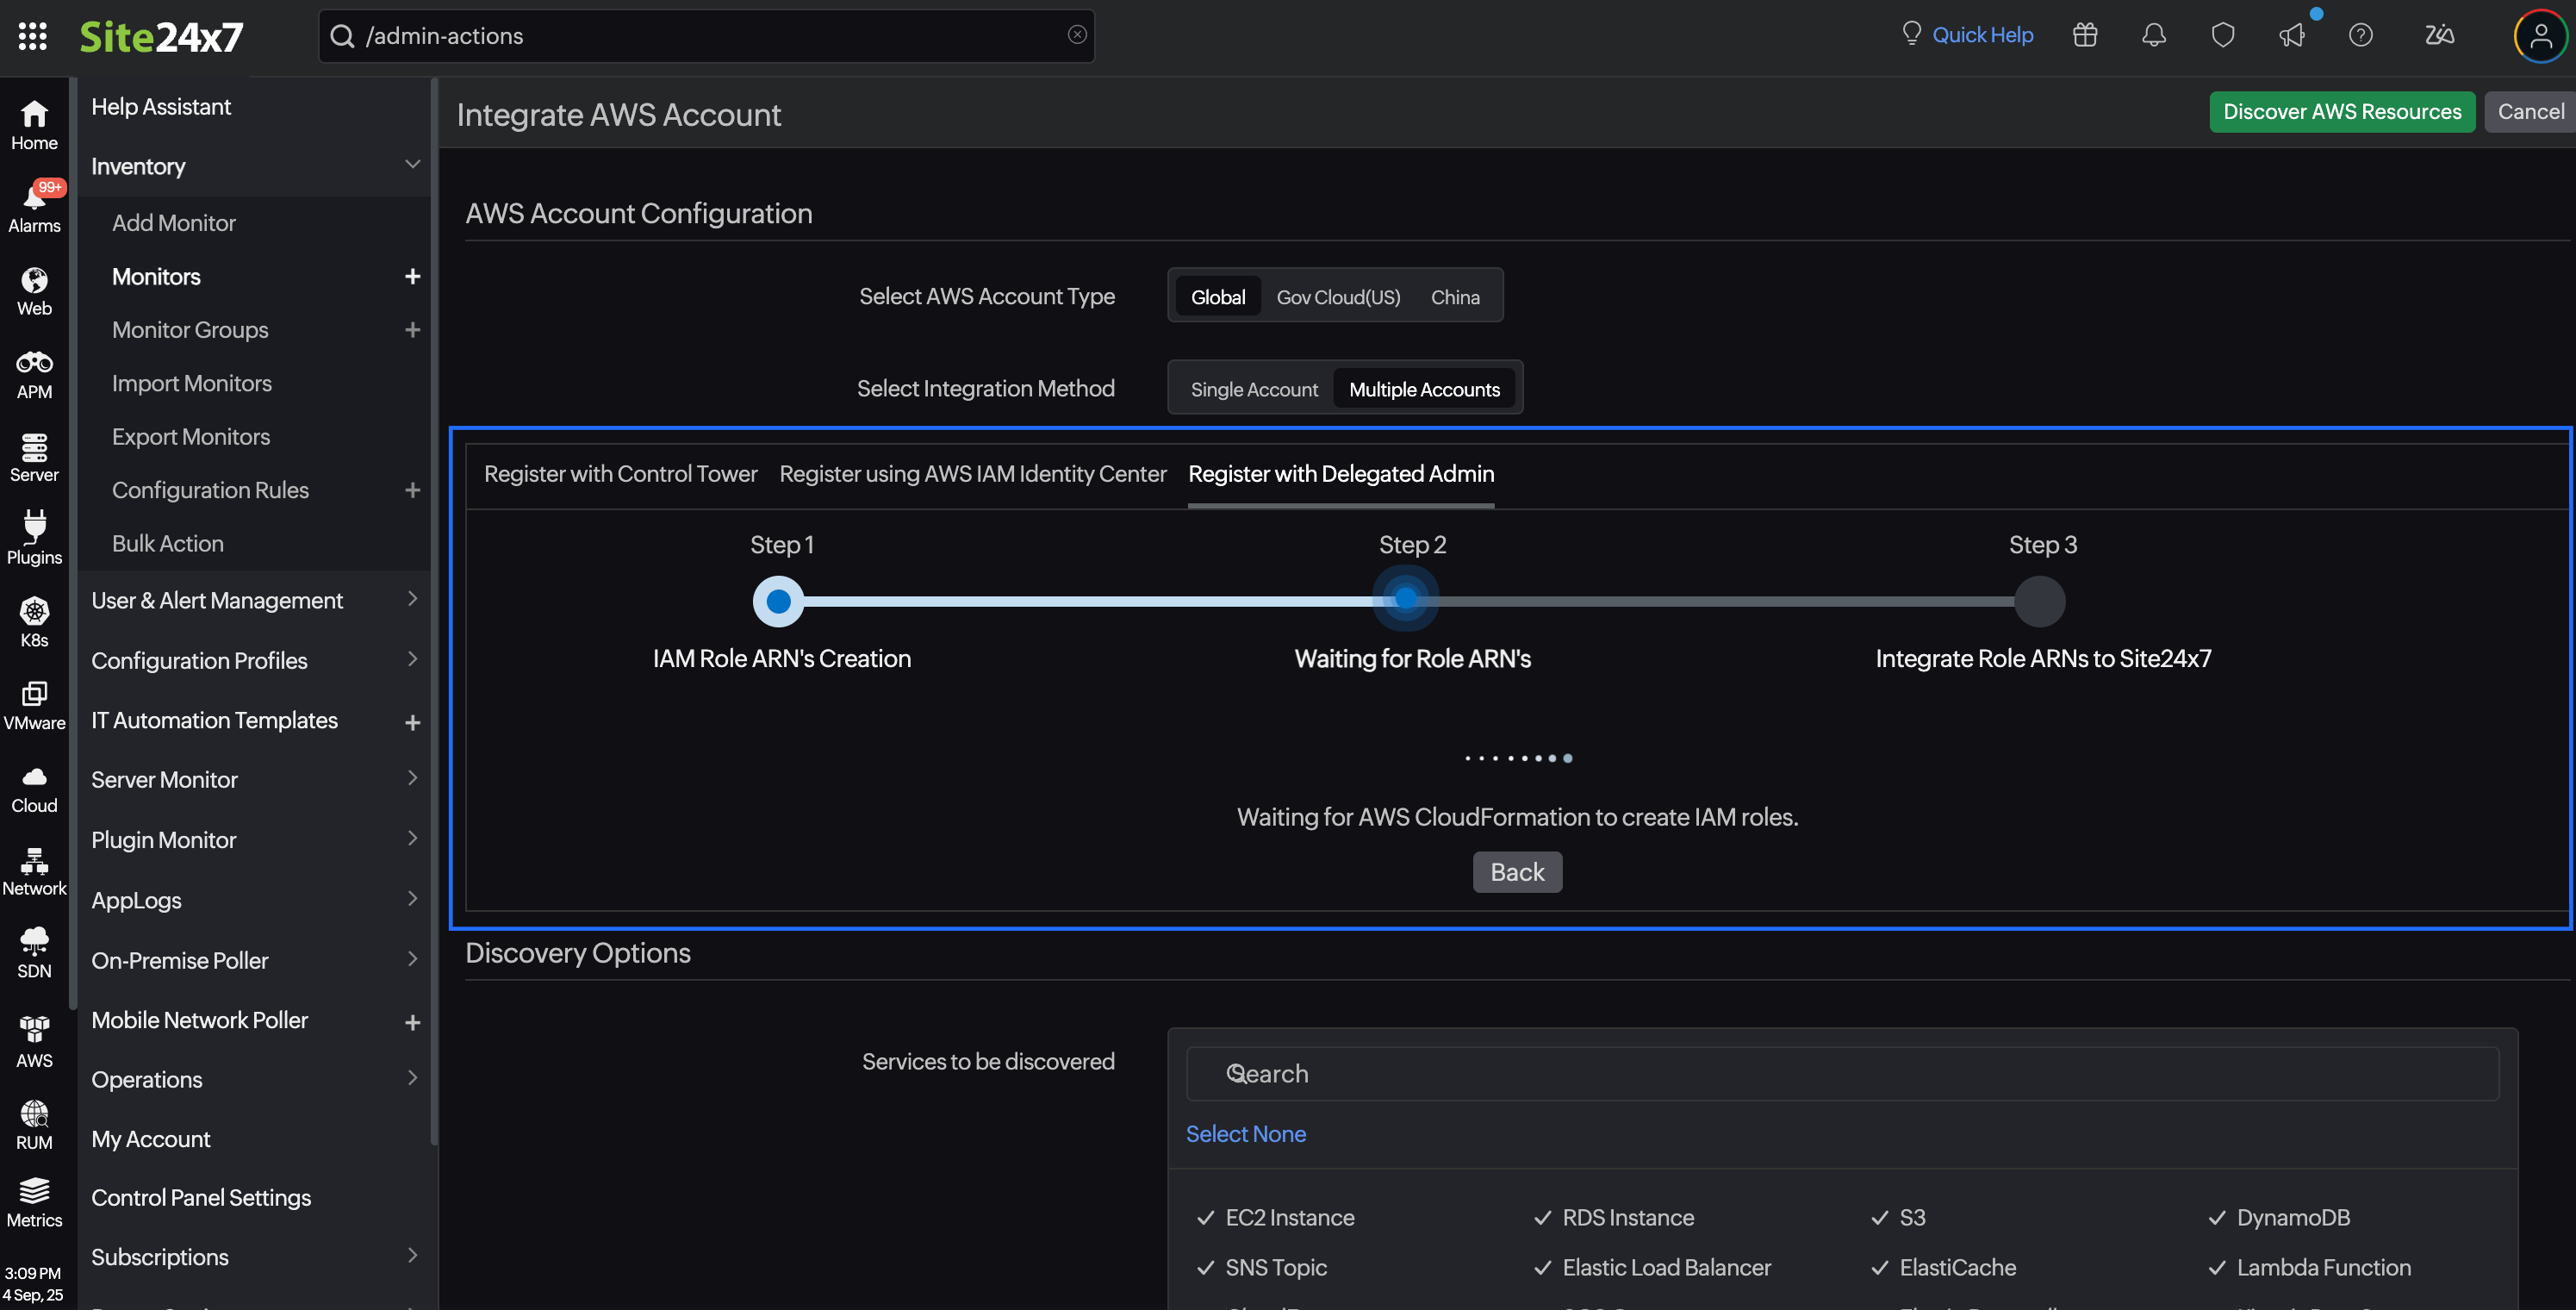
After creating the IAM role, the CloudFormation stack and stack sets will send the role ARNs to Site24x7 via the Lambda function.

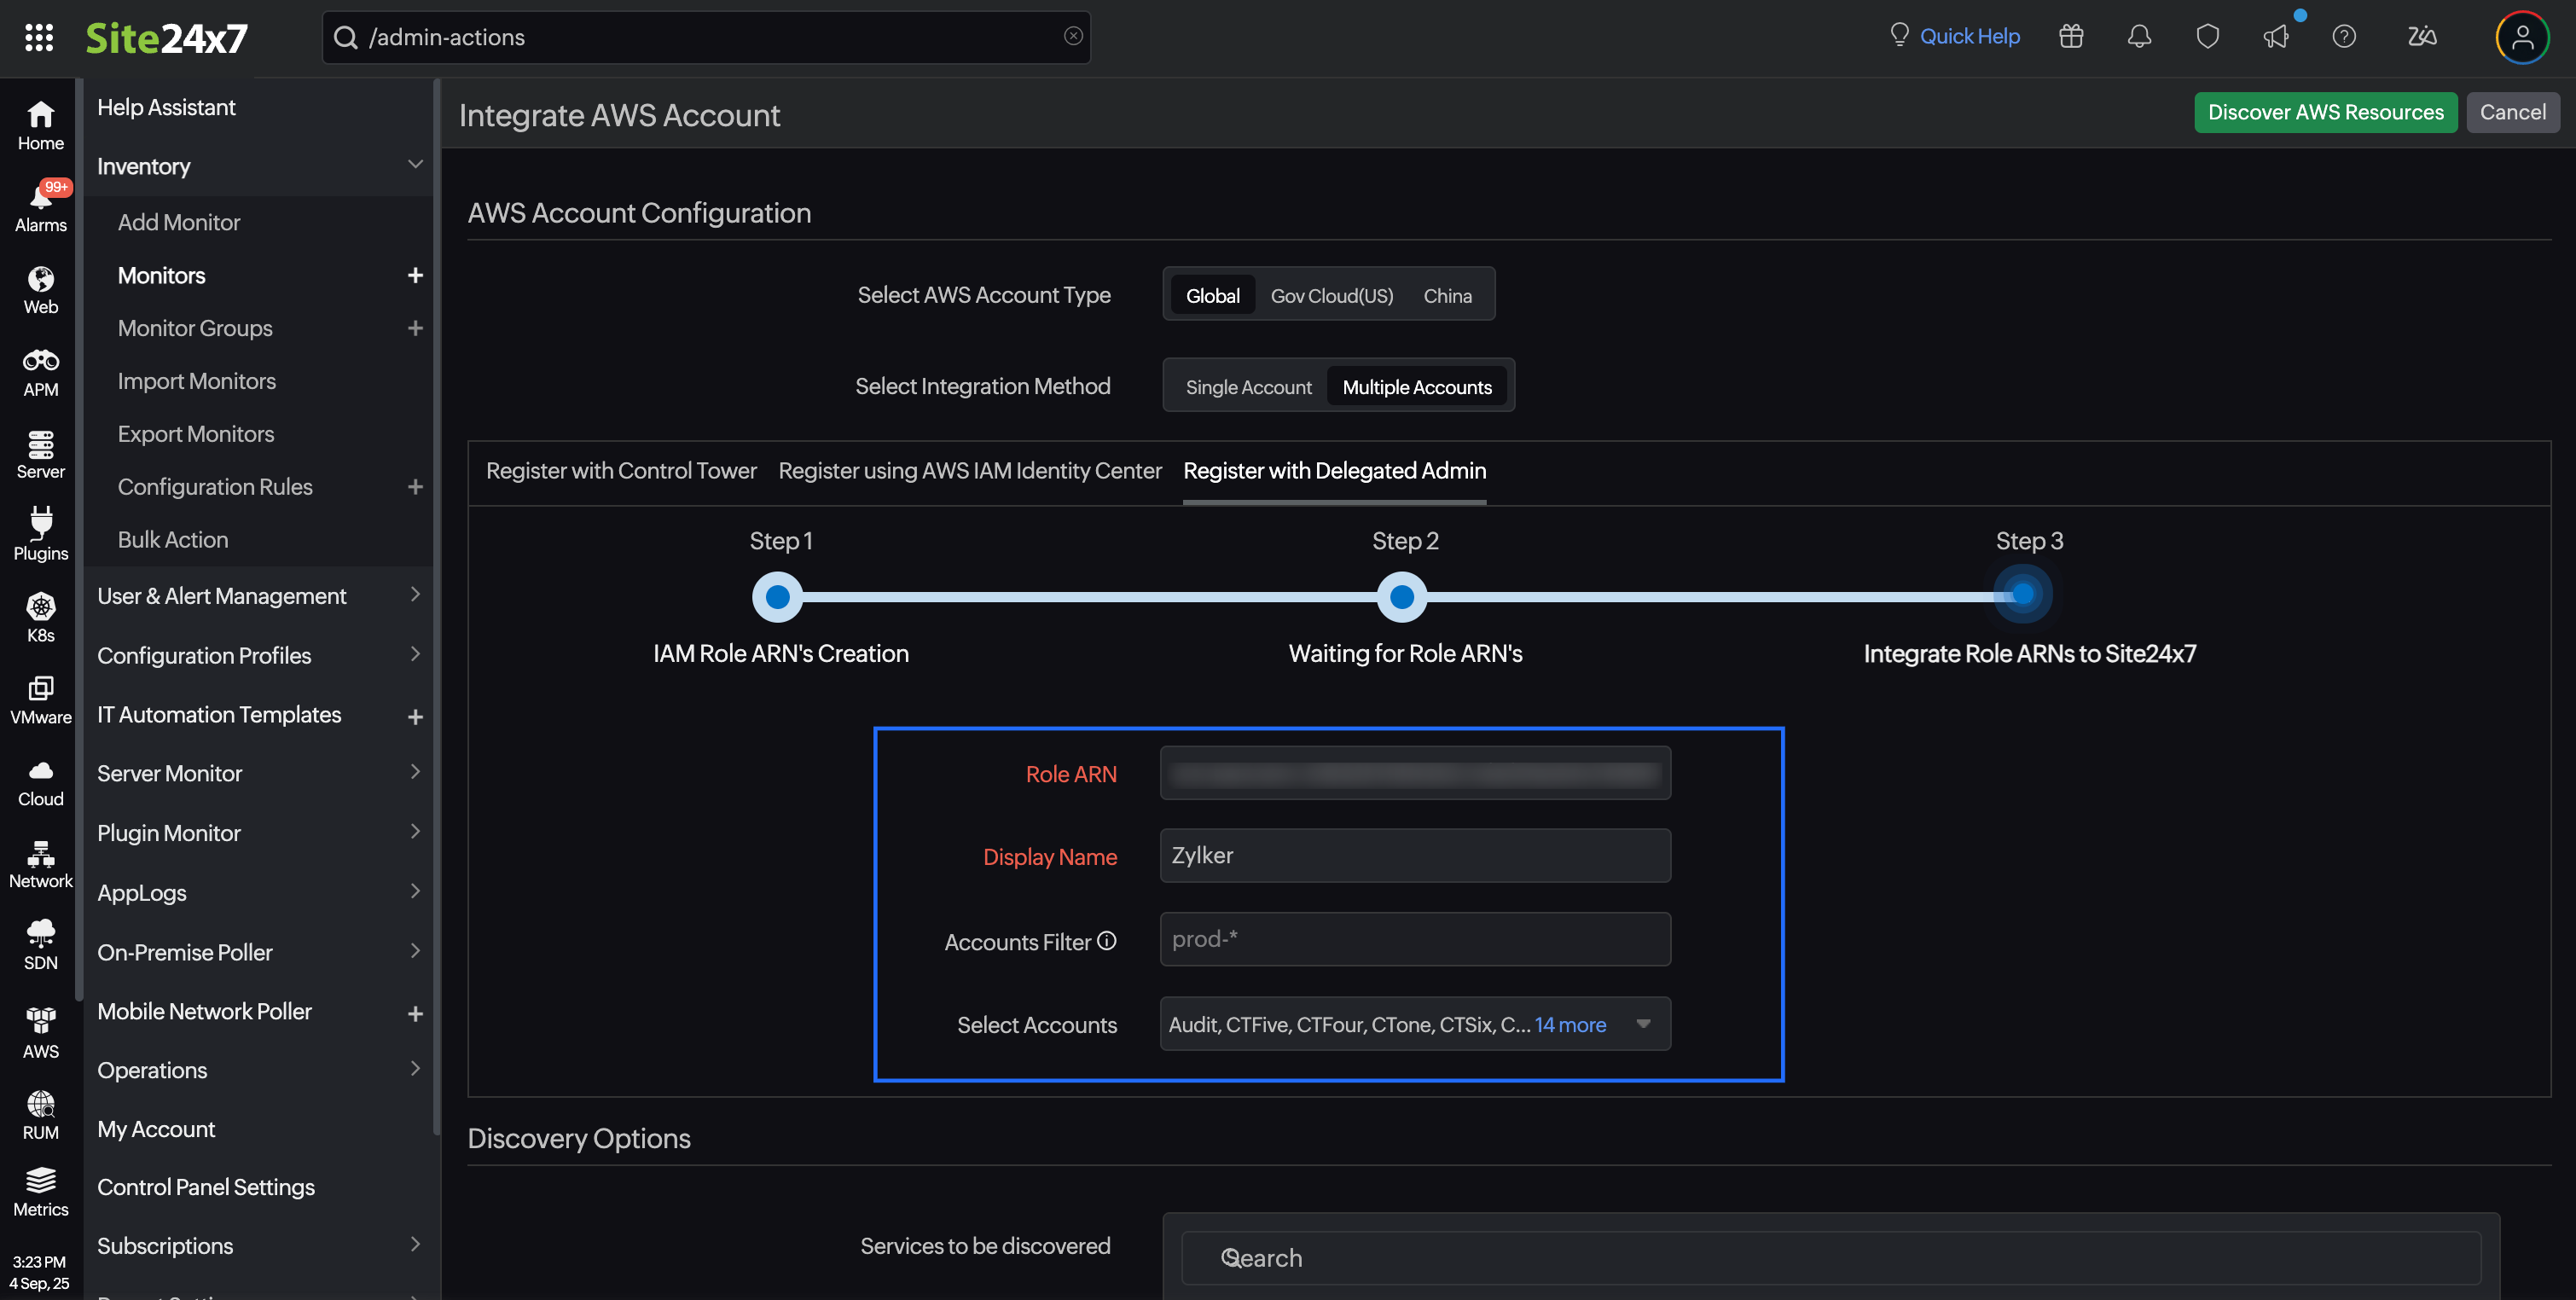
- Enter the Display Name.
- Enter the regular expression to be filtered in the Accounts Filter field or select the accounts to be integrated from the Select Accounts list.

- Once the role ARN details are fetched, you can configure settings (such as the default threshold profiles for each supported AWS service), mute resource termination alerts, and customize the Guidance Report using the Advanced Configuration options.
- Choose the services you wish to integrate with Site24x7 from the Services to be discovered list in the Discovery Options section. You can view all the integrated accounts inside the management account integrated with Site24x7.
- Click Discover AWS Resources to add the accounts.
Once your AWS account is integrated with Site24x7 using the Delegated Admin method, you can view all the Delegated Admin Accounts under Cloud > AWS > Delegated Admin Accounts. Click Schedule Report to generate the Delegated Admin Accounts Report, which contains the Delegated Admin Account details in CSV format.
All the accounts linked to the Delegated Admin parent account will be listed on the Delegated Admin Linked Accounts page under Cloud > AWS > Linked Accounts. Click Schedule Report to generate the Delegated Admin Linked Accounts Report, which contains the Delegated Admin linked account details in CSV format.
-
- If you delete a Delegated Admin parent account, all the Delegated Admin linked accounts will also be deleted.
- If you modify the existing configuration of a Delegated Admin parent account, then the existing configurations of the Delegated Admin linked accounts will be overwritten as well.
- If you modify the configuration of any individual Delegated Admin linked account, then the changes will be reflected only in the linked account and will not affect the Delegated Admin parent account or any other linked accounts.
- If the Automatically Remove Suspended Accounts option is enabled under Integrate AWS Account > Advanced Configuration, all the closed AWS accounts will be permanently removed from Site24x7.
Delegated Admin Inventory Dashboard and Custom Dashboard
The Delegated Admin Inventory Dashboard provides a centralized view of all your Delegated Admin parent and linked account resources. It offers insights into monitored resources, a resource breakdown by region, and key metrics to help you efficiently manage your AWS environment.
To view the Delegated Admin parent account details, go to the Inventory Dashboard and toggle to the Parent Account option in the top-right corner to view data for resources discovered in the parent account. To access the combined data for all resources discovered through the Delegated Admin integration, toggle the option to Linked Accounts.
The Geo Map widget on the Custom Dashboard provides a regional breakdown of resources for your Delegated Admin parent and linked accounts. You can choose to view the region map or the numerical data of the resources from a region.
The Monitor Count widget on the Custom Dashboard displays the total monitor count for all Delegated Admin Accounts. It shows:
- The total number of monitored resources for both parent and linked accounts.
- A numerical split-up of the region-based service count.
- The region-based service distribution in a table format with a numerical option.
- A vertical bar chart option, allowing you to visualize how different AWS services have been operating over a selected time range.
Migrating Control Tower Accounts to the Delegated Admin
If you have already integrated your AWS accounts with Site24x7 using the Control Tower method, you can seamlessly migrate all your active linked Control Tower Accounts to the Delegated Admin Account.
Suppose you previously integrated five AWS accounts with Site24x7 using the Control Tower method. Instead of managing them through the Control Tower Account, you now want to delegate this responsibility to a specific member account. By migrating them to the Delegated Admin Account, all configurations from the selected Control Tower Account, along with its linked accounts, will be transferred to the Delegated Admin Account, ensuring a seamless transition.
To migrate the Control Tower Account to the Delegated Admin Account:
- Go to the desired Control Tower Account.
- Click Edit.
- On the Edit Integrated AWS Account page, select Register with Delegated Admin.
- Click Create Role ARNs. The CloudFormation stack in your account will automatically create all the necessary components in your Delegated Admin Account. Learn more.
After creating the IAM role, the CloudFormation stack and stack sets will send the role ARNs to Site24x7 via the Lambda function. - Enter the Display Name if required.
- Click Save.
Once you click Save, all the configurations in the selected Control Tower Account, along with the linked accounts, will be migrated to the Delegated Admin Account.
-
On this page
- Use cases
- Prerequisites
- Benefits of using the Delegated Admin method for integration
- How to set up a delegated admin account
- Integrate your AWS accounts with Site24x7 using the Delegated Admin method
- Delegated Admin Inventory Dashboard and Custom Dashboard
- Migrating Control Tower Accounts to the Delegated Admin
