ManageEngine ServiceDesk Plus On-Premise Integration
ManageEngine ServiceDesk Plus (SDP) On-Premise is a web-based Help Desk and Asset Management software built on the ITIL framework. Site24x7 tightly integrates with ServiceDesk Plus to manually/automatically log tickets for specific alerts. Any down/trouble alerts from Site24x7 are converted into tickets in SDP portal. Whenever the incidents are resolved in Site24x7, tickets are automatically closed in your SDP portal. You can even track and manage IT tickets efficiently by designating them to technicians, thus, helping you resolve issues much faster.
Prerequisites
- You must have SDP installed on your network. Learn more about SDP installation.
- Site24x7’s integration with ServiceDesk Plus (SDP) requires you to have an On-Premise Poller installed on your network from where it can reach SDP. On-Premise Poller helps you to post alarms to SDP from the cloud.
NoteOn-Premise Poller helps in monitoring your internal network and resources like URLs and network devices behind the firewall. This software is near zero maintenance and firewall friendly. It can also act as a private monitoring station complementing Site24x7's 130+ global locations.
- You must either have a Super Admin or an Admin role in your Zoho Organization account inorder to setup this integration in your Site24x7 account.
- Once your SDP application is setup, login to the application account using the Technician login credentials. Follow the steps below to generate your SDP Technician Key:
- Access your SDP account using the user credentials.
- Once you're logged into SDP Portal, generate the unique Technician Key by following the steps listed here.
NoteTechnician Key is a secure alphanumeric identifier that can only be generated after you login into your SDP account. It's a unique identifier used for verifying your account during an API invocation. Learn more about SDP Technician Key generation.
Integration Procedures
To connect your Site24x7 account to SDP On-Premise, follow the steps below:
- Log in to Site24x7.
- Navigate to Admin > Third Party Integration.
- Choose ManageEngine ServiceDesk Plus from the list.
NoteYou'll see a prompt to install On-Premise Poller in your network.
- If you've On-Premise Pollers installed in your account, you'll be redirected to the SDP integration page. Update the integration form as follows:
- Integration Name: Specify a name for your SDP Integration.
- Choose Poller Type: Determine how the alert notifications for this integration must be routed. You have two options for routing alerts through your on-premises monitoring setup:
- On-Premise Poller: Select this option if you want to send alerts through a single, dedicated On-Premise Poller. Alerts will be routed through the selected poller only. Pick a preconfigured On-Premise Poller from the dropdown from where it can reach your configured SDP. Learn more about the On-Premise Poller.
Note
Learn how to install an On-Premise Poller.
- On-Premise Poller Group: Choose this option to assign a group of pollers instead of a single one. Learn more about On-Premise Poller Groups.
NoteAll pollers in the poller group, as well as those in the high availability poller configuration (both primary and standby), must be reachable for the third-party service (the on-premises version of ServiceDesk Plus or ServiceDesk Plus MSP).
- On-Premise Poller: Select this option if you want to send alerts through a single, dedicated On-Premise Poller. Alerts will be routed through the selected poller only. Pick a preconfigured On-Premise Poller from the dropdown from where it can reach your configured SDP. Learn more about the On-Premise Poller.
- ServiceDesk Plus On-Premise URL: Specify the name of the server and port number where ServiceDesk Plus is running
- Technician Key: Copy the SDP On-Premise Technician Key that you had generated in the SDP portal and paste it in this field.
- Template Name: In ServiceDesk Plus, there are predefined incident formats called as Templates. You can provide the Template Name from ServiceDesk Plus Cloud in this field. If not, the default name, Default Request, will be used as the Template Name. To obtain the Template Name, log in to your ServiceDesk Plus Cloud account and navigate to New Request > Service Catalog > Incident Templates.
- Request Subject: Use the $ tags to customize the subject line of your alert ticket. Use the Incident and Custom Parameters to customize the subject.
- Select Integration Level: You can post alerts to ServiceDesk Plus On-Premise from specific Monitors, all monitors/monitor groups associated to selected Tags, monitors associated with the selected Monitor Groups, or All Monitors in your account. It is set to All Monitors by default. Hence, it translates into a Global Integration where all alarms from your Site24x7 account are pushed to ServiceDesk Plus On-Premise.
NoteFor tags associated to your monitor group that have monitors in parent level and a few monitors in subgroup level, alerts from only the parent monitors get logged as tickets in ServiceDesk Plus On-Premise.
- Trigger Alerts for Monitor Status Change: Use the check boxes to choose the monitor status changes (Down, Trouble, and Critical) for which you'd wish to receive alerts.
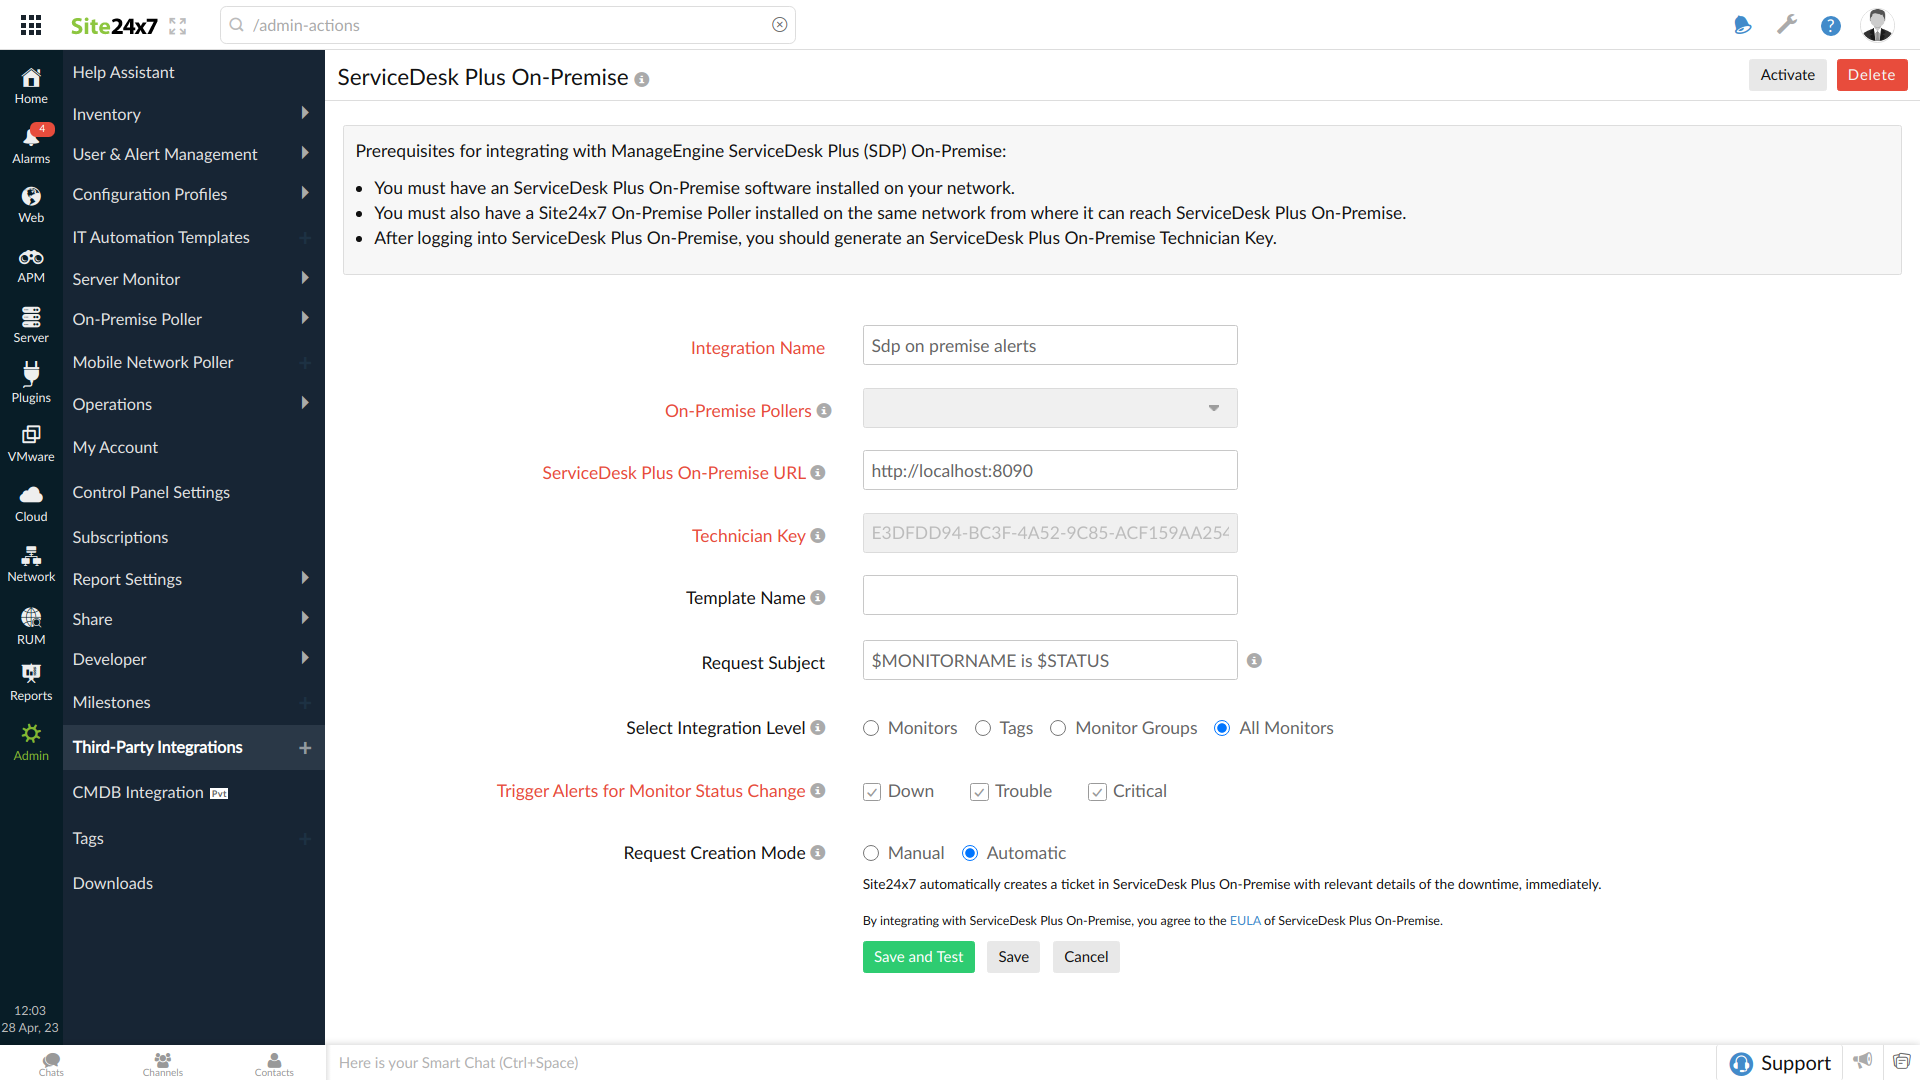
- Request Creation Mode: Click the Manual or Automatic radio button to invoke the desired mode of ticket creation in your SDP On-Premise portal.
NoteIn the automatic mode, down/trouble alerts from Site24x7 automatically log tickets in your SDP On-Premise portal. Detailed description about your monitor's downtime is also documented on the ticket. When the incidents are resolved in Site24x7, the tickets are closed automatically. Alternately, by initiating a close request, you can remotely close the ticket from within your Site24x7 control panel.
NoteIn the manual mode, the operator must access the Create Request in ServiceDesk Plus On-Premise link provided under the Overall status widget in the Monitor Summary Dashboard or the RCA page, and then submit the Create Request to manually generate a ticket in your SDP On-Premise portal. Detailed description about your monitor's downtime is also documented on the ticket. By submitting a Close Request, you can remotely close the ticket from within your Site24x7 control panel.
-
Click the Save and Test button to save the integration and to receive a test alert to check whether the integration is successful. Or, you can click the Save button to finish the integration.
NoteYou can track the status of any new or existing tickets on the SDP On-Premise portal.
Remotely Manage Tickets in Site24x7
Based on your chosen request creation mode, Site24x7 lets you to remotely create and close tickets, without you even having to access the SDP On-Premise portal.
Automatic Mode: Site24x7 down/trouble alerts cause automatic ticket creation in the SDP On-Premise portal. The tickets are automatically closed in the SDP On-Premise portal when the incidents are resolved in Site24x7. Nevertheless, tickets can also be remotely closed from the Site24x7 control panel itself. Follow the steps below:
- Log in to Site24x7.
- Open the Monitor Summary Dashboard for your Down/Trouble monitor.
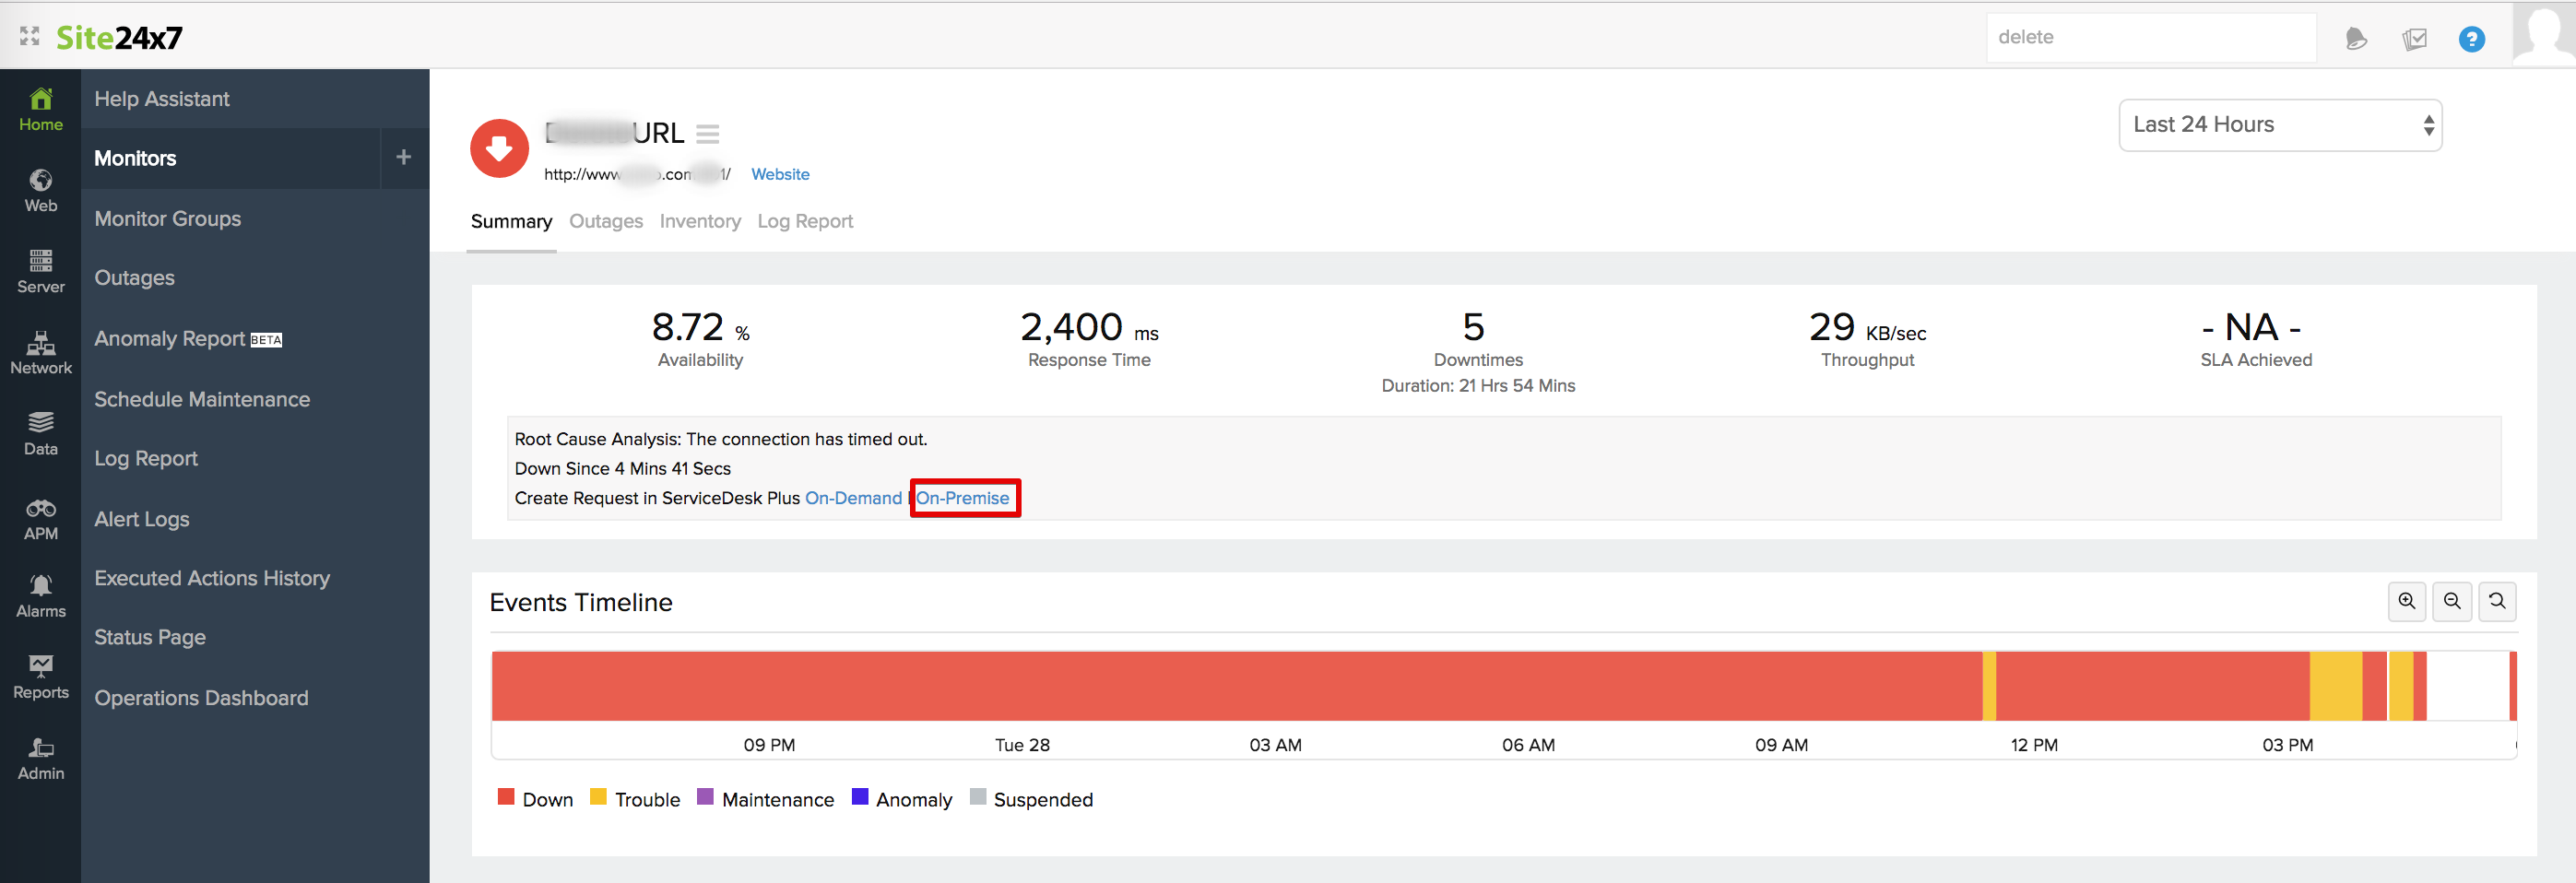
- Access the Create Request in ServiceDesk Plus On-Premise link listed under the overall status widget.
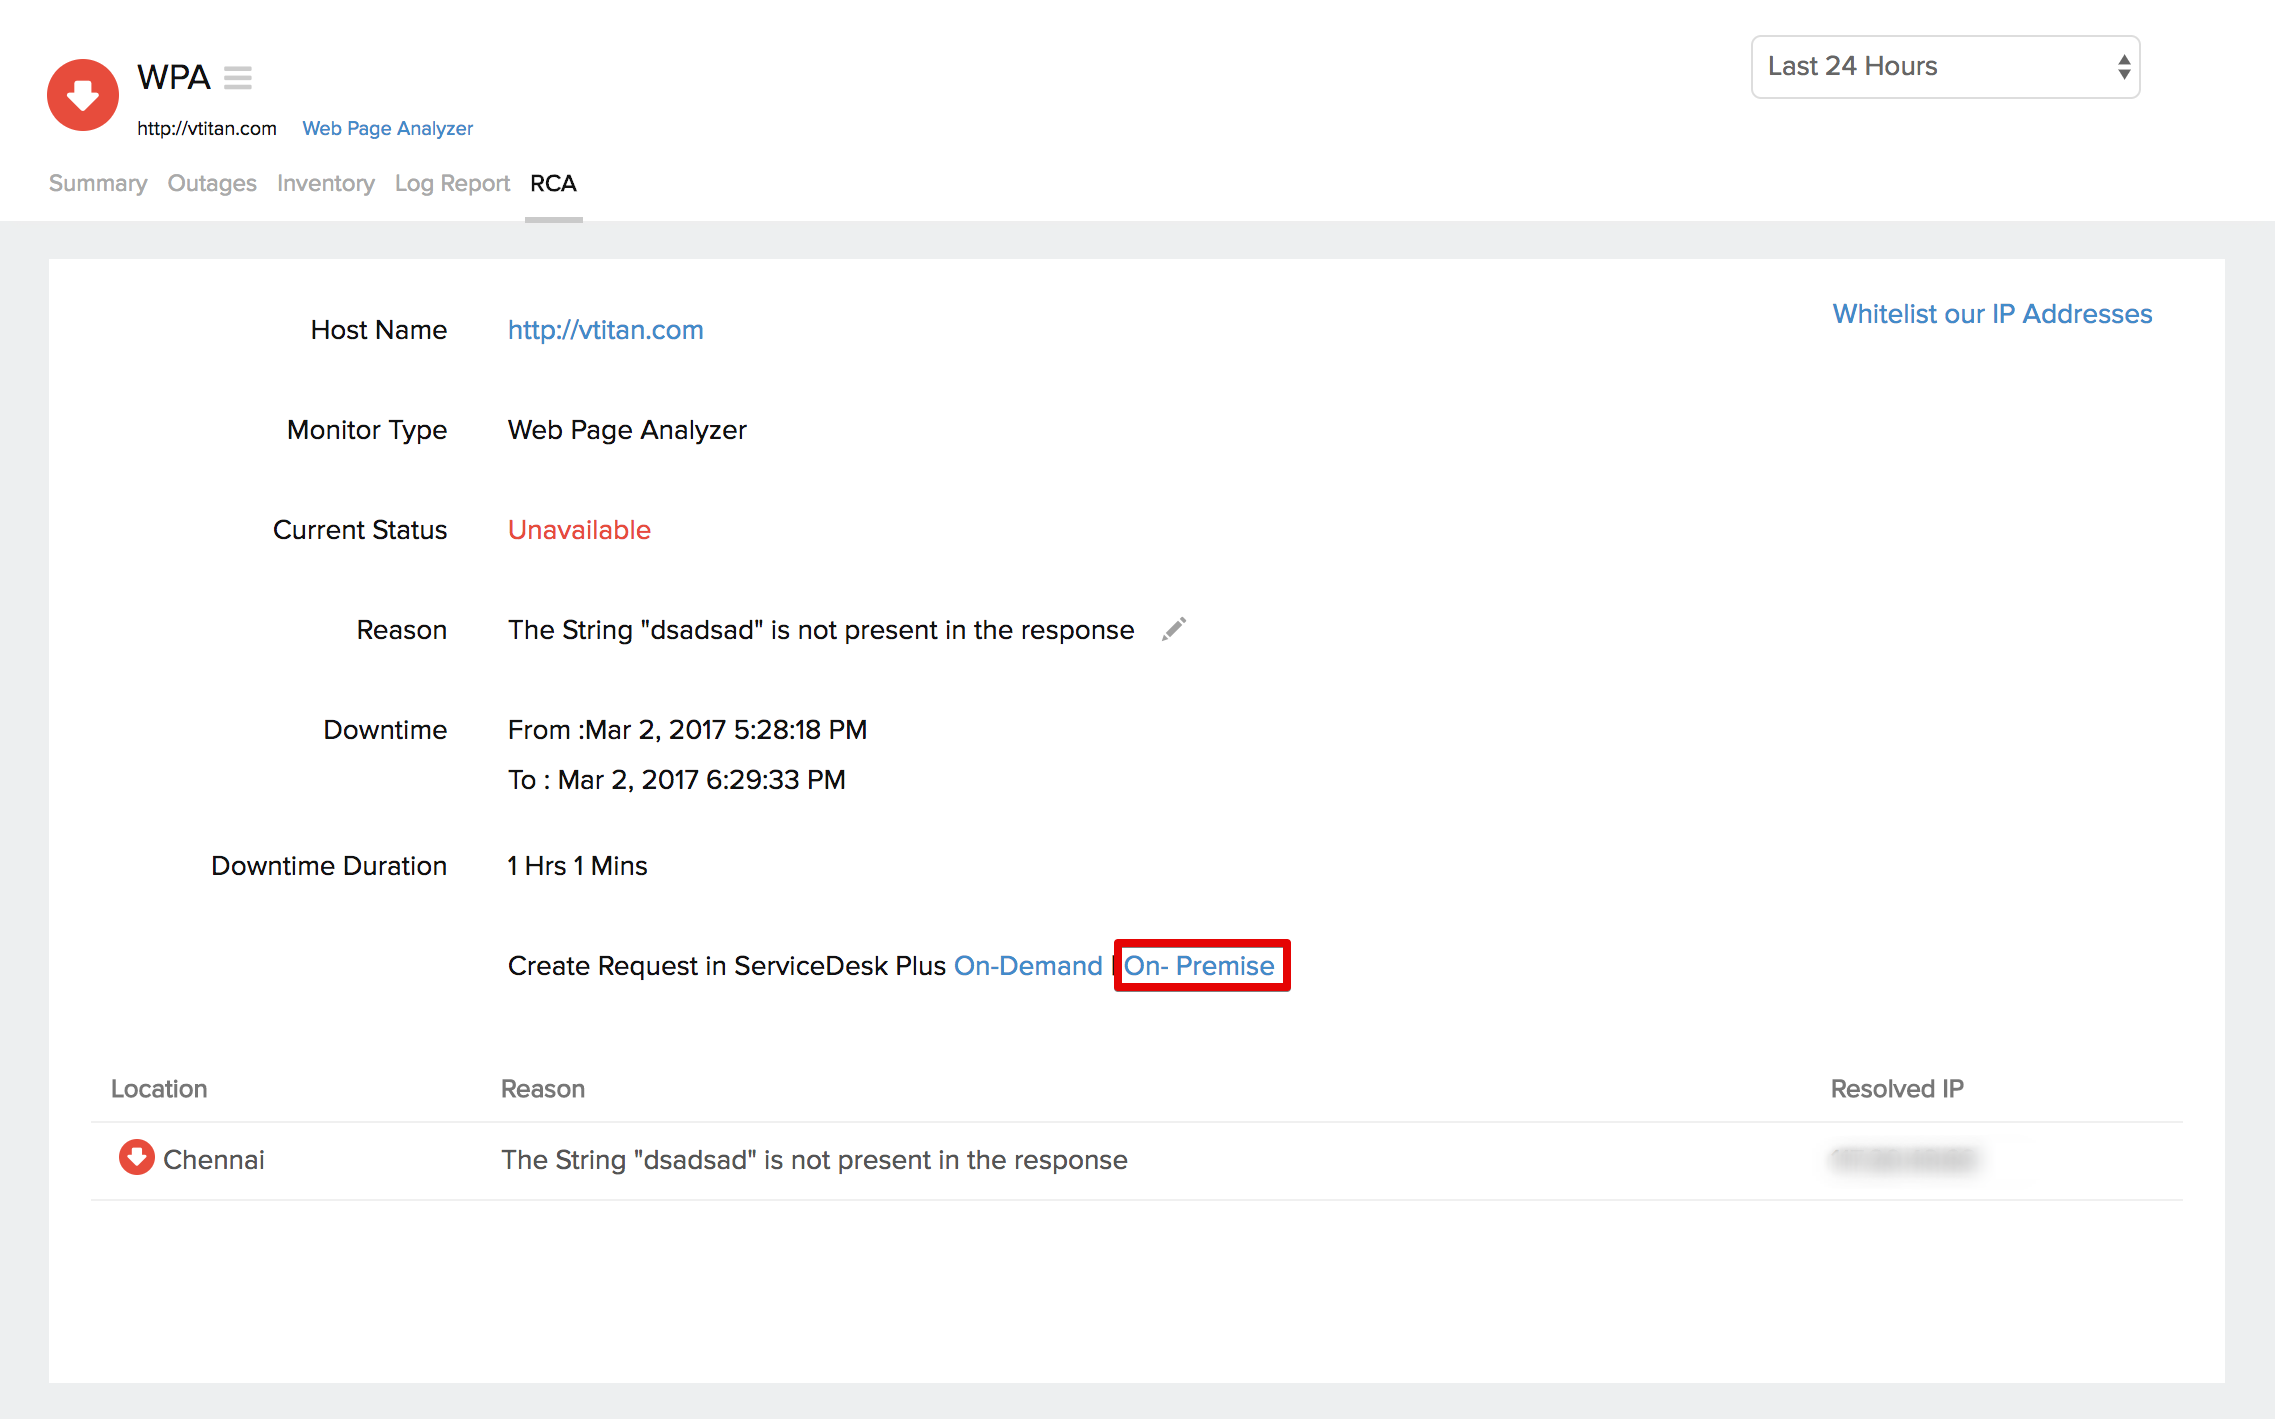
- You can also access the same link from your RCA page too.
- A Create Request window will pop up with the subject line of the ticket and a Close Request button.
- Submit Close Request button to remotely close the ticket in your SDP On-Premise portal.
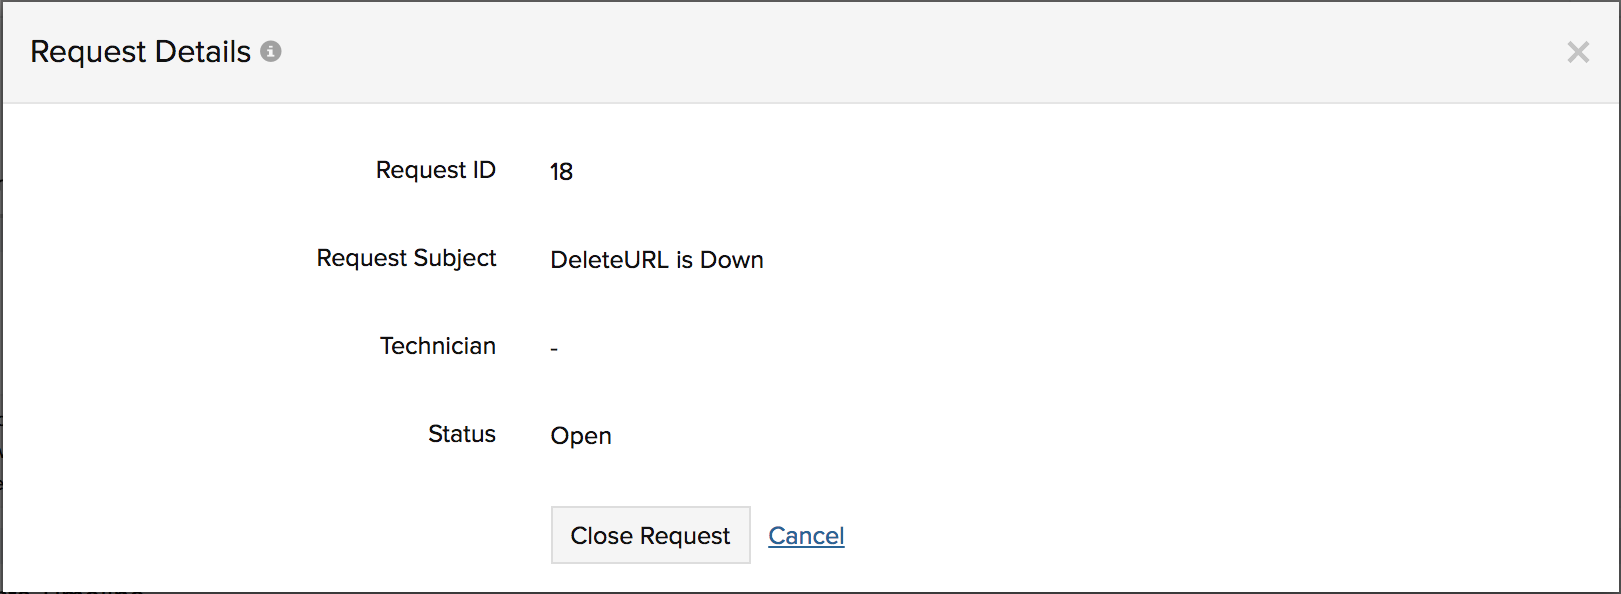
- Once the request is initiated, a Request Details window will pop up on your screen giving you details like; Ticket ID, Subject line, Technician Name and Status of the ticket.

Manual Mode: You can remotely log your down/trouble tickets in the SDP On-Premise portal; further, close these tickets remotely from the Site24x7 control panel itself. Follow the steps below:
- Log in to Site24x7.
- Open the Monitor SummaryDashboard for your Down/Trouble monitor.
- Access the Create Request in ServiceDesk Plus On-Premise link listed under the overall status widget. You can also access the same link from your RCA page.
- A Create Request window will pop up with the subject line of the ticket and a Create Request button.
- Click the Create Request button to remotely initiate the ticket creation in SDP On-Premise portal.
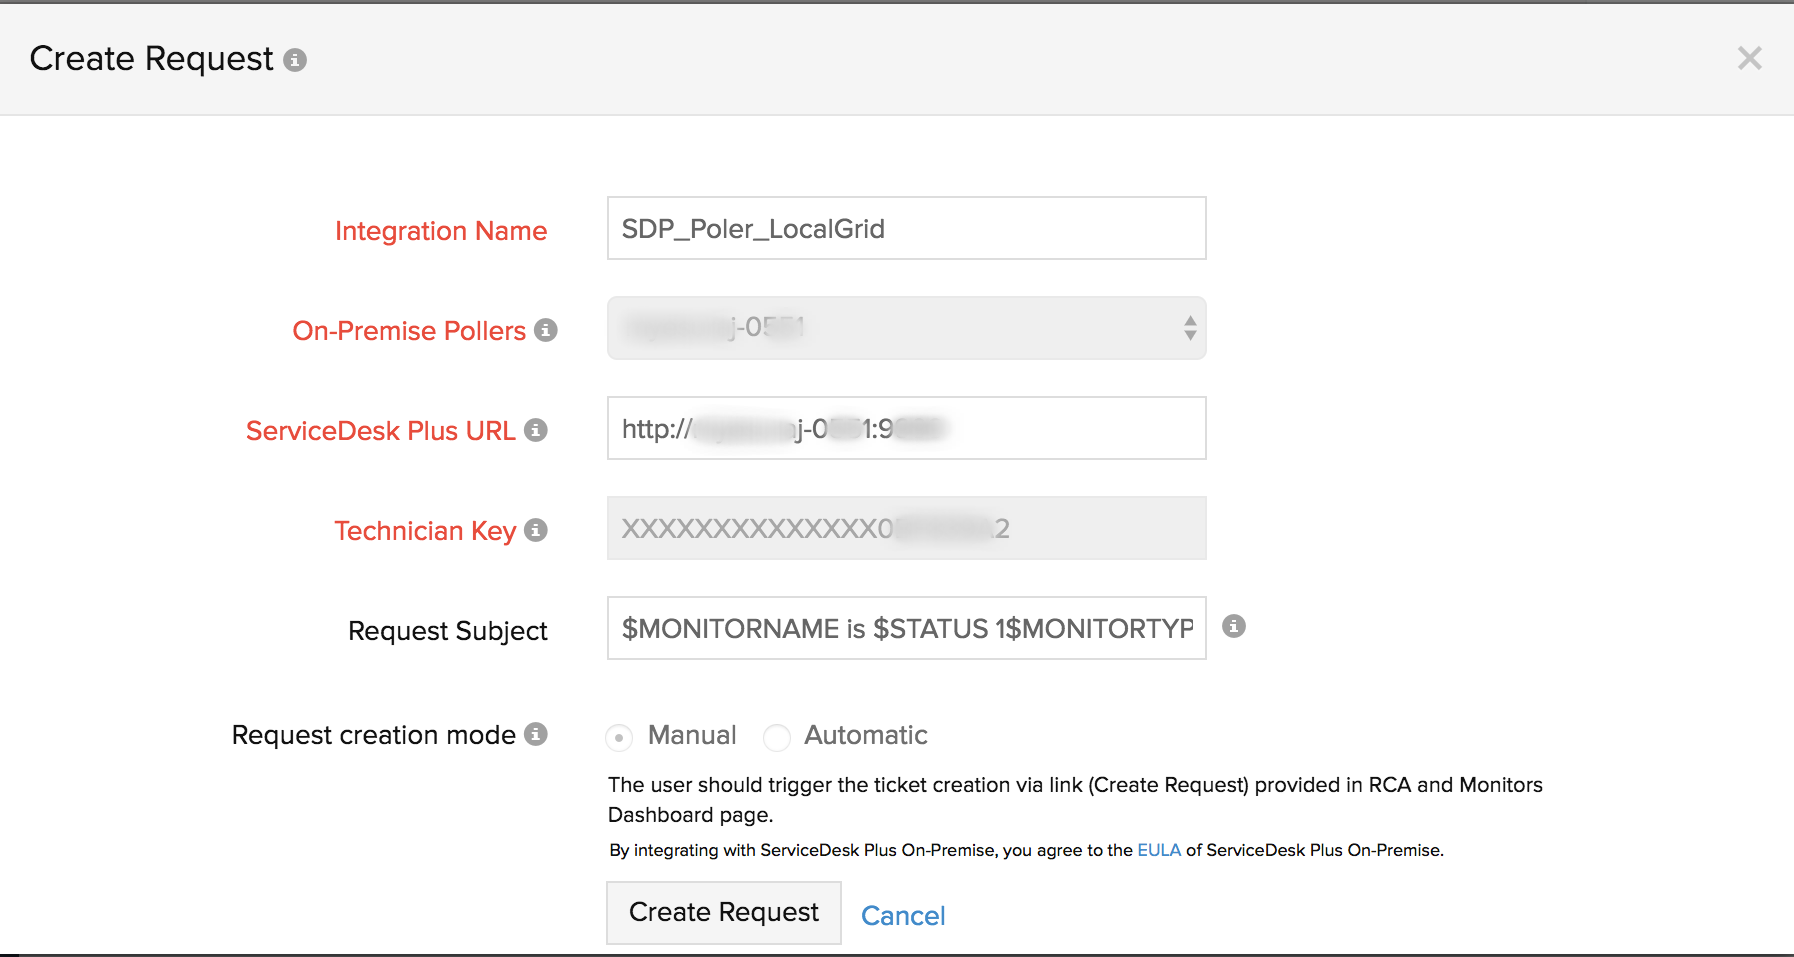
- Once the request is completed, a Request Details window will pop up giving you details of the ticket, including Ticket ID, Subject line, Technician Name and Status of the ticket.
- Later, you can access the same link Create Request in ServiceDesk Plus On-Premise and submit Close Request button to remotely close the ticket listed in your SDP On-Premise portal.
View Tickets in SDP On-Premise Portal
Once you've integrated your Site24x7 account with SDP, you'll be able to view all your alert tickets in a single dashboard inside the SDP Client. On top of this, any status change is documented inside the SDP client with proper description. Within the SDP portal, you can assign your tickets to a technician and execute many more operations. However, when the SDP application itself is not accessible, no down/trouble tickets would be logged in your SDP portal.
| Site24x7 Alert Status | SDP Status |
| Down |
Alert triggers ticket creation inside SDP portal. This is |
| Trouble |
Alert triggers ticket creation inside SDP portal. This is |
| Status changes from Trouble to Down |
Trouble alert triggers ticket creation inside SDP portal. |
| Down/Trouble status changes to UP |
Ticket is automatically closed inside SDP portal. |
| Monitor in Down/Trouble status is suspended |
Ticket remains open inside SDP portal, until the |
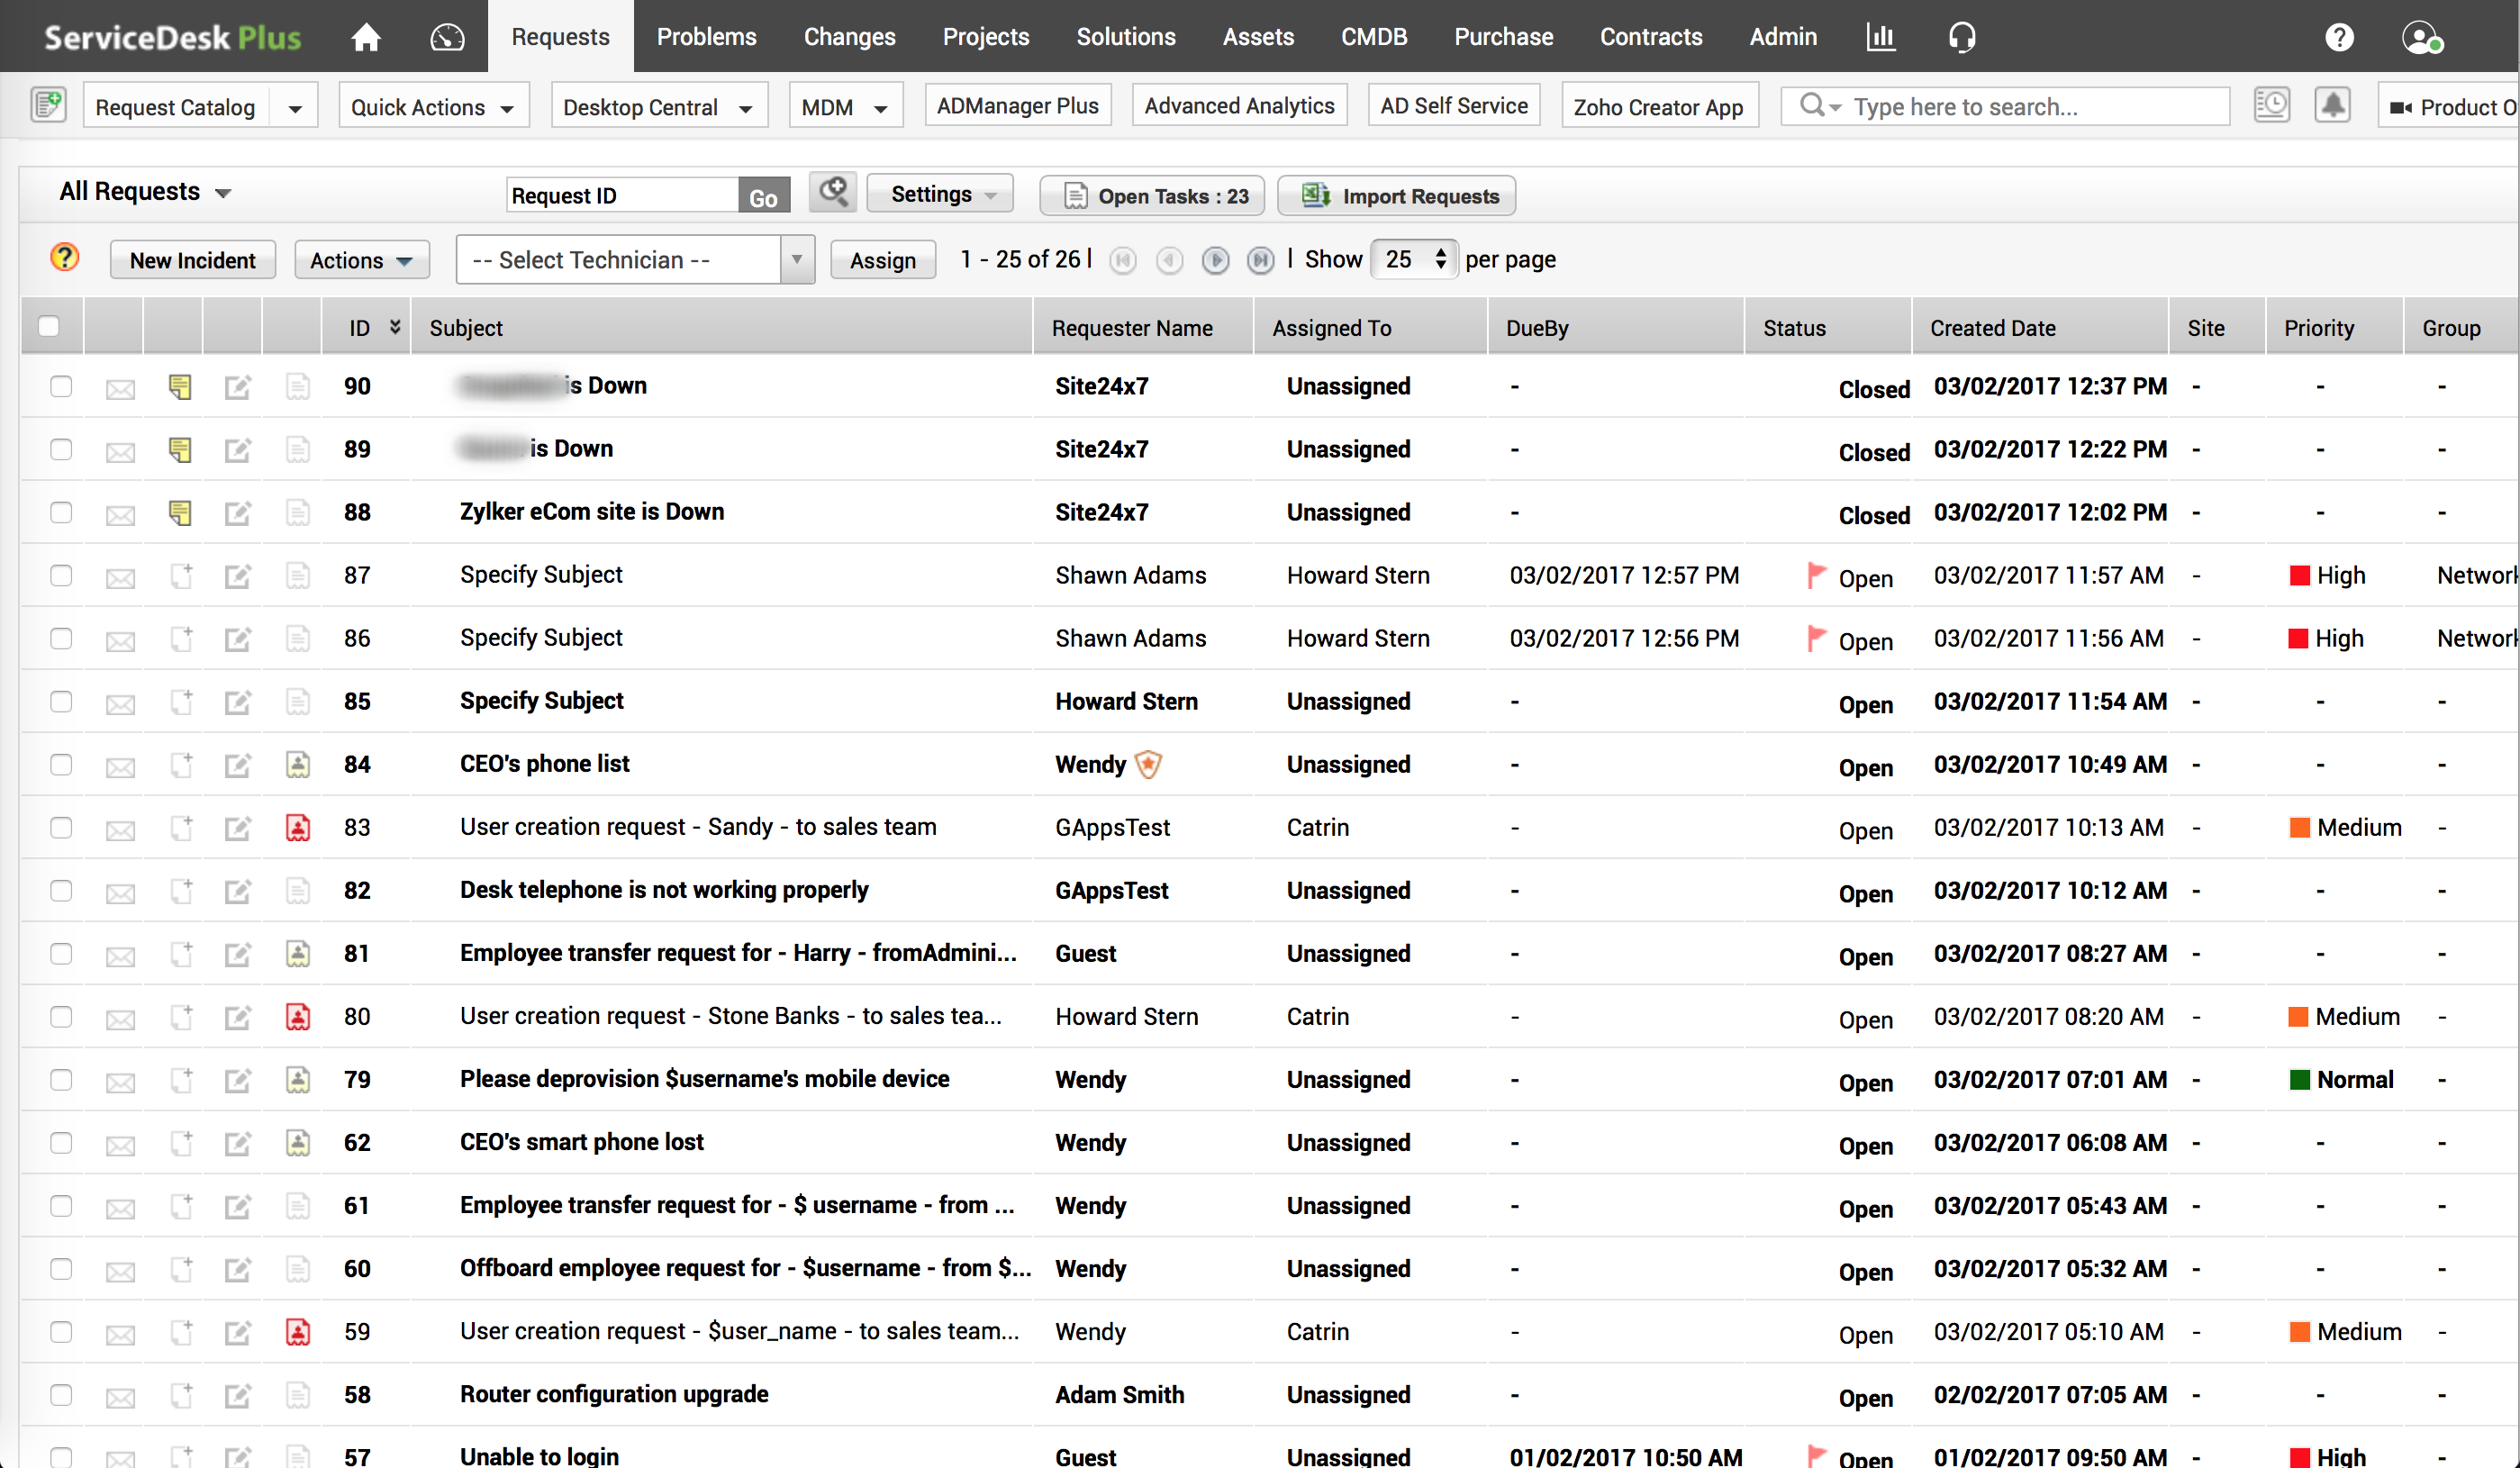
Fig.1: View Requests in SDP Portal
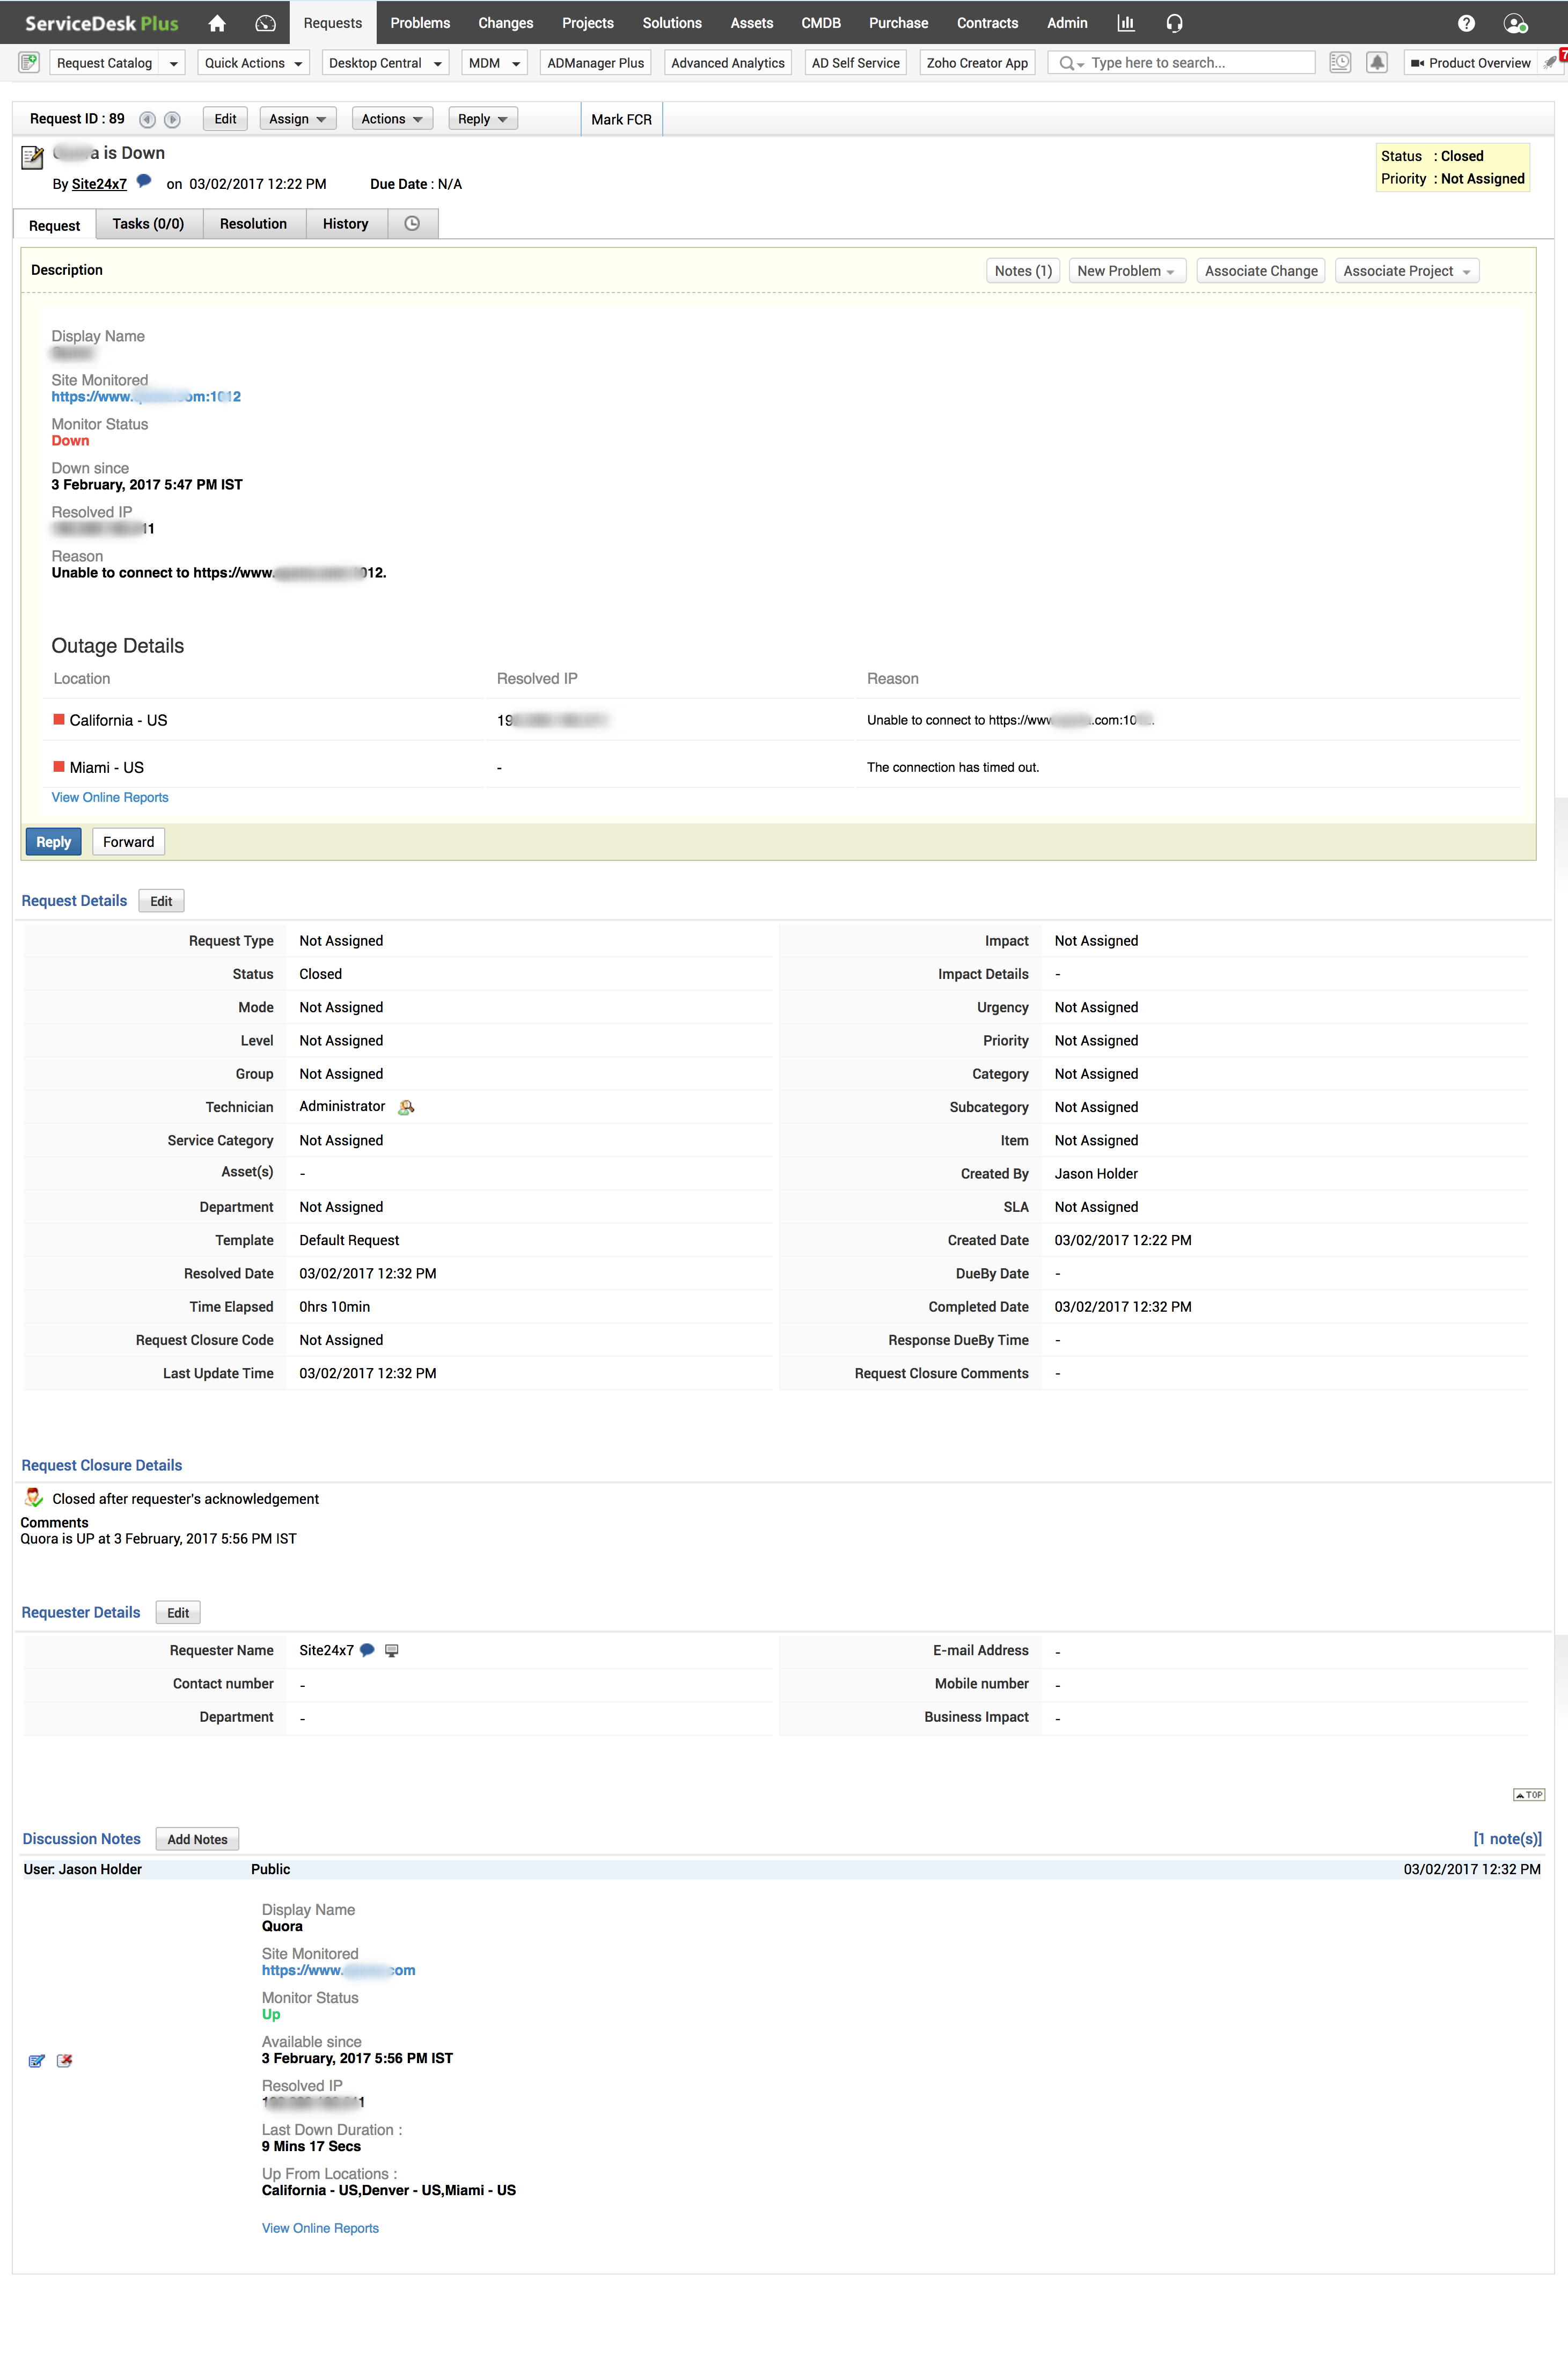
Fig.2: Request details in SDP Portal
Auto-resolve tickets and reduce resolution time further with Site24x7 IT Automation.
